RAM 2500 Truck 2WD L6-5.9L DSL Turbo VIN C (2002)

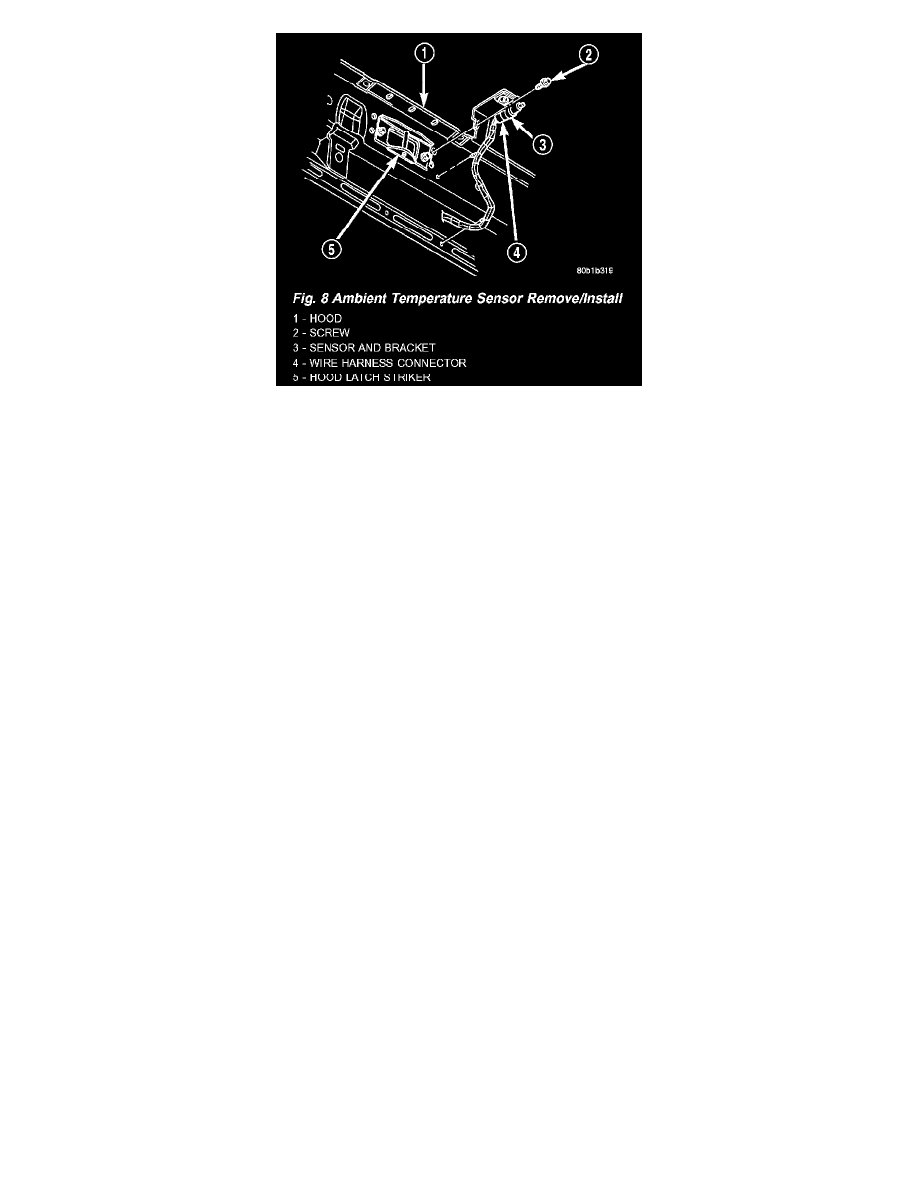
Fig. 8 Ambient Temperature Sensor Remove/Install
AMBIENT TEMP SENSOR
Ambient air temperature is monitored by the compass mini-trip computer module through the ambient temperature sensor. The ambient temperature
sensor is a variable resistor mounted to a bracket that is secured with a screw to the underside of the hood panel near the hood latch striker in the engine
compartment.
For complete circuit diagrams, refer to Overhead Console See: Accessories and Optional Equipment/Driver/Vehicle Information Display. The ambient
temperature sensor cannot be adjusted or repaired and, if faulty or damaged, it must be replaced.
The ambient temperature sensor is a variable resistor that operates on a five-volt reference signal sent to it by the compass mini-trip computer module.
The resistance in the sensor changes as temperature changes, changing the return circuit voltage to the compass mini-trip computer module. Based upon
the resistance in the sensor, the compass mini-trip computer module senses a specific voltage on the return circuit, which it is programmed to correspond
to a specific temperature.
Compass Calibration
CAUTION: Do not place any external magnets, such as magnetic roof mount antennas, in the vicinity of the compass. Do not use magnetic tools when
servicing the overhead console.
Compass Calibration
This is a Fast Auto-Cal compass that manually enters the calibration mode when the US/M and Step buttons are pressed for more than 6 seconds in the
Compass/Temperature screen. The 'CAL' will illuminate to indicate the compass is in calibration mode. Drive the vehicle around in all four compass
directions, such as driving around a street block several times or driving in 2-3 circles with a slow to medium speed. When the calibration process is
completed, the 'CAL' will go OFF and the compass will function normally. The calibration should take place in an area that is leveled and minimum of
50 feet away from metal objects, power lines, buildings and large steel structures.
The electronic compass unit features a self-calibrating design, which simplifies the calibration procedure. This feature automatically updates the compass
calibration while the vehicle is being driven. This allows the compass unit to compensate for small changes in the residual magnetism that the vehicle
may acquire during normal use. If the compass readings appear to be erratic or out of calibration, perform the following calibration procedure. Also, new
service replacement compass mini-trip computer modules must have their compass calibrated using this procedure. Do not attempt to calibrate the
compass near large metal objects such as other vehicles, large buildings, or bridges; or, near overhead or underground power lines.
1. Start the engine. If the compass/temperature data is not currently being displayed, momentarily depress and release the Step push button to step
through the display options until you have reached the compass/temperature display.
2. Depress both the U.S./Metric and the Step push buttons at the same time for more than six seconds, until "CAL" appears in the display, then
release both push buttons. The "CAL" in the display indicates that the compass is in the calibration mode.
3. Drive the vehicle on a level surface, at least fifty feet away from large metal objects and power lines, in all four compass directions, such as
driving around a city block several times or driving in two to three complete circles at a slow to medium speed.
4. When the calibration is successfully completed, "CAL" will disappear from the display and normal compass mini-trip computer operation will
resume.
