
RAM 2500 Truck 2WD L6-5.9L DSL Turbo VIN C (2002)
Glove Compartment: Removal and Replacement
Glove Box
REMOVAL
WARNING: ON VEHICLES EQUIPPED WITH AIRBAGS, DISABLE THE AIRBAG SYSTEM BEFORE ATTEMPTING ANY
STEERING WHEEL, STEERING COLUMN, OR INSTRUMENT PANEL COMPONENT DIAGNOSIS OR SERVICE. DISCONNECT
AND ISOLATE THE BATTERY NEGATIVE (GROUND) CABLE, THEN WAIT TWO MINUTES FOR THE AIRBAG SYSTEM
CAPACITOR TO DISCHARGE BEFORE PERFORMING FURTHER DIAGNOSIS OR SERVICE. THIS IS THE ONLY SURE WAY TO
DISABLE THE AIRBAG SYSTEM. FAILURE TO TAKE THE PROPER PRECAUTIONS COULD RESULT IN ACCIDENTAL
AIR-BAG DEPLOYMENT AND POSSIBLE PERSONAL INJURY.
1. Disconnect and isolate the battery negative cable.
2. Open the glove box.
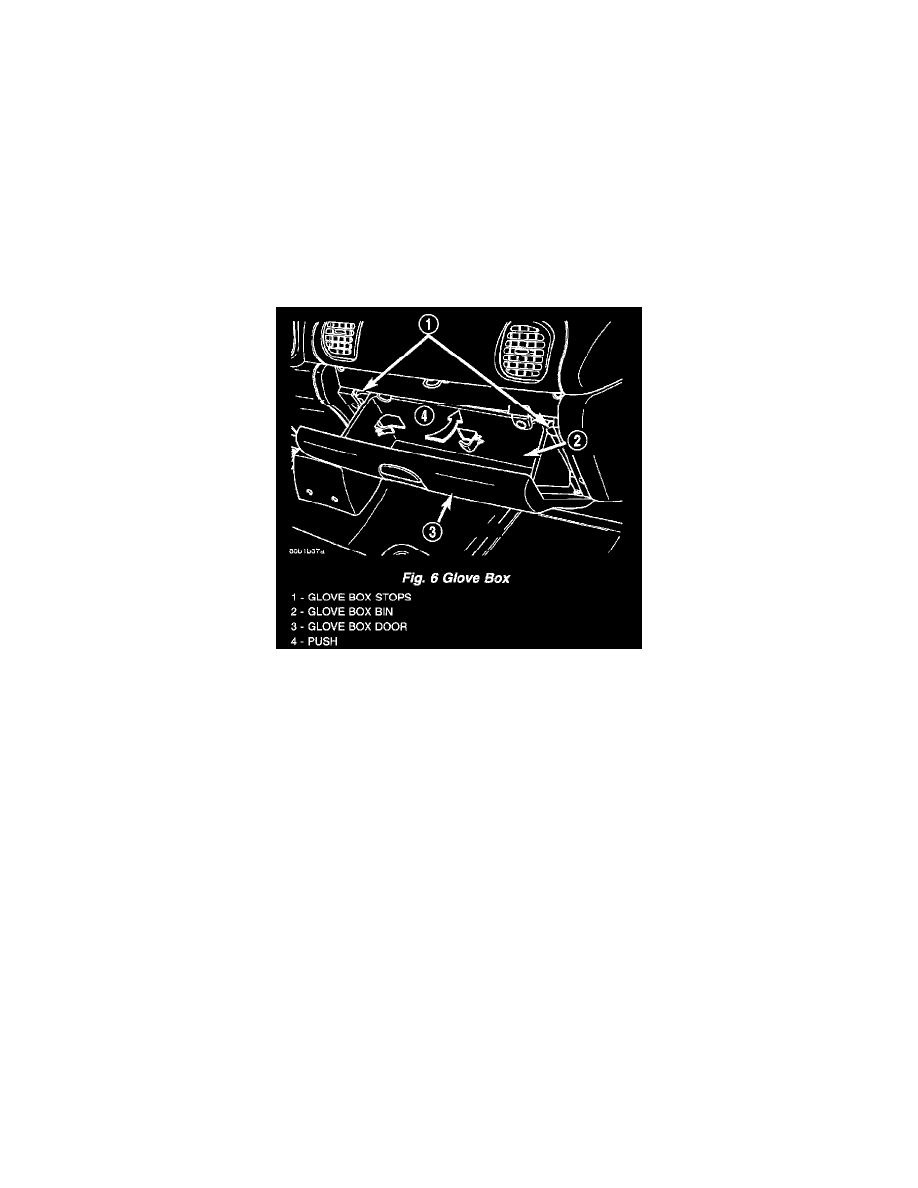
Fig. 6 Glove Box
3. while holding the glove box door securely with one hand, push the center of the glove box bin towards the front of the vehicle. Flex the center of
the glove box bin far enough so that the glove box stops on each side of the bin will clear the sides of the instrument panel glove box opening.
4. Roll the glove box downward until the stop bumpers are beyond the sides of the instrument panel glove box opening, then release the bin.
5. Lift the bottom of the glove box upward to disengage the three glove box hinge hooks from the three hinge pins on the instrument panel.
INSTALLATION
1. Position the glove box to the instrument panel.
2. Engage the three hinge hooks near the bottom of the glove box door with the three hinge pins on the instrument panel.
3. While holding the glove box door securely with one hand, push the center of the glove box bin towards the front of the vehicle. Flex the center of
the glove box bin far enough so that the glove box stops on each side of the bin will clear the sides of the instrument panel glove box opening.
4. Roll the glove box upward until the stop bumpers are beyond the sides of the instrument panel glove box opening, then release the bin.
5. Close the glove box.
6. Reconnect the battery negative cable.
Glove Box Latch Replacement
GLOVE BOX LATCH
REMOVAL
1. Remove the glove box.
2. Remove the 11 screws and separate the box and inner panel from the outer door.
3. Remove the two latch screws and remove the latch.
INSTALLATION
1. Install the latch and install the two screws.