
RAM 2500 Truck 2WD V10-8.0L VIN W (2003)
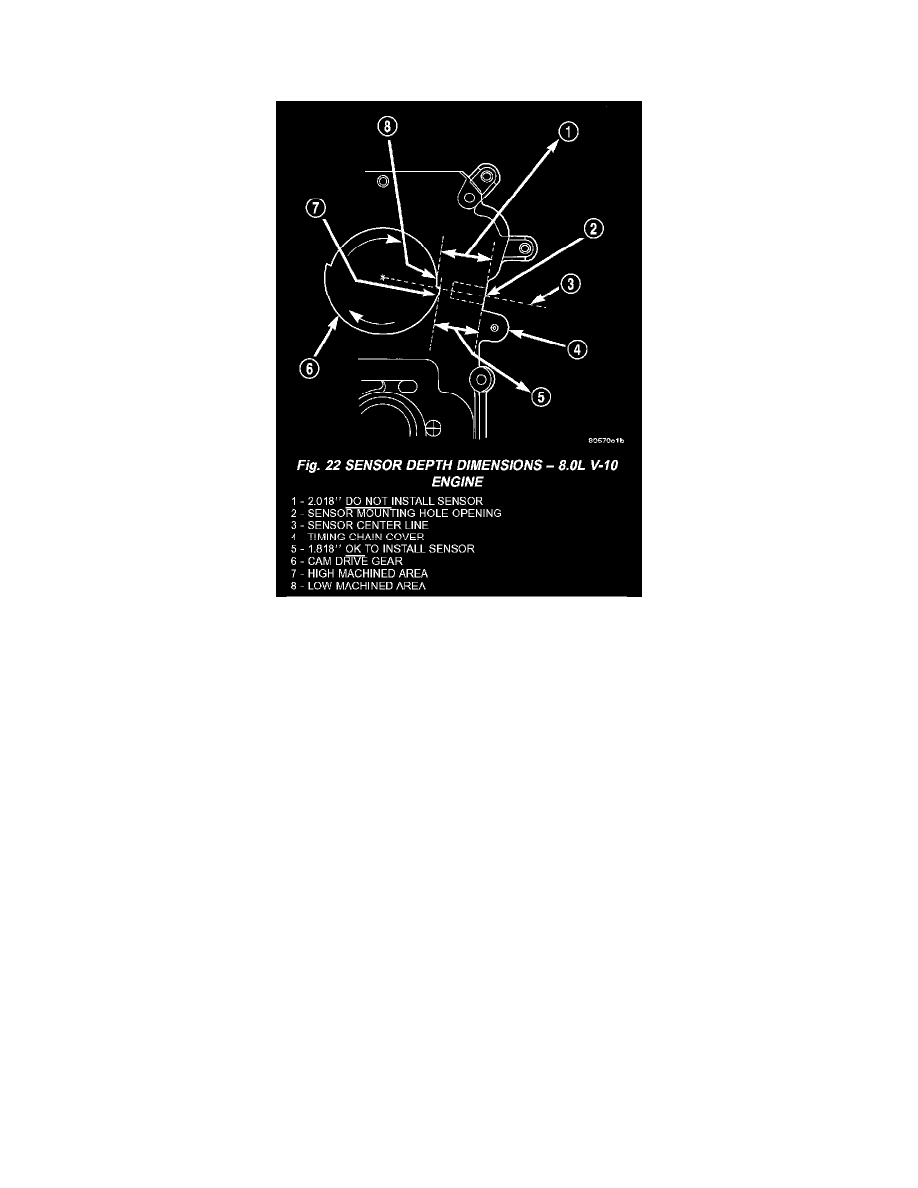
Before the sensor is installed, the cam gear may have to be rotated. This is to allow the high machined area on the gear to be directly in front of the
sensor mounting hole opening on the timing gear cover.
Fig.22 Sensor Depth Dimensions - 8.0L V-10 Engine
Do not install sensor with gear positioned at low area. When the engine is started, the sensor will be broken.
5. Using a 1/2 in. wide metal ruler, measure the distance from the cam gear to the face of the sensor mounting hole opening on the timing gear cover.
6. If the dimension is approximately 1.818 inches, it is OK to install sensor. Proceed to step Step 9.
7. If the dimension is approximately 2.018 inches, the cam gear will have to be rotated.
8. Attach a socket to the vibration damper mounting bolt and rotate engine until the 1.818 inch dimension is attained.
9. Install the sensor into the timing case/cover with a slight rocking action until the paper spacer contacts the camshaft gear. Do not install the sensor
mounting bolt. Do not twist the sensor into position as damage to the O-ring or tearing of the paper spacer may result.
10. Scratch a scribe line into the timing chain case/cover to indicate depth of sensor.
11. Remove the sensor from timing chain case/ cover.
12. Remove paper spacer from sensor. This step must be followed to prevent the paper spacer from getting into the engine lubrication system.
13. Again, apply a small amount of engine oil to sensor O-ring.
14. Again, install the sensor into the timing case/ cover with a slight rocking action until the sensor is aligned to scribe line.
15. Install sensor mounting bolt and tighten to 6 Nm (50 in. lbs.) torque.
16. Connect engine wiring harness to sensor.