
RAM 2500 Truck 2WD V8-5.7L (2008)
CAPPED FILL TUBE
1. Verify that the vehicle is parked on a level surface.
2. Remove the dipstick tube cap.
WARNING: There is a risk of accident from vehicle starting off by itself when engine is running. There is a risk of injury from contusions
and burns if you insert your hands into the engine when it is started or when it is running. Secure vehicle to prevent it from moving off by
itself. Wear properly fastened and close-fitting work clothes. Do not touch hot or rotating parts.
3. Actuate the service brake. Start engine and let it run at idle speed in selector lever position "P".
4. Shift through the transmission modes several times with the vehicle stationary and the engine idling.
5. Warm up the transmission, wait at least 2 minutes and check the oil level with the engine running. Push the Oil Dipstick 9336 into transmission fill
tube until the dipstick tip contacts the oil pan and pull out again, read off oil level, repeat if necessary.
NOTE: The dipstick will protrude from the fill tube when installed.
6. Check transmission oil temperature using the appropriate scan tool.
NOTE: The true transmission oil temperature can only be read by a scan tool in REVERSE or any forward gear position.
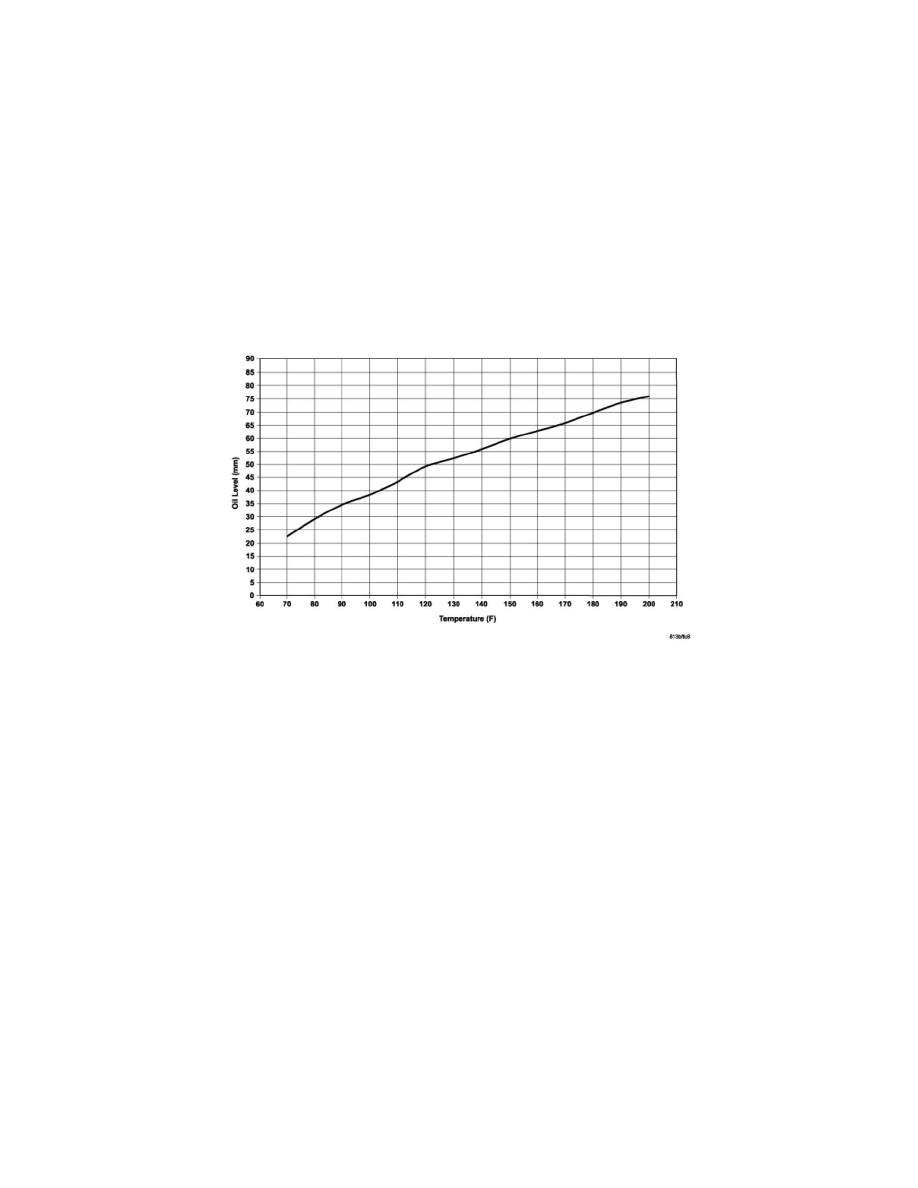
7. The transmission Oil Dipstick 9336 has indicator marks every 10 mm. Determine the height of the oil level on the dipstick and using the height,
the transmission temperature, and the Transmission Fluid Graph, determine if the transmission oil level is correct.
8. Add or remove oil as necessary and recheck the oil level.
9. Once the oil level is correct, install the dipstick tube cap.
Fluid And Filter Replacement
FLUID AND FILTER REPLACEMENT
For proper service intervals See: Maintenance .
REMOVAL
1. Hoist and support vehicle on safety stands.
2. Place a large diameter shallow drain pan beneath the transmission pan.
3. Remove bolts holding front and sides of pan to transmission.
4. Loosen bolts holding rear of pan to transmission.
5. Slowly separate front of pan away from transmission allowing the fluid to drain into drain pan.
6. Hold up pan and remove remaining bolts holding pan to transmission.
7. While holding pan level, lower pan away from transmission.
8. Pour remaining fluid in pan into drain pan.