
RAM 2500 Truck 2WD V8-5.7L VIN D (2004)
6.
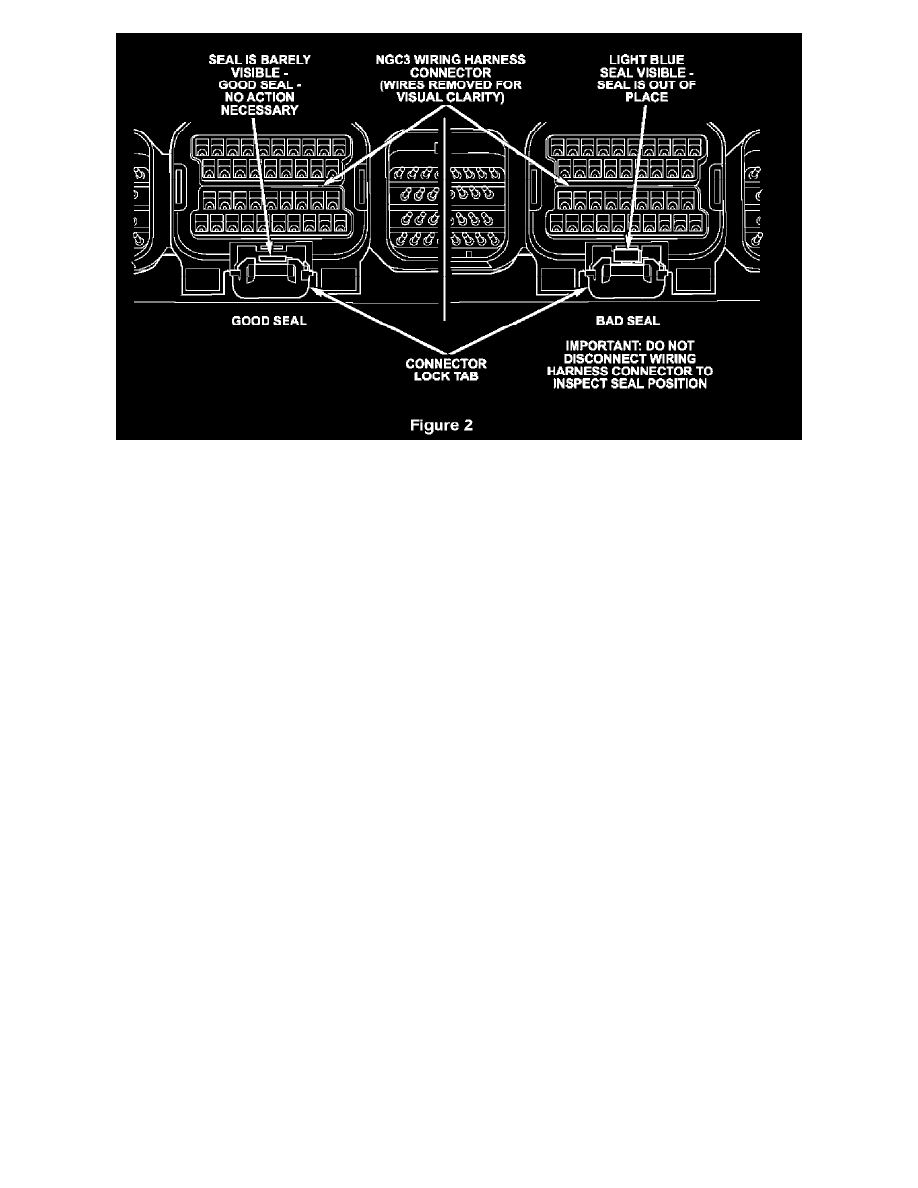
Rotate the PCM to visually inspect the four (4) PCM electrical connectors (Figure 1) for the presence of an out of place seal (Figure 2). Do not
disconnect the connectors. If the LIGHT BLUE colored seal can be seen through the red locking tab, it is improperly installed or out of place.
^
If one or more of the seals are out of place, continue with Step 7.
^
If NONE of the seals are out of place, no further action is necessary.
Continue with Step 11.
NOTE:
If an ORANGE colored seal is visible through the red locking tab, no further action is necessary. Only light blue seals require repair.
7.
Disconnect each PCM electrical connector that has the light blue seal visibly out of place (Figure 2.)
IMPORTANT:
Color photographs of the PCM connector and displaced seal can be viewed on DealerCONNECT. From the Service tab, select "STAR
Online", then select "STAR Center News, Documents and Reference Sheets" and then select "PCM Connector Seal Sheet"
8.
Inspect the disconnected electrical connector(s) and mating PCM connector for the presence of water and/or corrosion.
^
If any corrosion is present in the harness and/or PCM connector, the PCM and affected wiring harness must be replaced. Continue with Section
B - Replace PCM.
^
If water or moisture is present, without any signs of corrosion, dry the connector as follows:
a.
Firmly tap the harness connector onto a paper towel to remove the majority of the water from the connector.
b.
Using a blow dryer or heat gun, thoroughly dry out the harness and PCM connectors. Do NOT use shop air to blow out the connector.
IMPORTANT:
If the vehicle is equipped with a Huntsville PCM, the module connector can be dried out. If the vehicle is equipped with a Motorola
PCM, the module must be replaced. Refer to the PCM barcode label to identify the module manufacturer.
c.
Continue with Step 9.
^
If NO water or corrosion is present in the harness and/or PCM connector, continue with Step 9.
9.
Carefully reconnect the PCM connector(s). This may take several attempts. Be sure to insert the connector straight into the module. If the
connector is not inserted straight into the module, it may cause the seal to move out of place.
10.
Verify that all seals are in place (Figure 2).