
RAM 2500 Truck 4WD V10-8.0L VIN W HDC (2000)
Airbag Control Module Remove/Install
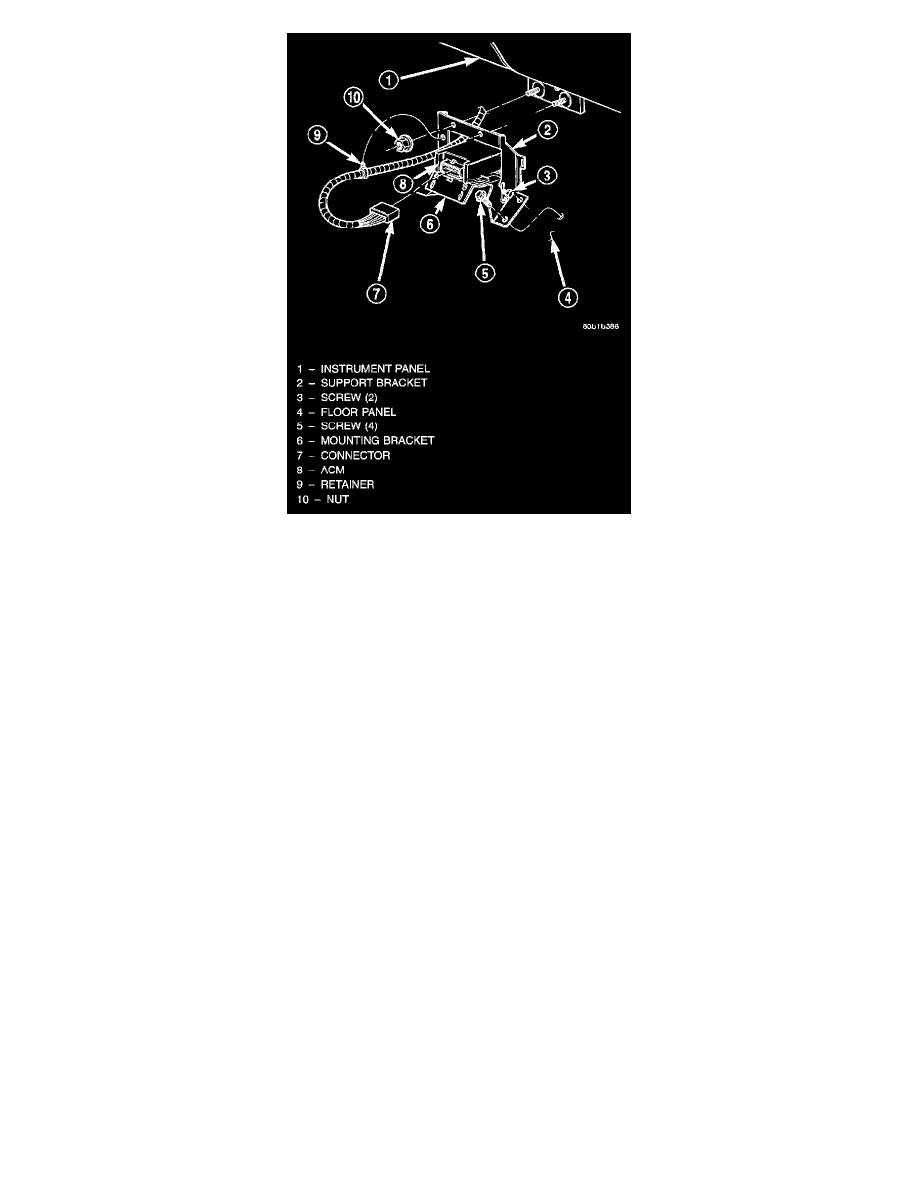
4. Loosen the screw that secures each side of the instrument panel center support bracket to the ACM mounting bracket. Do not remove these screws.
5. Remove the two nuts that secure the instrument panel center support bracket to the studs on the lower instrument panel structural support.
6. Disengage the retainer on the instrument panel wire harness to the ACM from the mounting hole in the left side of the instrument panel center
support bracket.
7. Pull the top of the instrument panel center support bracket rearward and down from the instrument panel studs. Fold it down over the top of the
ACM until it is laying flat on the floor panel transmission tunnel.
8. Disconnect the instrument panel wire harness connector from the ACM. To disconnect the instrument panel wire harness connector from the
ACM:
a. Slide the red Connector Position Assurance (CPA) lock on the top of the connector toward the side of the vehicle.
b. Depress the connector latch tab and pull the connector straight away from the ACM connector receptacle.
NOTE: Always remove and replace the airbag control module and its mounting bracket as a unit. Replacement modules include a replacement
mounting bracket. Do not transfer the module to another mounting bracket.
9. Remove the four screws that secure the ACM mounting bracket to the floor panel transmission tunnel.
10. Remove the ACM, the mounting bracket and the instrument panel center support bracket from the floor panel transmission tunnel as a unit.
INSTALLATION
1. Carefully position the ACM, the mounting bracket and the instrument panel center support bracket onto the floor panel transmission tunnel. When
the ACM is correctly positioned the arrow on the ACM label will be pointed forward in the vehicle.
2. Install and tighten the four screws that secure the ACM mounting bracket to the floor panel transmission tunnel. Tighten the screws to 14 Nm (125
in. lbs.).
3. With the instrument panel center support bracket still folded down flat on the floor panel transmission tunnel, reconnect the instrument panel wire
harness connector to the ACM connector receptacle. Be certain that the connector latch and the red CPA lock are fully engaged.
4. Fold the top of the instrument panel center support bracket up and forward over the studs on the lower instrument panel structural support.
5. Install and tighten the nuts that secure the instrument panel center support bracket to the studs on the lower instrument panel structural support.
Tighten the nuts to 14 Nm (125 in. lbs.).
6. Engage the retainer on the instrument panel wire harness with the mounting hole in the left side of the instrument panel center support bracket.
7. Tighten the screws that secure each side of the instrument panel center support bracket to the ACM mounting bracket. Tighten the screws 14 Nm
(125 in. lbs.).
8. If the vehicle is equipped with a manual transmission, install the center console onto the floor panel transmission tunnel.
9. If the vehicle is equipped with an automatic transmission, position the trim cover over the ACM on the floor panel transmission tunnel.
10. If the vehicle is equipped with an automatic transmission, install and tighten the two screws that secure the trim cover to the ACM mounting
bracket on the floor panel transmission tunnel. Tighten the screws to 2.2 Nm (20 in. lbs.).