
RAM 2500 Van V8-5.2L VIN Y (1998)
Housing Assembly HVAC: Service and Repair
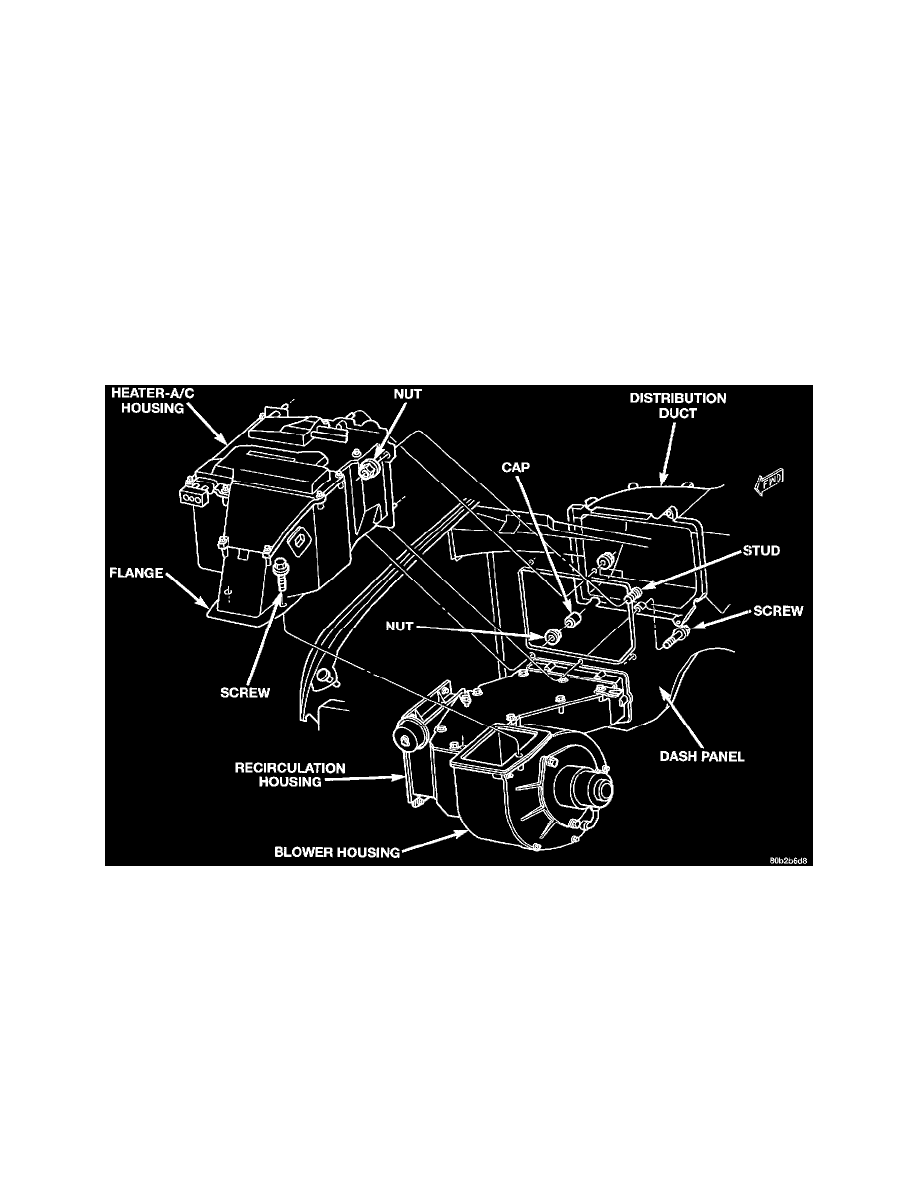
Heater-A/C Housing Removal and Installation
WARNING:
-
REVIEW THE WARNINGS AND CAUTIONS IN THE FRONT PERFORMING THE FOLLOWING OPERATION.
-
ON VEHICLES EQUIPPED WITH AIRBAGS, FAILURE TO TAKE THE PROPER PRECAUTIONS COULD RESULT IN
ACCIDENTAL AIRBAG DEPLOYMENT AND POSSIBLE PERSONAL INJURY.
REMOVAL
1. Disconnect and isolate the battery negative cable.
2. If the vehicle is not equipped with air conditioning, go to Step 6. If the vehicle is equipped with air conditioning, disconnect the suction line
jumper at the expansion valve.
3. Remove the screws that secure the filter-drier and its mounting bracket to the heater-A/C housing and the cowl side panel. Swing the filter-drier,
mounting bracket and refrigerant plumbing as a unit out of the way towards the center of the vehicle.
4. Unplug the wire harness connector from the fin sensing cycling clutch switch.
5. Unplug the wire harness connectors from the blower motor resistor, and the high speed blower motor relay
6. Place waterproof material over the generator, to protect it from spilled engine coolant.
7. Drain the engine cooling system. Refer to: "Engine, Cooling and Exhaust : Cooling System : Service and Repair" See: Engine, Cooling and
Exhaust/Cooling System/Service and Repair
8. Disconnect the heater hoses from the heater core tubes. Install plugs in, or tape over the opened heater core tubes.
Heater-A/C Housing Remove/Install
9. Remove the right headlamp assembly, the grille panel, the right cowl grille support panel, and the right radiator core support assembly.
10. Remove the two screws that secure the lower heater-A/C housing flange to the blower housing.
11. Disconnect the link from the blend-air door motor on the top of the distribution duct in the passenger compartment.
12. From the passenger compartment, reach through the instrument panel glove box opening to access and remove the two stamped nuts and one screw
that secure the heater-A/C housing to the dash panel below the distribution duct.
13. From the passenger compartment, reach through the instrument panel glove box opening to access and remove the two stamped nuts that secure
the heater-A/C housing to the dash panel above the distribution duct.
14. From the engine compartment, remove the one stamped nut that secures the heater-A/C housing to the stud on the dash panel.
15. Carefully separate the lower heater-A/C housing flange from the blower housing.
16. Pull the heater-A/C housing away from the dash panel until the blend-air door link is clear of the hole in the dash panel.
17. Remove the heater-A/C housing from the engine compartment.
Disassembly