
RAM 2500 Van V8-5.9L VIN Z (1997)
d. Select proper thickness end play spacer from spacer chart based on distance measured.
e. Remove Gauge Alignment Tool 6312, or equivalent.
OD THRUST PLATE SELECTION
1. Place overdrive unit in vertical position. Mount it on blocks, or in workbench with appropriate size mounting hole cut into it. Be sure unit is facing
upward for access to direct clutch hub. Also be sure output shaft is not loaded and internal components are moved rearward for accurate
measurement.
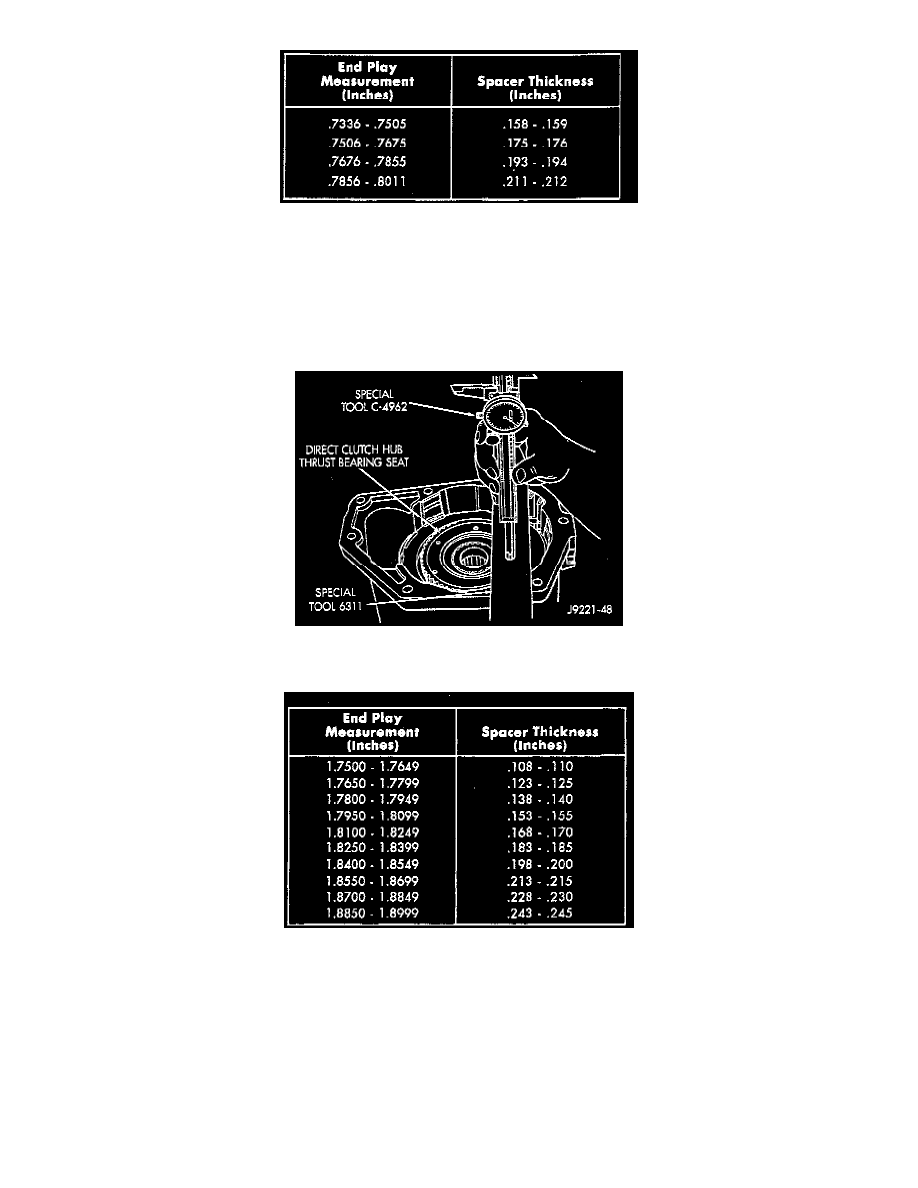
2. Determine correct thickness overdrive piston thrust plate as follows:
a. Position Gauge Tool 6311, or equivalent across face of over drive case. Then position Dial Caliper C-4962 over gauge tool.
b. Measure distance to clutch hub thrust bearing seat at four points 90° apart. Then average measurements by adding them and dividing by 4.
c. Select and install required thrust plate from information in thrust plate chart.
3. Leave Alignment Tool 6227-2, or equivalent in place. Tool will keep planetary and clutch hub splines in alignment until overdrive unit is ready for
installation on transmission.
4. Transmission speed sensor can be installed at this time if desired. However, it is recommended that sensor not be installed until after overdrive unit
is secured to transmission.
OVERDRIVE PISTON ASSEMBLY
1. Install new seals on over drive piston.
2. Stand transmission case upright on bellhousing.
3. Position Guide Ring 8114-1, or equivalent on outer edge of overdrive piston retainer.
4. Position Seal Guide 8114-3, or equivalent on inner edge of overdrive piston retainer.
5. Install overdrive piston in overdrive piston retainer by: aligning locating lugs on overdrive piston to the two mating holes in retainer.