
RAM 3500 Truck 2WD L6-6.7L DSL Turbo (2010)
Wiper Motor Linkage: Service and Repair
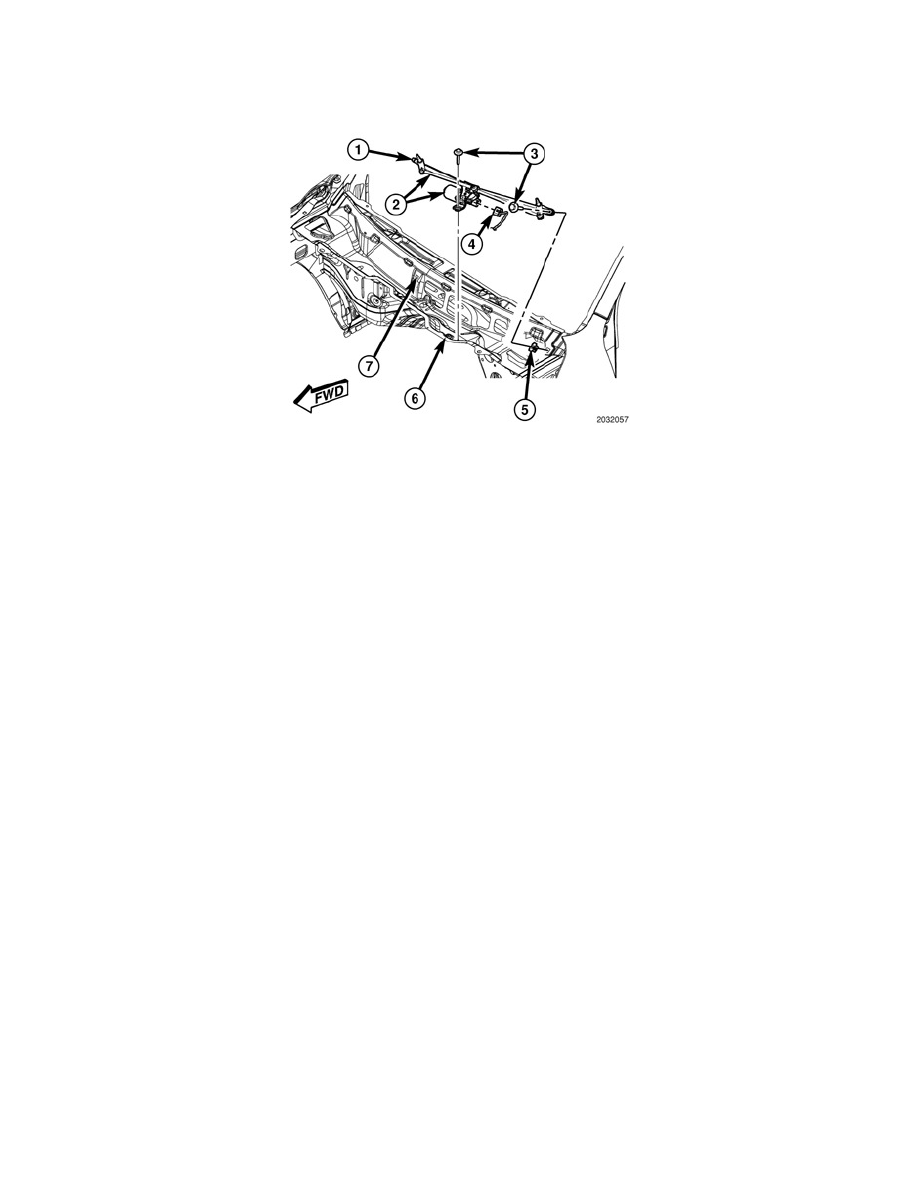
Wiper Arm Linkage - Installation
INSTALLATION
NOTE: The wiper linkage module includes the wiper motor. The wiper motor is also available for separate service replacement and can be
removed from the wiper linkage module without removing the module from the vehicle. See: Wiper Motor/Service and Repair/Wiper
Motor - Removal .
1. Be certain that the spring nut (5) that secures the left end of the wiper linkage module is in position in the cowl plenum (6) and is in good
condition.
2. Position the wiper linkage module (2) into the cowl plenum as a unit.
3. Lift the left end of the wiper linkage module upward out of the cowl plenum far enough to engage the rubber insulated tab (1) on the outboard end
of the right pivot bracket into the slot (7) in the cowl plenum.
4. Lower the left end of the wiper linkage module into the cowl plenum and align it to the two mounting points.
5. Install the two screws (3) that secure the wiper linkage module to the top of the cowl plenum panel. Tighten the screw on the left (driver) side
pivot bracket, followed by the screw on the center (motor) bracket. Tighten the screws to 8 Nm (75 in. lbs.).
6. Reconnect the left headlamp and dash wire harness connector (4) to the wiper motor pigtail wire connector.
7. Reinstall the cowl plenum cover/grille panel over the cowl plenum. See: Body and Frame/Cowl/Cowl Moulding / Trim/Service and Repair/Cowl
Panel Cover - Installation.
8. Reconnect the battery negative cable.
9. Reinstall both wiper arms onto the wiper pivots. See: Wiper Arm/Service and Repair/Wiper Arm - Installation.
10. Close and latch the hood.