
RAM 3500 Truck 4WD V10-8.0L VIN W (1997)
8.
Re-install the rear servo retainer, spring, and piston into the transmission. Secure it with the snap ring.
9.
Install the band adjusting screw (from old lever) and partially install the (new) band adjusting lever by pushing the reaction shaft through one
flange of the lever p/n 04897877AA.
10.
Using PETROLEUM JELLY, assemble the replacement strut and reaction lever p/n 04897877AA.
11.
Install the assembled strut and reaction lever inside the adjusting lever and push the reaction pin completely through the assembly until it is flush
with the back of the transmission case.
NOTE:
MAKE SURE THE STRUT IS INSTALLED CORRECTLY INTO THE LOW REVERSE BAND. TO CHECK INSTALLATION, APPLY THE
ADJUSTING LEVER BY HAND AND NOTE THE MOVEMENT OF THE BAND. IF IT IS NOT INSTALLED CORRECTLY, LOOSEN THE
ADJUSTING SCREW UNTIL THE STRUT CAN BE PUT IN PLACE WITHOUT DISASSEMBLING THE LEVERS.
NOTE:
DO NOT TIGHTEN THE ADJUSTING SCREW AT THIS POINT.
Overdrive Installation
1.
Inspect the gasket to make sure it was not damaged during removal. If damaged, refer to the service manual for replacement.
2.
Install the thrust bearing and spacer in overdrive unit sliding hub. Use petroleum jelly to hold it in place.
3.
Carefully slide the alignment tool 6227-2 out of the unit.
4.
Raise the overdrive unit and carefully slide it straight onto the intermediate shaft.
5.
Install the attaching bolts and tighten the bolts to 34 Nm (25 ft lbs) in a diagonal pattern.
6.
Install the transmission mount and tighten to 41 Nm (30 ft lbs).
7.
Connect speed sensors and speedometer wires.
Reverse Band Adjustment
1.
Remove the plug in the rear servo test port.
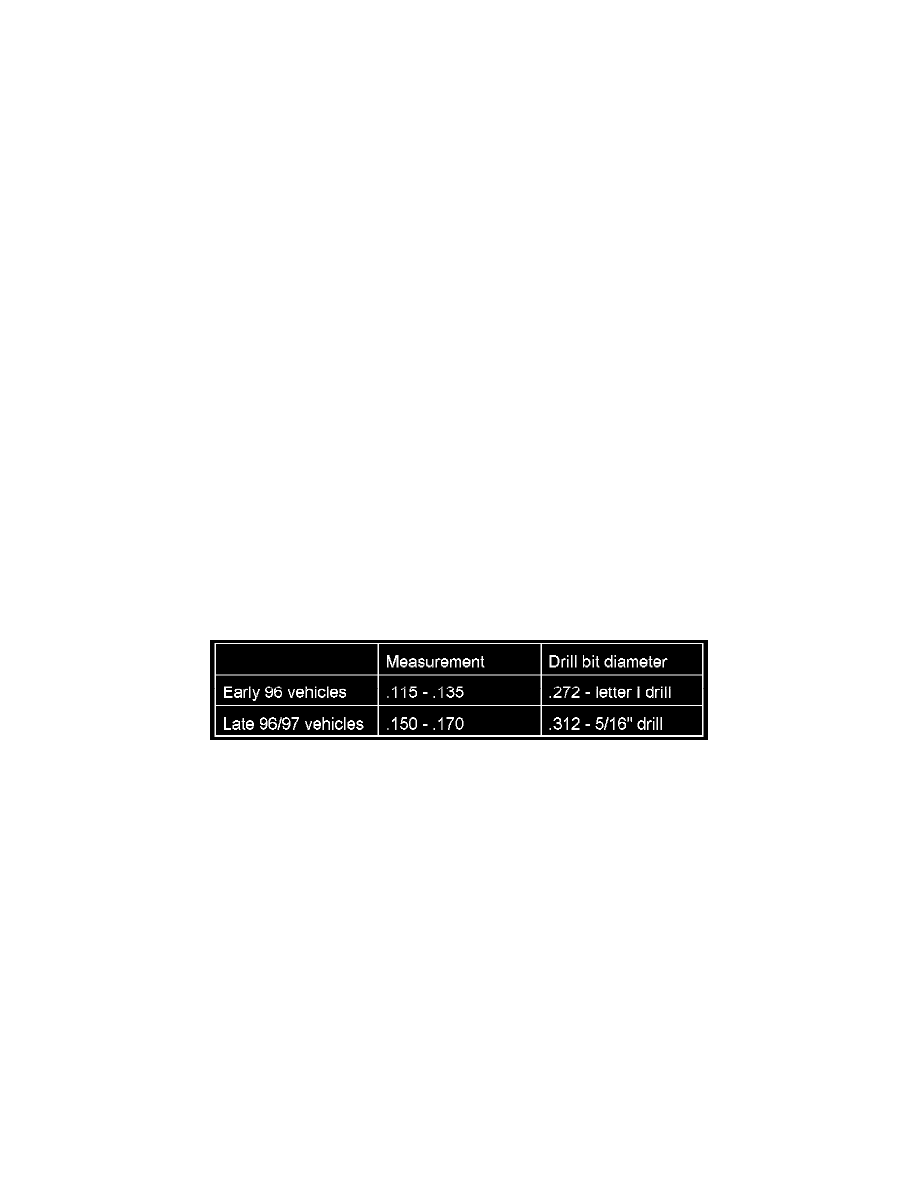
2.
Based on the measurement taken in step 7 of REVERSE BAND LEVERS AND STRUT REPLACEMENT select the appropriate size drill bit
from the table:
3.
Insert the butt end of the appropriate drill bit into the test port 3 inches deep and centered beneath the servo plug.
4.
With the bit properly located, tighten the reverse band adjusting screw to 8 Nm (72 in lbs) and back off the screw 2 1/4 turns.
**5. Loosen the adjusting screw and repeat step 4. While holding the adjusting screw, tighten the adjusting screw lock nut to 34 Nm (25 ft lbs).**
6.
Remove the drill bit and replace the rear servo test port plug.
Pressure Plug and Sleeve Replacement