Sprinter 3500 V6-3.0L DSL Turbo (2008)

16. Install the air filter housing and tube.
17. Connect the negative battery cable.
18. Start the engine, run until warm, turn engine off and inspect for leaks.
Right
RIGHT
1. Clean and inspect all sealing surfaces.
NOTE: Care must be taken not to get any engine sealant on the camshaft journals of the cylinder head cover.
2. Install a 1/8 in bead of Mopar Engine RTV Gen II sealant to the underside of the cylinder head cover .
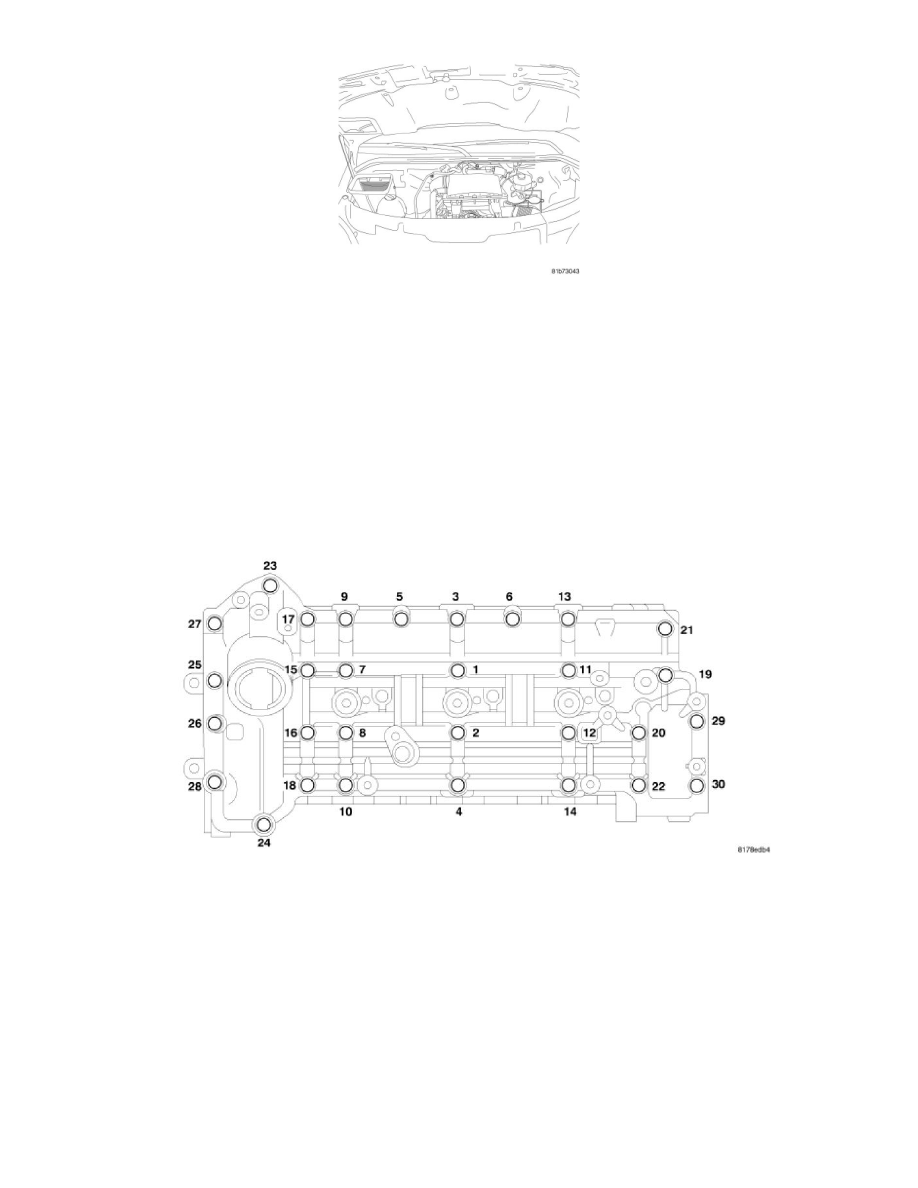
CAUTION: The cylinder head cover bolts are different lengths. Make sure to install the bolts into their original position.
3. Carefully position the cylinder head cover and install the bolts into their original position.
4. Tighten cylinder head cover bolts in sequence, first to 4 Nm (35 in. lbs.), and then repeat the sequence to 8.4 Nm (75 in. lbs).
CAUTION: Make sure to replace the lower copper washer seal on the injector. DO NOT re-use the old seal, DO NOT double the seals.
5. Install the fuel injectors. Tighten the retaining claw bolts to 7 Nm (5 ft. lbs.) and then an additional 180°.
6. Install the CCV housing. Tighten the fasteners to 9 Nm (80 in. lbs.).
7. Install the vacuum pump. Tighten the fasteners to 9 Nm (80 in. lbs.).
8. Install the EGR air control valve resonator. Tighten the fasteners to 9 Nm (80 in. lbs.).
9. Install the oil level indicator tube fastener. Tighten the bolt to 11 Nm (97 in. lbs.).
10. Install the AC / heater hose bracket. Tighten the bolts to 9 Nm (80 in. lbs.).
11. Install the fuel rail. Tighten bolts to 9 Nm (80 ft. lbs.).
NOTE: Inspect all fuel lines for damage or wear. Replace as necessary. DO NOT over tighten the fuel line nuts.
12. Install the fuel injector high pressure lines. Tighten line nuts to 33 Nm (24 ft. lbs.).
