Sprinter 3500 V6-3.0L DSL Turbo VIN 45 (2007)

1. Remove the tape or plugs from the opened refrigerant line fittings and compressor port.
2. Lubricate new rubber O-ring seals with clean refrigerant oil and install them onto the refrigerant line fittings. Use only the specified O-rings as
they are made of a special material for the R-134a system. Use only refrigerant oil of the type recommended for the A/C compressor in the vehicle.
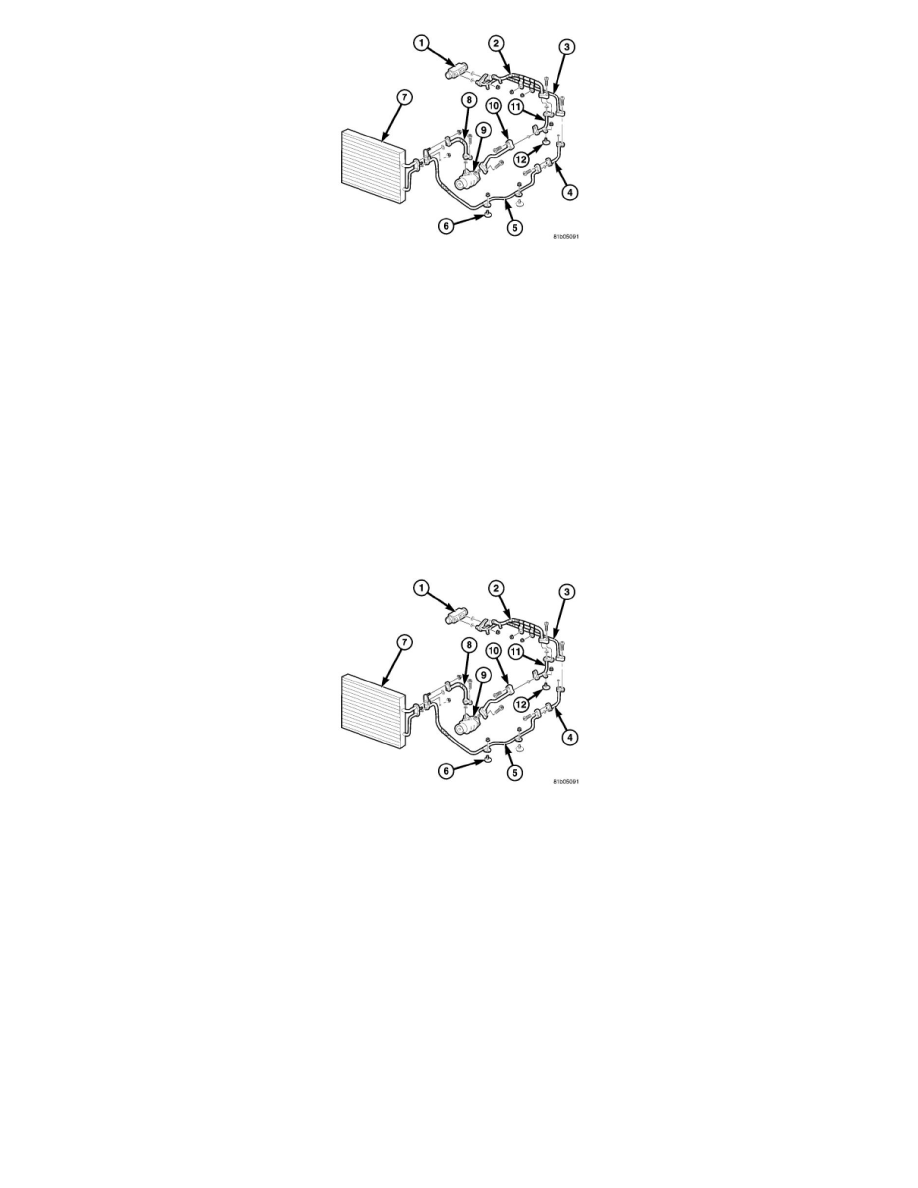
3. Position the front section of the A/C suction line (10) into the engine compartment.
4. Connect the front section of the A/C suction line to the middle section of the A/C suction line (11).
5. Install the bolt that secures the front section of the A/C suction line to the middle section of the A/C suction line. Tighten the bolt to 8 Nm (70 in.
lbs.).
6. Connect the A/C suction line to the A/C compressor (9).
7. Install the bolt that secures the A/C suction line to the A/C compressor. Tighten the bolt to 22 Nm (16 ft. lbs.).
8. On diesel engine equipped models, install the turbo resonator and the charge air outlet tube to the left side of the engine.
9. Install the windshield washer reservoir.
10. Reconnect the negative battery cable.
11. Evacuate the refrigerant system.
12. Adjust the refrigerant oil level.
13. Charge the refrigerant system.
14. Install the air cleaner housing.
MIDDLE SECTION
15. Remove the tape or plugs from the opened refrigerant line fittings.
16. Lubricate new rubber O-ring seals with clean refrigerant oil and install them onto the refrigerant line fittings. Use only the specified O-rings as
they are made of a special material for the R-134a system. Use only refrigerant oil of the type recommended for the A/C compressor in the vehicle.
17. Position the middle section of the A/C suction line (11) into the engine compartment.
18. Install the nut that secures the middle section of the A/C suction line to the stud (12) located at the left of the dash panel in the engine
compartment. Tighten the nut to 4 Nm (35 in. lbs.).
19. If equipped with rear A/C, install the A/C underbody lines.
20. Connect the front section of the A/C suction line (10) to the middle section of the A/C suction line.
21. Install the bolt that secures the front section of the A/C suction line to the middle section of the A/C suction line. Tighten the bolt to 8 Nm (70 in.
lbs.).
22. Connect the rear section of the A/C suction line (2) to the middle section of the A/C suction line.
23. Install the bolt that secures the rear section of the A/C suction line to the middle section of the A/C suction line. Tighten the bolt to 8 Nm (70 in.
lbs.).
24. Reconnect the negative battery cable.
25. Evacuate the refrigerant system.
26. Adjust the refrigerant oil level.
27. Charge the refrigerant system.
28. Install the air cleaner housing.
REAR SECTION
