
SRT-4 L4-2.4L Turbo VIN S (2004)
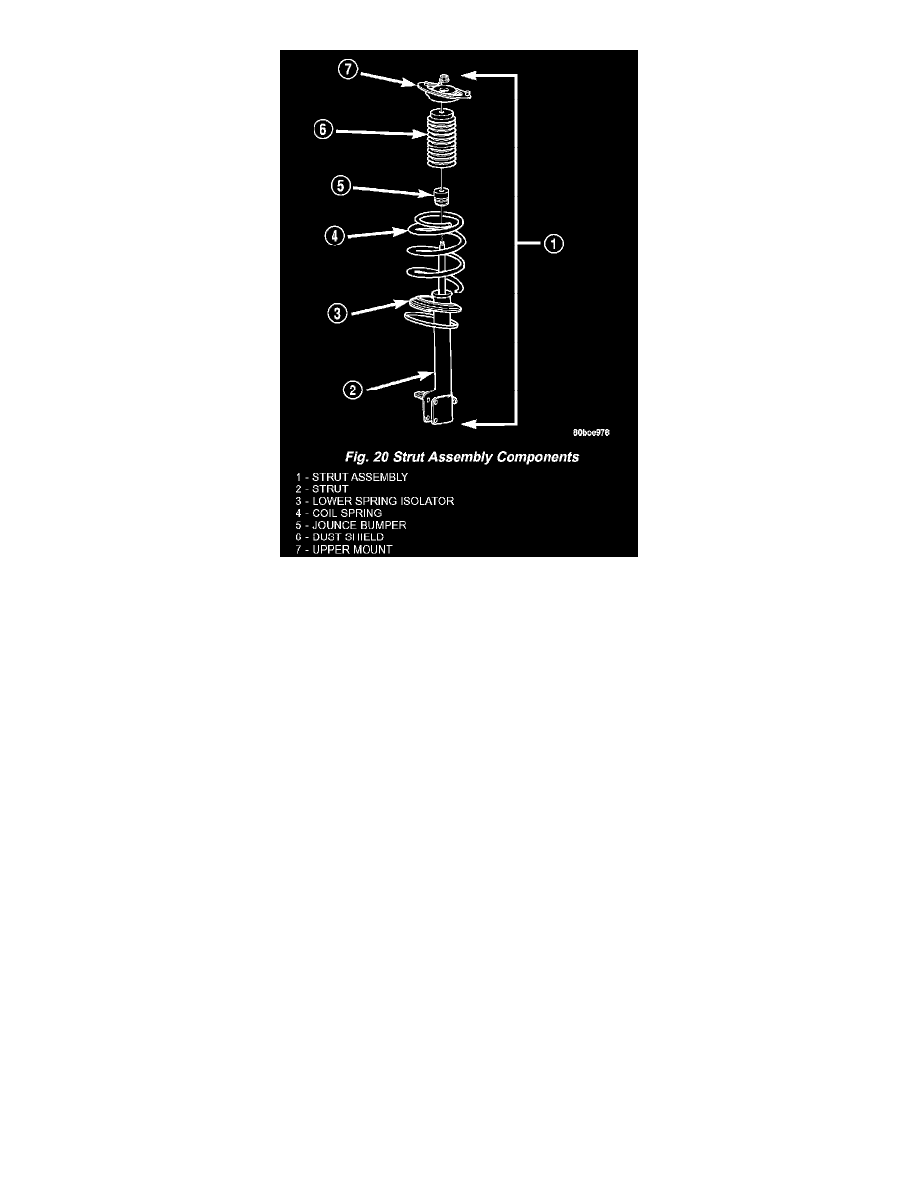
5. Remove the upper mount from the strut shaft (Fig. 20).
6. Remove the clamp from the bottom of the coil spring and remove the strut out through the bottom of the coil spring.
7. Remove the dust shield, then the jounce bumper from the strut shaft by pulling each straight up (Fig. 20).
8. Remove the lower spring isolator from the lower spring seat located on the strut.
NOTE: If the coil spring needs to be serviced, proceed with the next step, otherwise, proceed with step 10. Before removing the coil spring from
the compressor, make not of its position in the compressor, for easy reassembly.
9. Release the tension from the coil spring by backing off the compressor drive completely Push back the compressor hooks and remove the coil
spring.
10. Inspect the strut assembly components for the following and replace as necessary:
^
Inspect the strut for any condition of shaft binding over the full stroke of the shaft.
^
Inspect the jounce bumper for cracks and signs of deterioration.
^
Check the upper mount for cracks and distortion and its retaining studs for any sign of damage.
^
Inspect the dust shield for rips and deterioration.
^
Inspect the upper and lower spring isolators for material deterioration and distortion.
^
Inspect the coil spring for any sign of damage to the coating.
ASSEMBLY - STRUT ASSEMBLY (REAR)
The strut assembly must be removed from the vehicle for it to be disassembled and assembled. For the disassembly and assembly of the strut
assembly, use strut spring compressor, Pentastar Service Equipment (PSE) tool W-7200, or the equivalent, to compress the coil spring. Follow the
manufacturer's instructions closely.
NOTE: If the coil spring has been removed from the spring compressor, proceed with the next step, otherwise, proceed with step 3.
1. Place the coil spring in the compressor following the manufacturers instructions. Before compressing the spring, rotate the spring to the position
determined in the note prior to step 9 in disassembly.
2. Slowly compress the coil spring until enough room is available for strut assembly reassembly.
3. Install the lower spring isolator on the lower spring seat of the strut matching the step built into the isolator with the step in the lower spring seat
on the strut (Fig. 20).
4. Install the jounce bumper on the strut shaft. The jounce bumper is to be installed with the pointed end pointing downward toward the lower seat.
5. Install the dust shield on the strut shaft (Fig. 20). The bottom of the dust shield will snap past the retainer on top of the strut housing.
6. Install the strut through the bottom of the coil spring until the lower spring seat contacts the lower end of the coil spring. Rotate the strut until the
end of the coil spring fits against the step in the lower spring seat (Fig. 18). If done correctly, the clevis on the bottom of the strut should face