
Stratus Coupe V6-3.0L VIN H (2001)
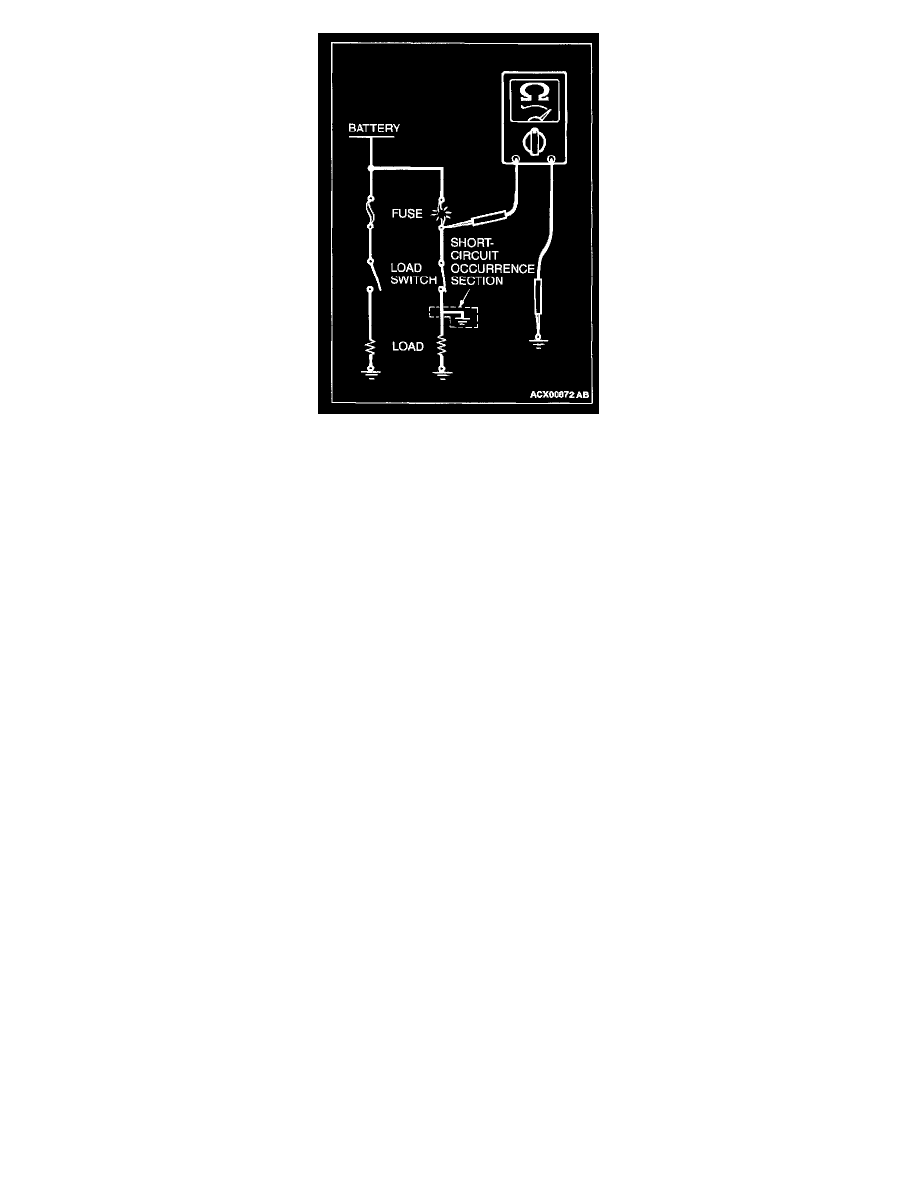
Remove the fuse and measure the resistance between the load side of the fuse and ground. Set the switches of all circuits which are connected to this fuse
to a condition of continuity. If the resistance is almost 0 Ohm at this time, there is a short somewhere between these switches and the load. If the
resistance is not 0 Ohm, there is no short at the present time, but a momentary short has probably caused the fuse to blow. The main causes of a short
circuit are the following.
-
Harness being clamped by the vehicle body
-
Damage to the outer casing of the harness due to wear or heat
-
Water getting into the connector or circuitry
-
Human error (mistakenly shorting a circuit, etc.)
Troubleshooting Guidelines
VERIFY THE COMPLAINT
-
Make sure the customer's complaint and the service writer's work order description are understood before starting work.
-
Make sure the correct operation of the system is understood. Read the description to verify any aspect of normal system operation.
-
Operate the system to see the symptoms. Look for other symptoms that were not reported by the customer, or on the work order, that may be
related to the problem.
DETERMINE POSSIBLE CAUSES
Compare the confirmed symptoms to the diagnostic symptom indexes to get to the right diagnosis procedure.
If the confirmed symptoms can not be found on any symptom index, determine other possible causes.
-
Analyze the system diagrams and list all possible causes for the problem symptoms.
-
Rank all these possible causes in order of probability, based on how much of the system they cover, how likely they are to be the cause, and how
easy they will be to check. Be sure to take experience into account. Consider the causes of similar problems seen in the past. The list of causes
should be ranked in order from general to specific, from most-likely to least-likely, and from easy-to-check to hard-to-check.
FIND THE PROBLEM
After the symptoms have been confirmed, and probable causes have been identified, the next step is to make step-by-step checks of the suspected system
components, junctions, and links in logical order.
Use the diagnostic procedures whenever possible. Follow these procedures carefully to avoid missing an important step in the diagnosis sequence. It
might be the skipped step that leads to the solution of the problem.
If the step-by-step procedures is not available to help diagnose the problem, come up with a series of checks based on the ranked list of probable causes.
Troubleshooting checks should be made in the order that the list of causes was ranked:
-
general to specific
-
most-likely to least-likely
-
easy-to-check to hard-to-check
REPAIR THE PROBLEM