
Viper SRT-10 V10-8.4L (2008)
coil spring.
NOTE: If the coil spring needs to be serviced, proceed with the next step, otherwise, proceed with step 7.
6. Release the tension from the coil spring by backing off the compressor drive fully. Push back the compressor upper hooks and remove the coil
spring from the spring compressor.
7. Inspect the shock absorber assembly components for the following and replace as necessary:
-
Inspect the shock absorber for any condition of shaft binding over the full stroke of the shaft.
-
Check the upper seat and lower seat for cracks and distortion.
-
Inspect the jounce bumper for cracks and signs of deterioration.
-
Inspect the plastic collar for cracks and signs of deterioration.
8. If the shock absorber needs to be removed from the clevis bracket, it can be done by performing the following:
a. Place the clevis bracket (with shock) vertically in a vise equipped with soft jaw caps.
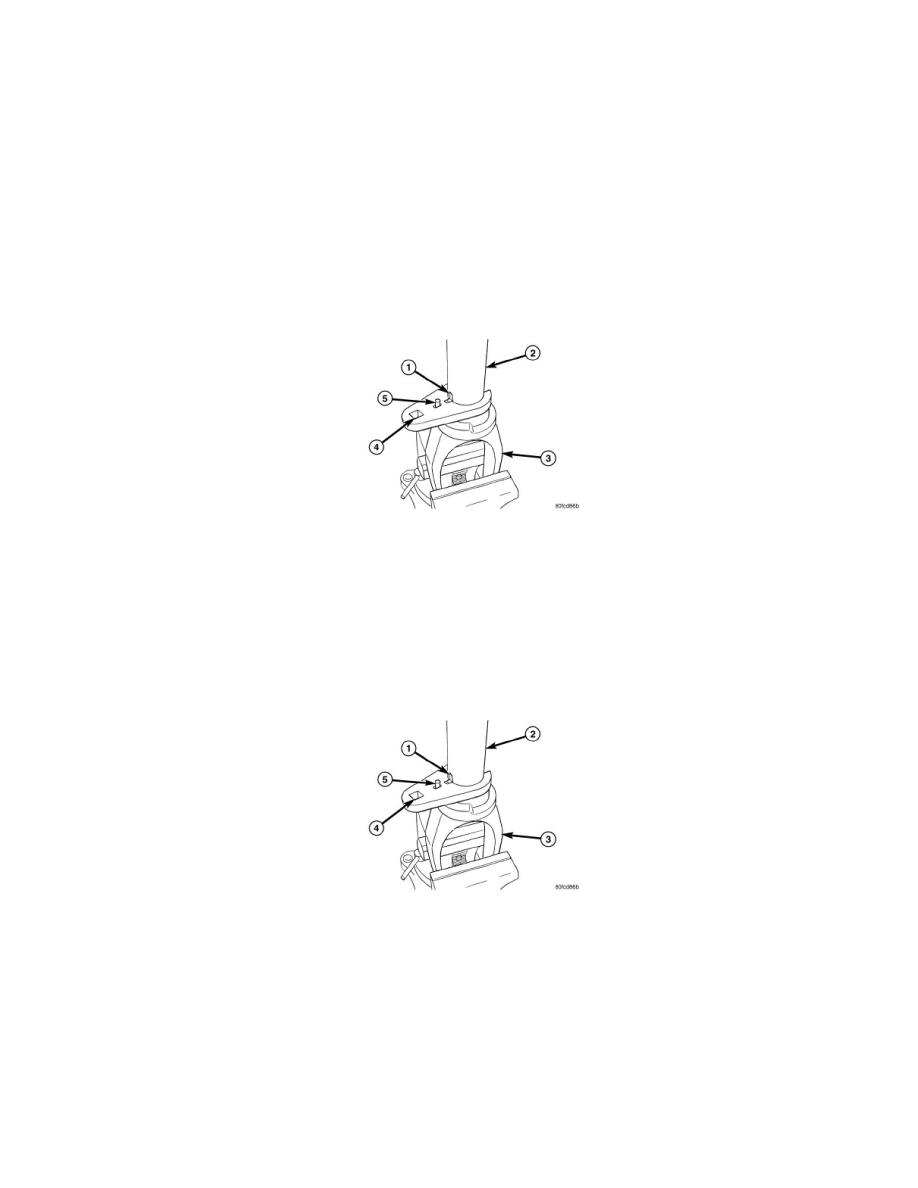
b. Pull back knob on Wrench, Special Tool 9024. Slide Wrench down over shock absorber body, then release knob, inserting spring-loaded tab
into notch of shock body as shown.
c. Attach a ratchet or breaker bar to the Wrench square drive hole, then loosen and remove the shock absorber from the clevis bracket.
9. Pull back knob on Wrench, and remove from shock absorber.
NOTE: For reassembly of the shock assembly, See: Assembly.
Assembly
ASSEMBLY
CAUTION: When installing the shock absorber into the clevis bracket, thread sealant must be used on the threads of the shock absorber and
the shock absorber must be tightened to the required torque specification.
1. If the shock absorber needs to be installed in the clevis bracket, it can be done by performing the following:
a. Place the clevis bracket (3) vertically in a vise.
b. Coat the threads on the shock absorber with Mopar(R) Lock 'N Seal Adhesive or equivalent.
c. Thread the shock absorber into the clevis by hand as far as possible.
d. Pull back knob (5) on Wrench, Special Tool 9024. Slide Wrench down over shock absorber body (2), then release knob, inserting
spring-loaded tab into notch (1) of shock body as shown.
e. Attach a torque wrench to the Wrench square drive hole (4), then tighten the shock absorber to 68 Nm (50 ft. lbs.).
f.
Pull back the knob on the Wrench, and remove it from the shock absorber.
g. Remove the shock absorber and clevis bracket from the vise.
NOTE: If the coil spring has been removed from the spring compressor, proceed with the next step, otherwise, proceed with step 4.
2. Place the coil spring in the compressor following the manufacturers instructions. Install the coil spring in the compressor with the round coil end of
the spring facing downward while the flat coil end faces upward.