
Aerostar 2WD V6-183 3.0L (1991)
Seat Belt: Service and Repair
Service Procedures
Post Collision Inspection
All safety belt assemblies must be replaced after a collision, provided:
1. The safety belt was in use at the time of the accident or,
2. The safety belt was damaged by the accident (bent retractor, torn webbing, etc.) or,
3. The safety belt attaching area(s) was damaged by the accident.
Before installing the new safety belt assembly, the safety belt attaching areas must be inspected for damage and distortion. If the attaching points are
damaged and distorted, the sheet metal must be reworked back to its original shape and structural integrity.
Install the new safety belt(s) using the appropriate instructions, then functionally test.
Repair Notes
The seat and shoulder safety belts are factory installed in their proper locations. If the belts are removed for any reason, they should be re-installed Ford
Caulking Cord D6AZ-19560-A or equivalent sealer should be placed around all seat belt anchor bolt holes in the floorpan. Tighten the anchor bolts to
30-43 N.m (22-32 ft-lb).
Seat Belt With Anchor Plate Thread Damage
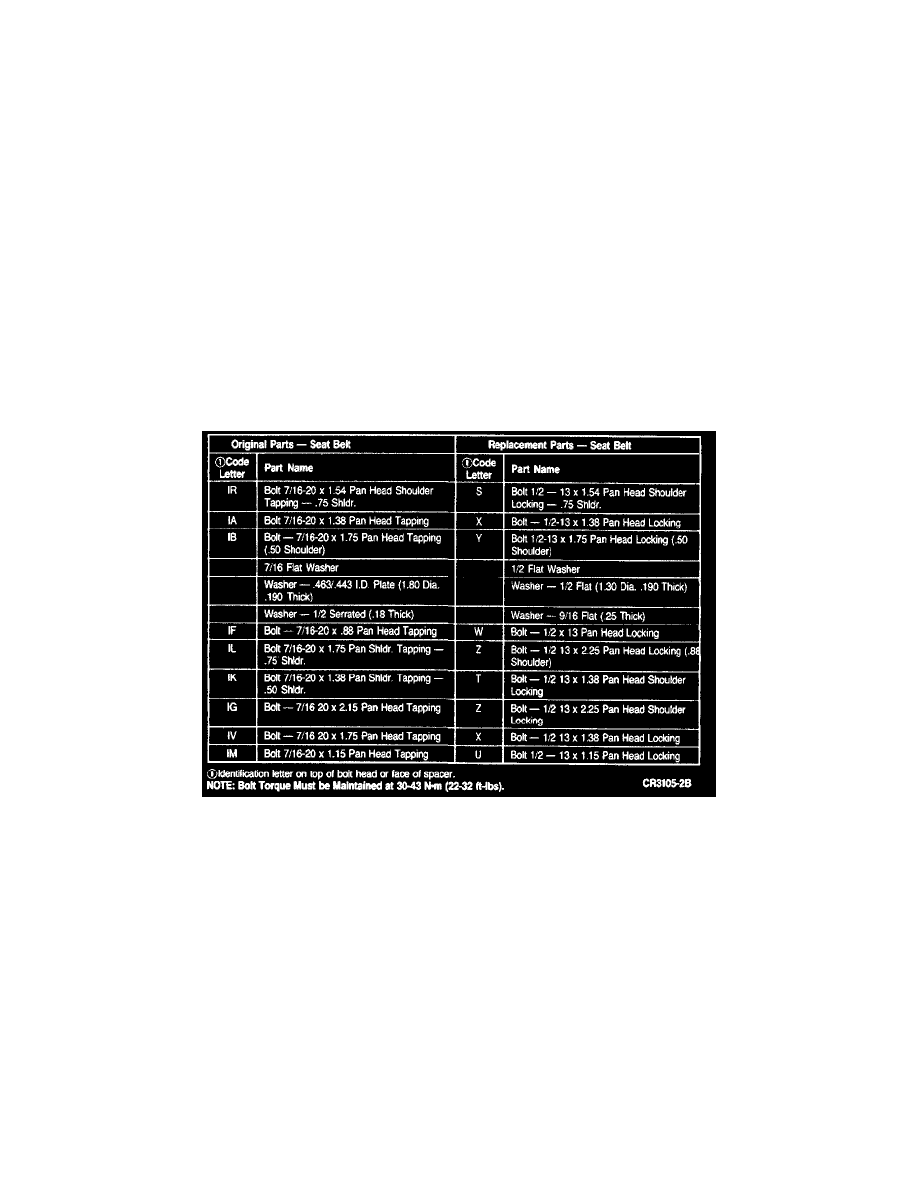
Parts Replacement Chart
1. Remove the broken or stripped bolt and discard.
2. Drill out the internal threads in the safety belt anchor plate with a 27/64-inch drill.
3. Re-thread the anchor plate with a 1/2-13 tap (seat belt).
4. Blow out the chips.
5. Install the attachment parts in the order shown, whichever is applicable. Tighten the replacement bolt to 30-43 N.m (22-32 ft-lb). Original parts
are to be replaced with the repair parts indicated in the Parts Replacement Chart. Unless specified in the chart, use original parts.
6. When repairing a multiple belt and attachment, install nut to the bolt in the tunnel area from the underside of the floorpan. Tighten to specification
30-43 N.m (22-32 ft-lb).
Seat Belt Without Anchor Plate Thread Damage