
Aerostar 2WD V6-183 3.0L (1991)
6.
Insert valve body insertion tool No. T78P-3504-C or equivalent in top of valve housing, lining up D-flat on input shaft 180° from yoke plug hole
center and insert valve assembly in bore. The D-flat must point straight to the rear when the gear is installed in the vehicle with the gear in the
on-center position. If necessary, rotate input shaft slightly from side to side to mesh pinion to rack teeth. Push valve assembly in by hand until
properly seated.
7.
Install suitable tool on input shaft and check if pinion is centered by rotating input shaft and counting number of turns from center to each stop. If
number of turns is not equal, pull valve assembly out far enough to free pinion teeth, rotate input shaft 60° in direction that requires least turns and
reinsert valve assembly. Repeat procedure as necessary until pinion is centered.
8.
With rack away from stops, install nut on pinion end of valve assembly, hold input shaft with shaft holding tool No. T74P-3504-R, or equivalent
and torque nut to 30-40 ft. lbs.
9.
Position input shaft bearing over shaft and in bore, then, using suitable tool, drive bearing into bore until firmly seated.
10.
Coat input shaft seal with suitable lubricant.
11.
Install input shaft seal with lip toward gear housing.
12.
Install input shaft seal over seal protector tool so seal lip faces valve.
13.
Drive seal into bore until seated.
14.
Install snap ring in valve bore.
15.
Coat input shaft with suitable lubricant in dust seal contact area.
16.
Install input shift seal tool No. T85T-3504-CH1 or equivalent over input shaft.
17.
Install input shaft dust seal and drive into position with suitable tool.
18.
Remove seal tool from seal and input shaft.
19.
Install bearing cap, torquing to 50 ft. lbs.
20.
Adjust rack yoke plug preload.
Oil Seals Replacement
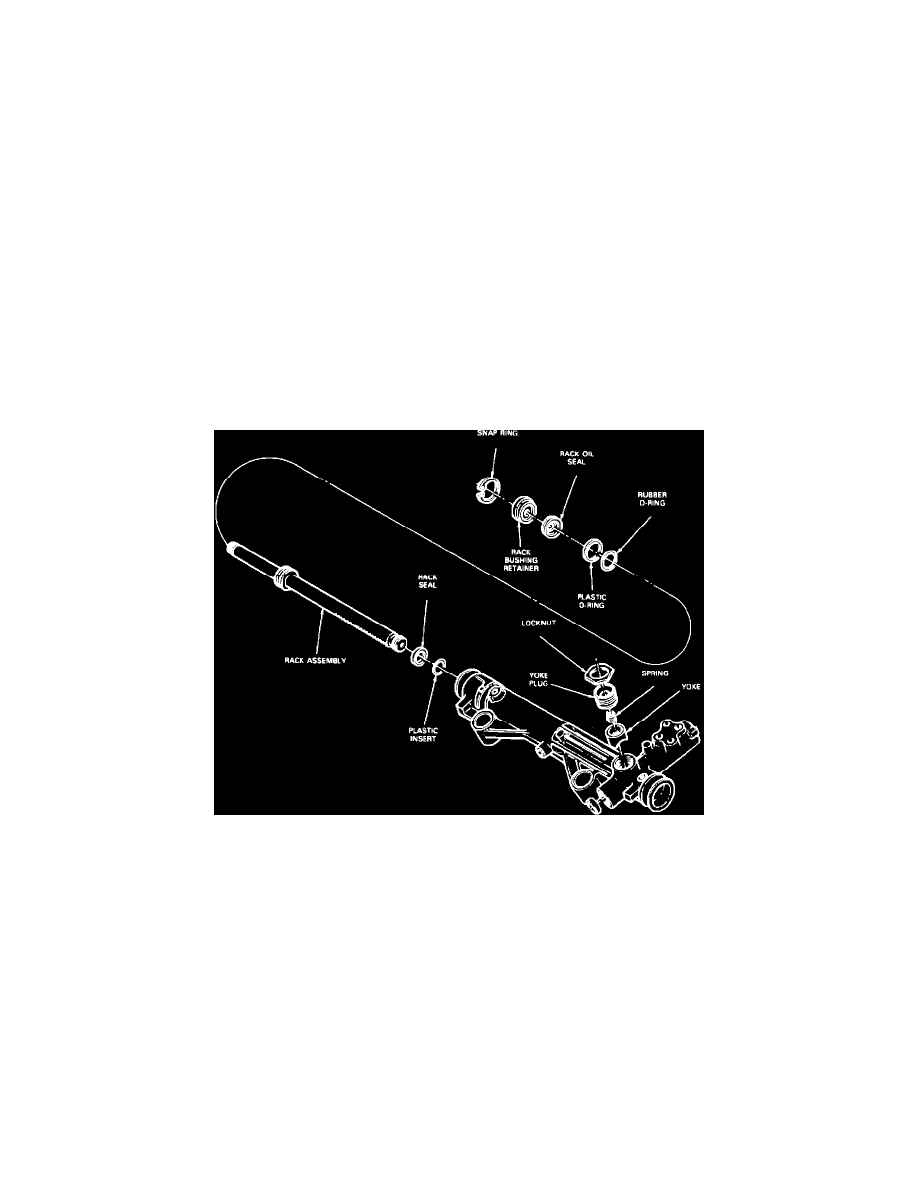
Fig. 3 Gear Housing
DISASSEMBLY
1.
Remove tie rod, socket assemblies, input shaft and valve assembly.
2.
Using suitable puller, remove yoke plug locknut, Fig. 3.
3.
Remove yoke plug from housing.
4.
Remove yoke spring and yoke from gear housing. Remove yoke by gripping on guide post with pair of pliers.
5.
Working from right end of gear, push rack into housing far enough to gain access to snap ring.
6.
Remove snap ring from right end of gear housing.
7.
Using hammer and brass drift, slowly drive rack out of right side of housing together with rack bushing, then remove rack from housing.
8.
To remove internal high pressure rack oil seal, insert oil seal remover tool No. T78P-3504-J or equivalent into housing until it bottoms.
9.
Activate expander with wrench until expander fully tightens against oil seal.
10.
Insert slide hammer into tool and pull seal from housing. Discard seal. On first attempt, plastic insert may pull out of seal, leaving seal in housing.
Repeat procedure until seal is removed.
11.
Using suitable tool, remove plastic O-ring and rubber O-ring from rack piston.
12.
Remove rack bushing seal by gripping seal in vise and squeezing seal to distort it, then pry out with screwdriver.