
Aerostar AWD V6-183 3.0L (1991)
Tie Rod End: Service and Repair
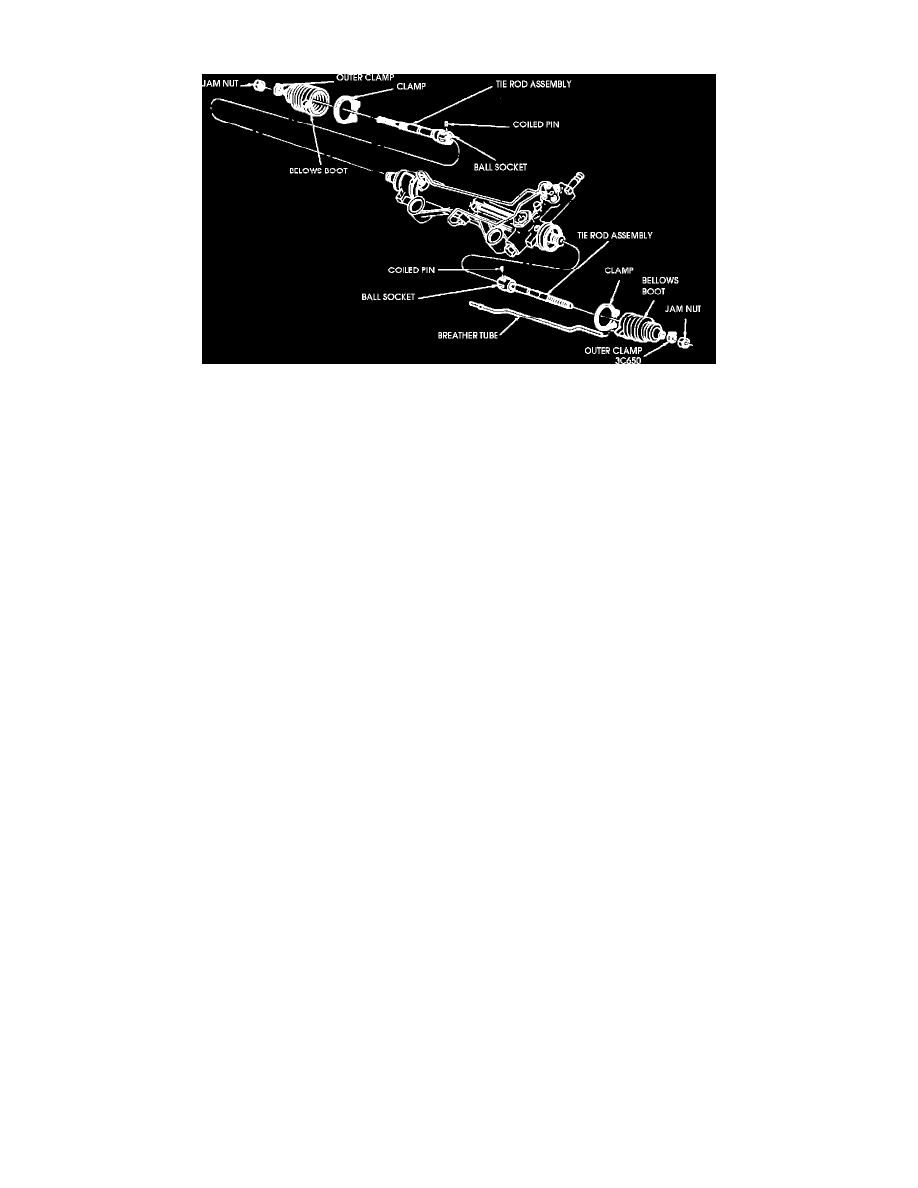
Fig. 1 Tie Rod Ends, Bellows and Ball Joint Sockets
DISASSEMBLY
1.
With two long bolts and washers installed through mounting ears, attach steering gear to suitable holding fixture.
2.
Mark position of tie rod ends on tie rods, then loosen jam nuts and remove tie rod ends, Fig. 1, counting and recording number of turns required to
remove ends from tie rods, then remove jam nuts.
3.
Remove four clamps retaining bellows to gear housing, replacing clamps as necessary.
4.
Remove bellows along with breather tube from housing, being careful not to damage bellows, and replace bellows as necessary.
5.
If pinion requires service, remove.
6.
Thread point of locknut pin remover D81P-3504-N or equivalent, into coiled pin in ball socket and tighten finger tight.
7.
Tighten locknut on tool and remove and discard pin.
8.
If pinion was not removed, remove housing from holding fixture to prevent damaging gear teeth.
9.
Rotate input shaft to move rack so several teeth are exposed, then, while holding rack with suitable tool on end teeth only, loosen ball socket nuts
with nut wrench tool No. T74P-3504-U or equivalent, then remove ball socket and tie rod assembly.
10.
With tool still on end teeth, remove opposite ball socket and tie rod assembly.
ASSEMBLY
1.
If pinion was not removed, turn input shaft to rotate gear against or near left stop, then, holding rack in position with suitable tool installed nearest
to rack end, install ball socket and tie rod assembly on rack, torquing assembly to 55-60 ft. lbs. Repeat procedure on opposite ball socket and tie
rod assembly.
2.
If pinion was removed, install tie rod and ball socket assemblies on each end of rack and, while holding one ball socket nut with suitable wrench,
torque opposite ball socket nut to 55-60 ft. lbs.
3.
Support ball joint socket with block of wood and install new coiled pins in sockets by tapping lightly with plastic hammer.
4.
If removed, install gear in holding fixture.
5.
If pinion was removed, install pinion.
6.
Thoroughly clean rack and housing bore of any foreign material.
7.
Apply suitable lubricant to groove in rods where bellows clamps to tie rod.
8.
Install bellows and breather tube on gear housing with new clamps. Clamps must be installed on crossmember side of gear and clamp screw axis
must be parallel with yoke plug locknut.
9.
Install new clamps that attach bellows to tie rods.
10.
Install jam nuts on tie rods.
11.
Apply suitable lubricant to threads in tie rod ends.
12.
Install tie rod ends onto tie rods the number of turns recorded and marked position recorded during disassembly.
13.
Torque jam nuts to 35-50 ft. lbs., holding tie rod end while tightening jam nuts.