
E 250 Van L6-300 4.9L (1984)
Propeller Shaft: All Technical Service Bulletins
Driveline - Vibration/Boom Noise In Overdrive
^
DRIVELINE - VIBRATION AND "BOOM" NOISE-VEHICLES WITH TWO-PIECE STEEL DRIVESHAFT
^
VIBRATION - "BOOM" NOISE - VEHICLES WITH TWO-PIECE STEEL DRIVESHAFT
Article No. 88-4-17
LIGHT TRUCK:
1983-86 E-150, F-150
ISSUE:
A driveline vibration and "booming" noise at 45-65 mph (72-105 km/h) with the transmission in overdrive may be caused by the two (2)
piece steel driveshaft assembly. The affected Econolines are units built before 10/10/85 with a 138 inch wheelbase, 4.9L or 5.0L engine,
AOD transmission, and 9 inch rear axle. The affected F-Series are F-150 4 x 2 units with a 133 inch wheelbase, 5.0L engine, AOD
transmission and an 8.8 inch rear axle.
ACTION:
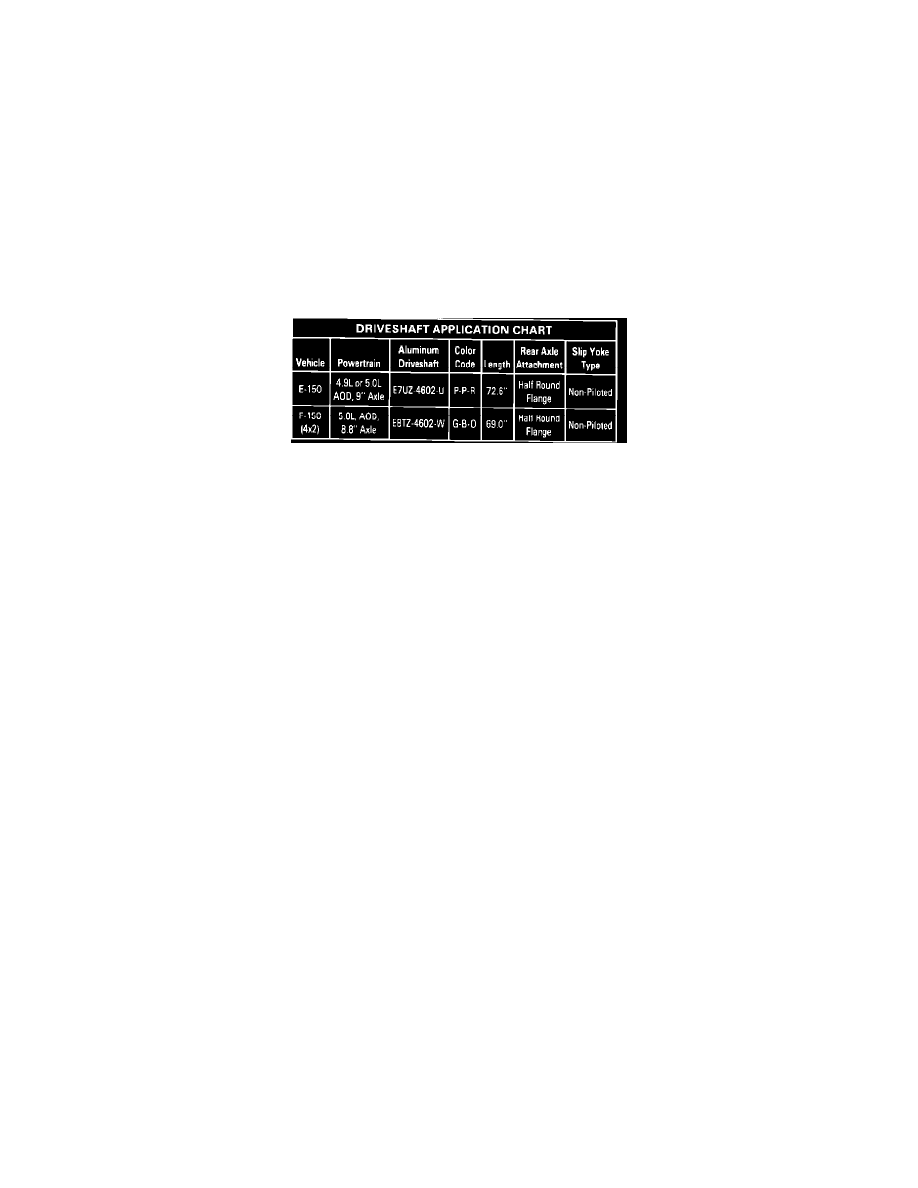
To correct this, install a new onepiece aluminum driveshaft using the following service procedure. Refer to the driveshaft application chart
on this page for the correct service part.
1.
Remove the existing two (2) piece steel driveshaft.
2.
Install the appropriate tool in the transmission extension housing to prevent fluid leakage.
3.
Remove the driveshaft center bearing support plate by chiseling off the rivet heads. The center bearing support plate must be removed to allow
clearance for the new aluminum driveshaft.
CAUTION: DO NOT drill or use a cutting torch to remove the rivets. This could damage the crossmember.
4.
If the axle pinion flange lugs are damaged, replace the flange.
5.
Lubricate the slip yoke splines with Ford Long Life Lubricant (C1AZ-19590-BA).
6.
Remove the tool from the transmission extension housing.
CAUTION: Never replace a two (2) piece STEEL driveshaft with a one (1) piece STEEL driveshaft.
7.
Install the slip yoke end of the new aluminum driveshaft on the transmission output shaft. Be careful not to bottom the slip yoke on the
transmission output shaft.
8.
Install the aluminum driveshaft to the rear axle flange. Make sure the yellow dot on the driveshaft and the yellow dot on the axle flange are
aligned. If the yellow dots are not visible, the vehicle will have to be test driven to determine the best position.
9.
Tighten the U-bolts evenly to prevent premature U-joint failure. Torque the nuts to 8-15 ft.lbs. (11-20 N-m).
PART NUMBER
PART NAME
CLASS
E7UZ-4602-U
Driveshaft
C
E8TZ-4602-W
Driveshaft
C
C1AZ-19590-BA
Ford Long Life Lubricant
B
OTHER APPLICABLE ARTICLES: 87-2-28
WARRANTY STATUS: Eligible Under Basic Warranty and Powertrain Coverages
OPERATION: 880417A - Install driveshaft
TIME:
0.8 Hr.
OPERATION: 880417AS1 - Re-index driveshaft