
F 350 2WD Pickup V8-460 7.5L VIN G EFI (1997)
Drive/Propeller Shaft: Service and Repair
Removal and Installation
One Piece
REMOVAL
1. Raise vehicle and install safety stands.
2. To maintain driveline balance, if the yellow alignment marks are not visible, mark the relationship of the driveshaft flange yoke and the rear axle
companion flange so they may be reinstalled in their original positions.
NOTE: On four-wheel drive vehicles equipped with a slip between center driveshaft, disconnect the driveshaft at the transfer case during
removal.
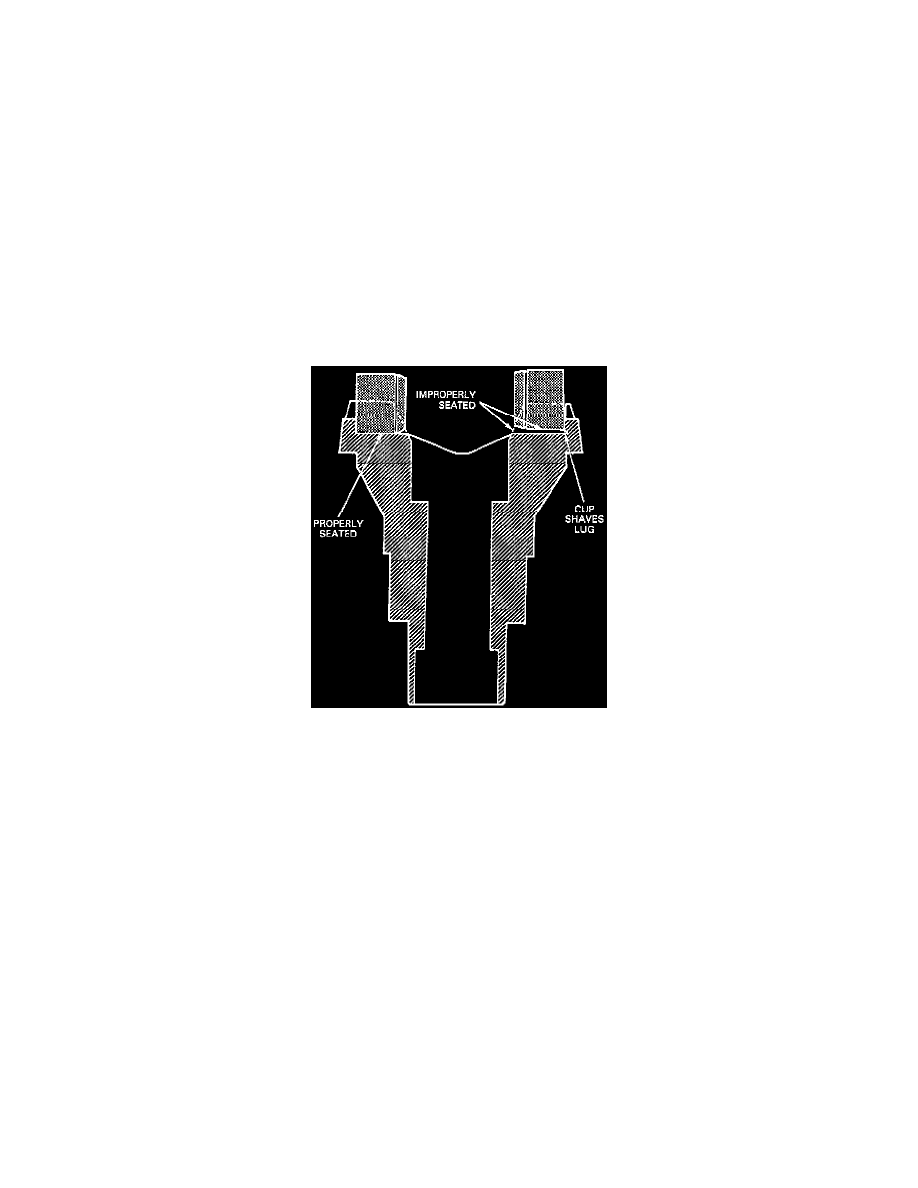
3. Remove the nuts retaining the driveshaft universal joint U-bolt to the rear axle companion flange or bolts and straps.
a. Disconnect the Point from the rear axle companion flange, being careful not to drop the U-joint bearing cups.
b. Wrap tape around the U-joint to retain the bearing cups.
c. Slide the driveshaft rearward off the transmission output shaft.
d. Install an appropriate plug in the extension housing to prevent fluid loss.
INSTALLATION
1. If the lugs on the rear axle companion flange are shaved or distorted so the bearings slide, replace the rear axle companion flange.
2. Lubricate the slip yoke spline with Premium Long-Life Grease XG-1-C or -K or equivalent meeting Ford specification ESA-M1C75-B.
3. Remove the plug from the extension housing. Inspect extension housing seal for damage. Replace if necessary.
4. Install the driveshaft slip yoke on the transmission output shaft. Do not allow the driveshaft slip yoke to bottom on the output transmission shaft
with excessive force.
5. Install the driveshaft so that the index marks made before removal are aligned or the yellow mark (if visible) on the driveshaft tube (light side) is in
line with the yellow mark on the rear axle companion flange high side runout. This prevents vibration that occurs when the balance of the shaft and
runout of the axle companion flange become additive instead of neutralizing. If a vibration exists, the driveshaft should be disconnected from the
rear axle, rotated 180 degrees and reinstalled.
NOTE: When installing a new driveshaft, align the factory-made yellow paint mark at the rear of the driveshaft tube with the factory-made yellow
paint mark on the outside diameter of the rear axle companion flange.
6. Install the U-bolts and nuts that attach the U-joint to the rear axle companion flange. If equipped with straps and bolts, install and tighten bolts to
specifications.
7. Remove stands and lower vehicle.
8. Road test vehicle
Two Piece
REMOVAL
1. Raise the vehicle and install safety stands.
2. Disconnect the driveshaft from the rear axle companion flange and disconnect the driveshaft slip yoke from the coupling shaft yoke. Wrap tape
around the loose bearing caps to prevent the bearings from falling off the universal joint spiders.