
F 350 4WD Super Duty V8-6.4L DSL Turbo (2008)
and the fuel to cool.
2. Remove the turbocharger inlet pipes. Carry out the Exhaust Gas Recirculation (EGR)-Oxidation Catalytic Converter (OC) and Turbocharger Inlet
Pipes - 6.4L, Body Off procedure.
3. Remove the pushnuts and the glow plug module heat shield.
-
Discard the pushnuts.
4. Remove the RH high-pressure fuel injection pump heat shield bolts.
5. Remove the RH high-pressure fuel injection pump heat shield nuts and position the engine-to-body ground wire aside. Remove the RH
high-pressure fuel injection pump heat shield.
6. Remove the nuts, the fuel tube bracket and the LH high-pressure fuel injection pump heat shield.
7. Remove the fuel rail supply tube bracket bolts.
8. CAUTION: Fuel injection equipment is manufactured to very precise tolerances and fine clearances. To prevent fuel system damage it is
essential that absolute cleanliness is observed when working with these components. Always install Fuel System Caps to any open orifices
or tubes.
Remove and discard the fuel rail supply tubes.
9. Disconnect the high-pressure fuel injection pump electrical connector.
10. CAUTION: Fuel injection equipment is manufactured to very precise tolerances and fine clearances. To prevent fuel system damage it is
essential that absolute cleanliness is observed when working with these components. Always install Fuel System Caps to any open orifices
or tubes.
Disconnect the fuel injector return tube fitting from the check valve.
11. Loosen the high-pressure fuel injection pump supply tube bracket nuts.
12. CAUTION: Fuel injection equipment is manufactured to very precise tolerances and fine clearances. To prevent fuel system damage it is
essential that absolute cleanliness is observed when working with these components. Always install Fuel System Caps to any open orifices
or tubes.
NOTE: Use a back-up wrench to prevent the fittings in the high-pressure fuel pump from turning.
Remove the fuel tube-to-high-pressure fuel injection pump nuts and the copper sealing washers. Remove the fuel injection pump-to-fuel cooler
return tube and position the fuel supply tube aside.
-
Discard the copper sealing washers.
13. NOTE: Rotate the cover to the right when removing the cover.
Remove the bolts and the high-pressure fuel injection pump cover.
14. Remove and discard the press-in-place gasket from the high-pressure fuel injection pump cover.
15. NOTE: Use a thin gasket scraper to separate the gasket from the crankcase.
Disconnect the pressure control valve and volume control valve electrical connectors. Remove the high-pressure fuel injection pump cover gasket.
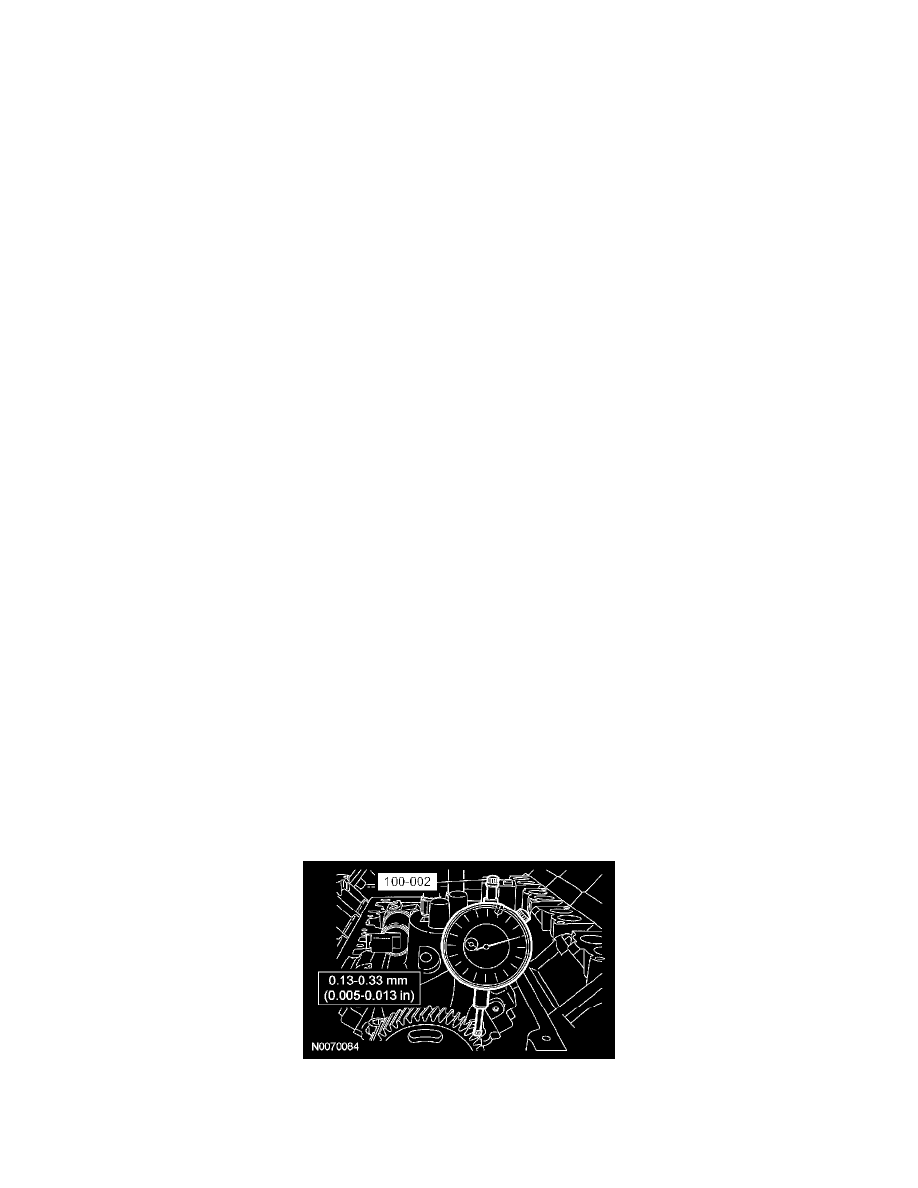
16. Position the special tool and check the high-pressure fuel injection pump drive gear backlash.
17. Remove the bolts and the high-pressure fuel injection pump.
18. NOTE: The high-pressure fuel injection pump drive gear bolt is a LH thread.