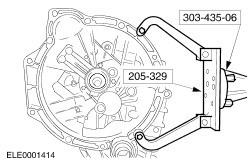
| Disassembly Special Tool(s) | | Remover, Drive Pinion Oil Seal 205-078 (15-048) | | | Remover, Differential Bearing Cone 205-176 (15-074) | | | Mounting Bracket, Engine/Differential 205-329 (15-105) | | | Mounting Stand 303-435 (21-187) | | | Mounting Bracket for 303-435 303-435-06 (21-031B) | | | Installer, Extension Housing Bushing/Oil Seal 308-045 (16-015) | | | Remover, Input Shaft Fifth Gear 308-082 (16-035) | General Equipment Disassembly All vehicles CAUTION:Always use soft jaws when working with a vice. CAUTION:Use a copper or plastic hammer to avoid causing any damage. | | -
Mount the transmission on the mounting stand using the special tool. | Vehicles built up to 08/1999 | | -
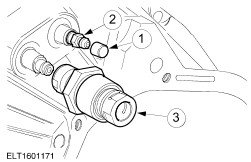
WARNING:Brake fluid contains polyglycol ethers and polyglycols. Avoid contact with the eyes. Wash your hands thoroughly after working with brake fluid. If brake fluid gets into the eyes, flush the eyes with cold running water for 15 minutes. If the irritation persists, call a doctor. If brake fluid is swallowed, drink water and induce vomiting. Call a doctor immediately. Failure to observe these instructions can lead to personal injury. Remove the pre-load valve. - Remove the protective cap.
- Remove the bleed nipple.
- Unscrew the preload valve.
| All vehicles | | -
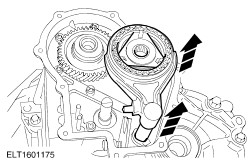
Remove the clutch slave cylinder. | Vehicles built up to 08/1999 | | -
NOTE:The thrust bearing is a push-fit. Remove the thrust bearing. - Detach the thrust bearing from the clutch slave cylinder by tapping it on a soft surface.
| | | -
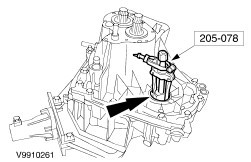
Remove the speedometer drive pinion. - Remove the retaining pin.
- Remove the speedometer drive pinion.
| Vehicles built from 08/1999 | | -
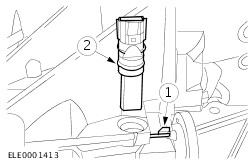
Remove the vehicle speed sensor (VSS). - Remove the retaining pin.
- Remove the VSS.
| All vehicles | | -
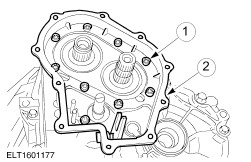
Remove the 5th gear housing end cover and selector interlock mechanisms. - 5th gear housing end cover
- 5th gear selector interlock mechanism
- Auxiliary selector shaft interlock mechanism
| | | -
Remove snap rings and gear selector boss. - Remove and discard snap ring from 5th gear wheel.
- Remove and discard snap ring from 5th gear synchronizer unit.
- Remove gear selector boss.
| | | -
Remove the 5th gear synchronizer unit with selector fork. | | | -
NOTE:Mark the exact position of the gear synchronizer before dismantling. Dismantle the 5th gear synchronizer unit. - Snap ring
- Retaining plate
- Gear synchronizer
- Synchronizer ring
- 5th gear wheel.
| | | -
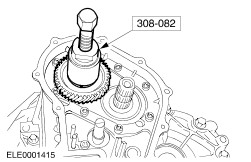
Remove the 5th gear wheel using the special tool. | | | -
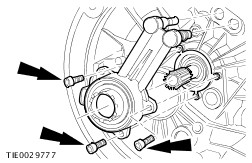
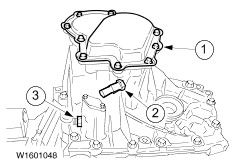
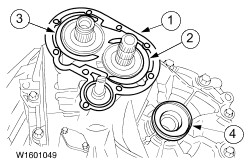
Remove 5th gear housing. - Unscrew and remove the bolts and separate the 5th gear housing by tapping it lightly.
- Clean the mating face.
| | | -
Remove the snap rings. - Remove and discard the gasket.
- Remove the output shaft snap ring.
- Remove the input shaft snap ring.
- Pull out the assembly plug.
| | | -
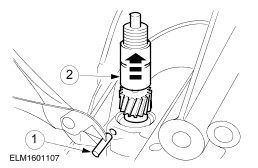
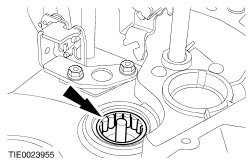
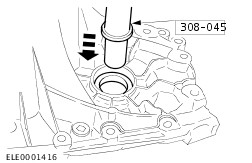
Remove both front drive halfshaft oil seals using the special tool (left-hand side shown). - The reversing lamp switch only needs to be removed if an oil leak is suspected.
| | | -
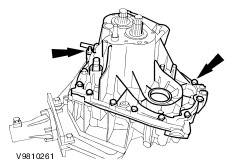
NOTE:Turn the housing slightly to lift it up (transmission breather pipe catches on input shaft). Separate the transmission housing (14 bolts). - Carefully separate the transmission housing sections.
| | | -
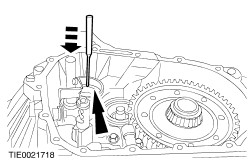
Detach the upper snap ring from the selector shaft guide sleeve. - Remove and discard the upper snap ring.
- Push the selector shaft guide sleeve downwards.
| | | -
Remove the selector shaft guide sleeve. - Remove and discard the lower snap ring from the guide sleeve.
- Remove the selector shaft guide sleeve.
| | | -
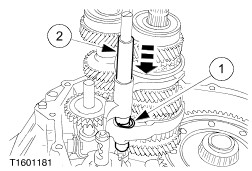
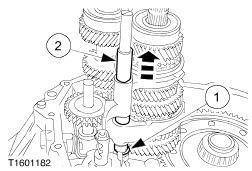
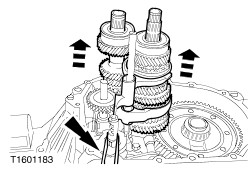
NOTE:Attach a rubber strap to the auxiliary selector shaft to ease assembly. Remove the input and output shafts together with the selector forks. | | | -
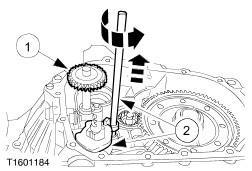
Remove the reverse gear idler, selector shaft and shift locking plate. - Remove the reverse gear idler.
- Remove the selector shaft and the shift locking plate.
| | | -
Remove and discard the input shaft oil seal using a suitable drift. | | | -
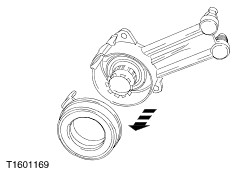
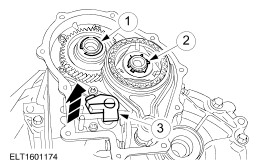
Remove the differential and permanent magnet. | | | -
Remove output shaft roller bearing. - Press out rollers from bearing cage and remove bearing cage from output shaft roller bearing.
| | | -
CAUTION:Use special tool in the position indicated only, otherwise the blanking plug will be pressed out of the housing. Remove the output shaft bearing outer race using the special tool. | | | -
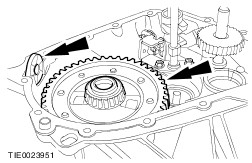
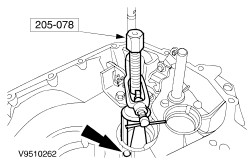
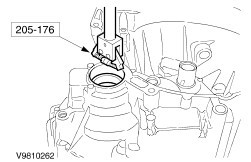
Using the special tool, remove the differential bearing outer race. | | | -
NOTE:Insert the special tool in the transmission housing recesses. Using the special tool, remove the differential bearing outer race. | |