| PINPOINT TEST E : THE ROOF OPENING PANEL DOES NOT OPEN OR CLOSE |
| TEST CONDITIONS | DETAILS/RESULTS/ACTIONS |
| E1: CHECK FUSE 21 (40 A) |
NOTE:Fuse 21 also feeds circuit 29 (power windows) |
| | 1 Ignition switch in position 0. |
| | 2 CHECK Fuse F21 (40A). |
| | 3 Check fuse F21 (40A). |
| | Is the fuse OK? Yes No INSTALL a new fuse F21 (40A). TEST the circuit for normal operation. If the fuse fails again check circuit 14-AG12A (VT/BK) for short to ground. |
| E2: CHECK THE VOLTAGE TO THE ROOF OPENING PANEL UNIT CIRCUIT 14-AG12A (VT/BK) |
| | 1 Ignition switch in position 0. |
| | 2 Disconnect Roof opening panel unit C748a. |
| | 3 Ignition switch in position II. |
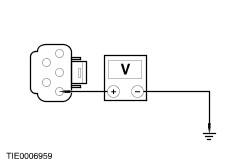
| | 4 Measure the voltage between the roof opening panel unit connector C748a pin 1, circuit 14-AG12A (VT/BK) and ground. |
| | Is the voltage greater than 10 volts? Yes No |
| E3: CHECK CIRCUIT 14-AG12A (VT/BK) FOR CONTINUITY |
| | 1 Ignition switch in position 0. |
| | 2 Disconnect CJB C367. |
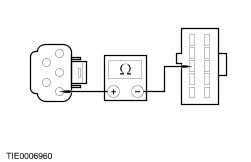
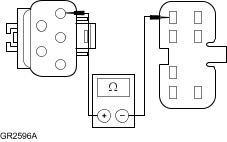
| | 3 Measure the resistance between the roof opening panel unit connector C748a pin 1, circuit 14-AG12A (VT/BK), and the central junction box connector C367 pin 8, circuit 14-AG12 (VT/BK). |
| | Is the resistance less than 5 ohms? Yes REPAIR circuit 14-AG12A (VT/BK) or circuit 14-AG12 (VT/BK). TEST the system for normal operation. No INSTALL a new central junction box (CJB). TEST the system for normal operation. |
| E4: CHECK CIRCUIT 14-AG7 (VT/BU) FOR OPEN |
| | 1 Ignition switch in position 0. |
| | 2 Disconnect Roof opening panel unit C748b. |
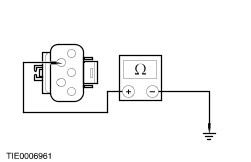
| | 3 Measure the resistance between the roof opening panel unit connector C748b pin 5, circuit 14-AG7 (VT/BU) and ground. |
| | Is the resistance less than 5 ohms? Yes No REPAIR circuit 14-AG7 (VT/BU). TEST the system for normal operation. |
| E5: CHECK CIRCUIT 14-AG7 (VT/BU) FOR VOLTAGE |
| | 1 Disconnect Roof opening panel adjust switch C3009. |
| | 2 Connect Roof opening panel unit C748a. |
| | 3 Connect CJB C367. |
| | 4 Ignition switch in position II. |
| | 5 Measure the voltage between the roof opening panel adjust switch connector C3009 pin 2, circuit 14-AG7 (VT/BU), and ground. |
| | Is the voltage greater than 10 volts? Yes No |
| E6: CHECK CIRCUIT 14-AG7 (VT/BU) FOR CONTINUITY |
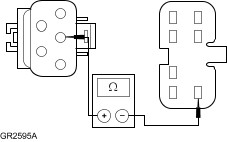
| | 1 Ignition switch in position 0. |
| | 2 Disconnect Roof opening panel unit C748b. |
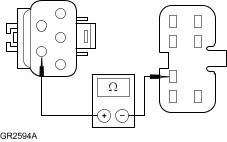
| | 3 Measure the resistance between the roof opening panel unit connector C748b pin 5, circuit 14-AG7 (VT/BU), and the roof opening panel adjust switch connector C3009 pin 2, circuit 14-AG7 (VT/BU). |
| | Is the resistance less than 5 ohms? Yes INSTALL a new roof opening panel unit. TEST the system for normal operation. No REPAIR circuit 14-AG7 (VT/BU). TEST the system for normal operation. |
| E7: CHECK CIRCUIT 31-AG7 (BK) FOR CONTINUITY |
| | 1 Measure the resistance between the roof opening panel unit connector C748b pin 4, circuit 31-AG7 (BK), and the roof opening panel adjust switch connector C3009 pin 3, circuit 31-AG7 (BK). |
| | Is the resistance less than 5 ohms? Yes No REPAIR circuit 31-AG7 (BK). TEST the system for normal operation. |
| E8: CHECK CIRCUIT 31-AG6 (BK) FOR CONTINUITY |
| | 1 Measure the resistance between the roof opening panel unit connector C748b pin 1, circuit 31-AG6 (BK), and the roof opening panel adjust switch connector C3009 pin 6, circuit 31-AG6 (BK). |
| | Is the resistance less than 5 ohms? Yes No REPAIR circuit 31-AG6 (BK). TEST the system for normal operation. |
| E9: CHECK CIRCUIT 33-AG6 (YE) FOR CONTINUITY |
| | 1 Measure the resistance between the roof opening panel unit connector C748b pin 3, circuit 33-AG6 (YE), and the roof opening panel adjust switch connector C3009 pin 1, circuit 33-AG6 (YE). |
| | Is the resistance less than 5 ohms? Yes No REPAIR circuit 33-AG6 (YE). TEST the system for normal operation. |
| E10: CHECK CIRCUIT 32-AG10 (WH/BU) FOR CONTINUITY |
| | 1 Measure the resistance between the roof opening panel unit connector C748b pin 2, circuit 32-AG10 (WH/BU), and the roof opening panel adjust switch connector C3009 pin 7, circuit 32-AG10 (WH/BU). |
| | Is the resistance less than 5 ohms? Yes No REPAIR circuit 32-AG10 (WH/BU). TEST the system for normal operation. |
| E11: CHECK THE ROOF OPENING PANEL ADJUST SWITCH |
| | 1 Carry out the component test for the roof opening panel adjust switch. For additional information, refer to the Component Test in this section. |
| | Is the roof opening panel adjust switch OK? Yes INSTALL a new roof opening panel unit. TEST the system for normal operation. No INSTALL a new roof opening panel adjust switch. TEST the system for normal operation. |