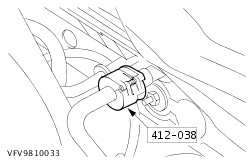
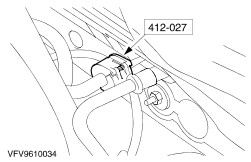
| Removal and Installation Special Tool(s) | | Disconnect Tool, Spring Lock Coupling 1/2 inch (blue) 412-027 (34-001) | | | Disconnect Tool, Spring Lock Coupling 5/8 inch (black) 412-038 (34-003) | | | Remover/Installer, Cooling Hose Clamp 303-397 (24-003) | Removal All vehicles | | -
Drain the cooling system. For additional information, refer to: (303-03 Engine Cooling) Cooling System Draining, Filling and Bleeding - 1.8L Duratec-HE (MI4)/1.8L Duratec-SCi (MI4)/2.0L Duratec-HE (MI4) (General Procedures), Cooling System Draining, Filling and Bleeding - 2.5L Duratec-VE (VE6)/3.0L Duratec-SE (VE6)/3.0L Duratec-ST (VE6) (General Procedures), Cooling System Draining, Filling and Bleeding - 2.0L Duratorq-Di/TDDi (Puma) Diesel/2.0L Duratorq-TDCi (Puma) Diesel/2.2L Duratorq-TDCi (Puma) Diesel (General Procedures). | | | -
Drain the air conditioning system.
For additional information, refer to: Air Conditioning (A/C) System Recovery, Evacuation and Charging (412-00 Climate Control System - General Information, General Procedures).
| | | -
Raise and support the vehicle. For additional information, refer to: (100-02 Jacking and Lifting) Lifting (Description and Operation), Lifting - 3.0L Duratec-ST (VE6) (Description and Operation). | Vehicles with diesel engine | | -
Remove the engine undershield. | All vehicles | | -
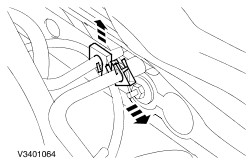
Using the special tool, disconnect the coolant hoses from the heater core. - Disconnect the water drain hose from the water drain channel.
| | | -
Remove the instrument panel.
For additional information, refer to: Instrument Panel (501-12 Instrument Panel and Console, Removal and Installation).
| | | -
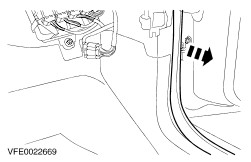
Detach the right-hand door opening weatherstrip from the A-pillar. | | | -
Remove the right-hand cowl side trim panel. | | | -
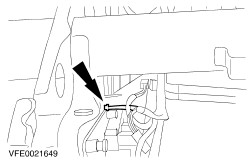
Remove the ground connection retaining bolts. | | | -
Disconnect the main body electrical connector. | | | -
Disconnect the generic electronic module (GEM) electrical connectors. | | | -
Detach the wiring harness from the heater core and evaporator core housing. | | | -
Disconnect the vent actuators electrical connectors. - Unclip the wiring harness.
| | | -
Disconnect the blower motor and blower motor resistor electrical connectors. | | | -
Disconnect the temperature sensor electrical connector. | | | -
Disconnect the parking brake warning light switch electrical connector. | | | -
Disconnect the adaptive restraint module electrical connectors. - Unclip the wiring harness.
| | | -
Disconnect the central junction box (CJB) electrical connectors. | | | -
Remove the windshield air duct. | Vehicles built up to 05/2001 | | -
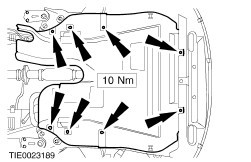
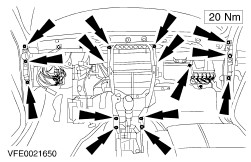
Remove the in-vehicle crossbeam retaining bolts (right-hand side shown). - Remove the blanking caps.
| Vehicles with 2.5L engine | | -
Remove the ignition coil.
For additional information, refer to: Ignition Coil Pack - 2.5L Duratec-VE (VE6) (303-07C Engine Ignition - 2.5L Duratec-VE (VE6)/3.0L Duratec-SE (VE6)/3.0L Duratec-ST (VE6), Removal and Installation).
| All vehicles | | -
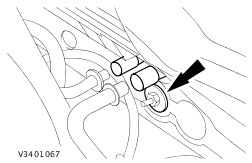
Remove the refrigerant line spring lock coupling locking clips. | CAUTION:Cap the refrigerant lines and the evaporator core to prevent dirt ingress. | | -
Using the special tool, disconnect the left-hand refrigerant line from the evaporator core. - Discard the O-ring seals.
| | | -
Using the special tool, disconnect the right-hand refrigerant line from the evaporator core. - Discard the O-ring seals.
| | | -
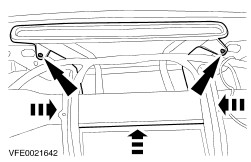
Remove the heater core and evaporator core housing retaining nut. | | | -
Remove the in-vehicle crossbeam. - Unclip the wiring harness.
| | | -
Remove the heater core and evaporator core housing. | Installation | | -
NOTE:Install new refrigerant line O-ring seals. NOTE:Lubricate the refrigerant line O-ring seals with clean refrigerant oil before installation. To install, reverse the removal procedure. | |