| Removal and Installation Draw cord with a minimum length of one meter Removal All vehicles | | -
Disconnect the battery ground cable.
For additional information, refer to: Battery Disconnect and Connect (414-01 Battery, Mounting and Cables, General Procedures).
| | | -
Remove the A-pillar trim panels.
For additional information, refer to: A-Pillar Trim Panel (501-05 Interior Trim and Ornamentation, Removal and Installation).
| | | -
Detach the interior lighting wiring harness from the A-pillar. | | | -
Remove the passenger assist handles. | | | -
Detach the door opening weatherstrips from the B-pillars. | | | -
Move the front safety belt shoulder height adjuster to its lowest position. | | | -
Detach the B-pillar upper trim panels from the B-pillars and position them to one side. - Detach the locating tangs from the B-pillar lower trim panel.
- Remove the screw cover.
- Remove the retaining screw.
| | | -
Remove the sun visor retaining clips. | Vehicles with power roof opening panel | | -
Remove the roof opening panel trim. | All vehicles | | -
Remove the overhead console.
For additional information, refer to: Overhead Console (501-12 Instrument Panel and Console, Removal and Installation).
| Vehicles with auto-dimming interior mirror | | -
Disconnect the interior mirror electrical connector. | Vehicles with power roof opening panel | | -
Partially lower the headliner and disconnect the roof opening panel motor electrical connector (headliner shown removed for clarity). | All vehicles | | -
Detach the rear interior lamp (if equipped). | | | -
Disconnect the electrical connectors and remove the rear interior lamp (if equipped). | Vehicles with power roof opening panel | | -
Pull down on the rear interior lamp opening to detach the headliner spacer glue fixing from the roof panel. | 5-door | | -
Detach the rear door opening weatherstrips from the C-pillars. | | | -
Detach the liftgate opening weatherstrip from the C-pillars. | | | -
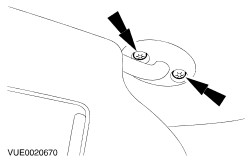
Remove the C-pillar upper trim panel retaining screws. - Remove the blanking plugs and retaining screws.
| | | -
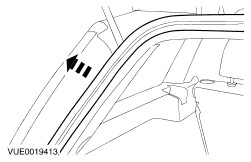
Remove the C-pillar upper trim panels. - Detach the retaining clips.
| 4-door | | -
Detach the rear door opening weatherstrips from the C-pillars. | | | -
Remove the C-pillar lower trim panels (vehicle with trim panel shown, vehicles with seat bolster similar). - Remove the C-pillar lower trim panel retaining screw.
| | | -
Fold down the rear seat backrests. | | | -
Remove the rear seat backrest latch covers. | | | -
Detach the parcel shelf trim panel. | | | -
Detach the C-pillar upper trim panels from the C-pillars and position them to one side. | | | -
Remove the high mounted stoplamp cover. | | | -
Disconnect the high mounted stoplamp electrical connector and remove the high mounted stoplamp. | Wagon | | -
Detach the load space interior lamp. | | | -
Disconnect the electrical connectors and remove the load space interior lamp. | | | -
Detach the liftgate opening weatherstrip. | | | -
Remove the D-pillar trim retaining screws. | | | -
CAUTION:Disconnect the rear window washer tube from the right-hand D-pillar trim panel. Detach the D-pillar trim panel retaining clips and remove the D-pillar trim panels. | | | -
Detach the rear door opening weatherstrip. | | | -
Remove the load space upper trim panel retaining screws and remove the load space upper trim panels. | | | -
Disconnect the power outlet electrical connector on the right-hand load space upper trim panel (if equipped). | | | -
CAUTION:The bolt securing the safety belt anchor is held captive by a paper washer. The bolt, spacer and paper washer must remain on the safety belt anchor at all times when the safety belt is detached or removed. Detach the safety belt upper anchors. - Detach the trim panel.
- Detach the safety belt upper anchors.
| | | -
Remove the C-pillar trim panel. | 5-door and wagon | | -
Remove the headliner retaining clips. | | | -
Disconnect the rear window washer tube from the right-hand A-pillar. | | | -
Disconnect the rear window washer tube from the rear right-hand side of the headliner. | All vehicles | | -
Lower the headliner and support on the seat headrest's. | | | -
CAUTION:Take care not to damage the insulation of the roof wiring harness. CAUTION:The roof wiring harness must be cut off of the headliner and not pulled or ripped. Failure to follow this instruction could result in the incorrect function of electrical components. NOTE:Make a note of the position of the roof harness to ensure that it is installed in exactly the same position as when removed. Using a suitable knife, detach the roof wiring harness from the headliner. | 5-door and wagon | | -
CAUTION:Take care not to damage the rear washer jet tube. CAUTION:The rear washer jet tube must be cut off of the headliner and not pulled or ripped. Failure to follow this instruction could result in damage to the new headliner and incorrect function of the rear washer jet. NOTE:Make a note of the position of the rear washer jet pipe to ensure that it is installed in exactly the same position as when removed. Using a suitable knife, remove the rear washer jet pipe from the headliner. | | | -
Remove the headliner (5-door shown). | 4-door | | -
Recline the front seat backrests to allow removal of the headliner through the passenger door opening. | Installation 4-door | | -
Position the new headliner in the vehicle resting on the seat headrest. | | | -
CAUTION:The roof wiring harness must be installed in the same position as when removed. Using a suitable adhesive, bond the roof wiring harness to the headliner. | 5-door | | -
Position the new headliner in the vehicle resting on the seat headrest. | | | -
CAUTION:The roof wiring harness and rear washer jet tube must be installed in the same position as when removed. Using a suitable adhesive, bond the roof wiring harness and rear washer jet tube to the headliner. | Wagon | | -
Position the new headliner in the vehicle resting on the seat headrest. | | | -
CAUTION:The roof wiring harness and rear washer jet tube must be installed in the same position as when removed. Using a suitable adhesive, bond the roof wiring harness and rear washer jet tube to the headliner. | All vehicles NOTE:Make sure the front safety belt shoulder height adjuster locking control is correctly located on the safety belt shoulder height adjuster. | | -
To install, reverse the removal procedure. | | | -
Initialize the door window motors.
For additional information, refer to: Door Window Motor Initialization (501-11 Glass, Frames and Mechanisms, General Procedures).
| |