| Removal and Installation Audio unit removal tools (GV3301) Removal All vehicles | | -
Remove the floor console side trim panels. - Remove the retaining screw.
- Detach the retaining clips.
| | | -
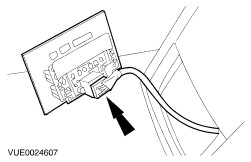
Disconnect the speaker electrical connector (if equipped). | Vehicles with navigation system | | -
CAUTION:When detaching the navigation system display module, do not place excessive strain on the wiring harness. NOTE:When installing the audio removal tools, make sure that the wording on the audio removal tools is followed, TOP L (left-hand) indicates the top of the tool, left-hand side and TOP R (right-hand) indicates the top of the tool, right-hand side. Using the audio unit removal tools, detach the navigation system display module from the instrument panel by approximately 30 mm. | All vehicles | | -
Move the selector lever to the "N" (NEUTRAL) position. | | | -
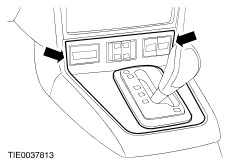
Remove the selector lever trim panel (vehicle with 5-speed automatic transaxle shown). - Using a suitable screwdriver, release the front retaining clips.
| | | -
Remove the floor console trim panel upper retaining screws (vehicle with 5-speed automatic transaxle shown). | | | -
Remove the floor console trim panel retaining screws on both sides. | | | -
Remove the floor console trim panel (right-hand drive shown). - Disconnect the liftgate release switch or luggage compartment lid release switch electrical connector (if equipped).
- Disconnect the heated front seats switch or the climate controlled seats switch electrical connector (if equipped).
| Vehicles with cellular phone | | -
Detach the ashtray and cellular phone holder assembly from the floor console. | | | -
Disconnect the cigar lighter electrical connector. | | | -
Disconnect the cellular phone antenna and electrical connector (navigation system display module shown removed for clarity). | Vehicles without cellular phone | | -
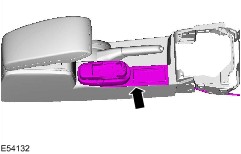
Detach the ashtray and cup holder assembly from the floor console. | | | -
Remove the ashtray and cup holder assembly. - Disconnect the cigar lighter electrical connector.
| All vehicles | | -
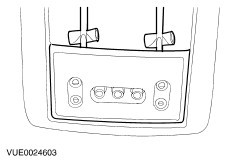
CAUTION:Use a pad between the screwdriver and the surround to prevent damage. Lever out the passenger entertainment control panel (if equipped). | | | -
Disconnect the electrical connector and remove the passenger entertainment control panel (if equipped). | | | -
Detach the floor console from the floor panel. - Remove the retaining screws.
- Remove the retaining bolts.
| | | -
Fully raise the parking brake control lever. | Vehicles with heated rear seat | | -
Disconnect the heated rear seat electrical connectors. | All vehicles | | -
NOTE:Raise the floor console to gain access to the parking brake warning indicator switch electrical connector. Disconnect the parking brake warning indicator switch electrical connector. | | | -
Remove the floor console. | Vehicles with cellular phone | | -
NOTE:This step is only necessary if installing a new floor console. Detach the cellular phone wiring harness from the floor console. - Release the retaining clips.
| | | -
NOTE:This step is only necessary if installing a new floor console. Remove the ashtray and cellular phone holder assembly. | Installation Vehicles with navigation system | | -
Remove the audio unit removal tools from the navigation system display module before attaching the navigation system display module to the instrument panel. | All vehicles | | -
To install, reverse the removal procedure. | Vehicles with power windows | | -
Initialize the door window motors.
For additional information, refer to: Door Window Motor Initialization (501-11 Glass, Frames and Mechanisms, General Procedures).
| |