
Mustang V8-4.6L DOHC (1996)
Impact Sensor: Service and Repair
WARNING: THE ELECTRICAL CIRCUIT NECESSARY FOR SYSTEM DEPLOYMENT IS` POWERED DIRECTLY FROM THE
BATTERY TO AVOID ACCIDENTAL DEPLOYMENT AND POSSIBLE PERSONAL INJURY, THE POSITIVE BATTERY CABLE MUST
BE DISCONNECTED PRIOR TO SERVICING OR REPLACING ANY SYSTEM COMPONENTS.
REMOVAL
1. Record USER 1 and USER 2 preset radio frequencies for reprogramming following completion of service procedure.
2. Disconnect battery ground cable.
3. Remove retaining screws and radiator upper sight shield.
4. Remove Engine Air Cleaner
(ACL) RH side or battery LH side.
5. Disconnect RH/LH primary crash sensor electrical connector and wiring retainer.
6. Remove RH air bag sensor mounting bracket and LH air bag sensor mounting bracket.
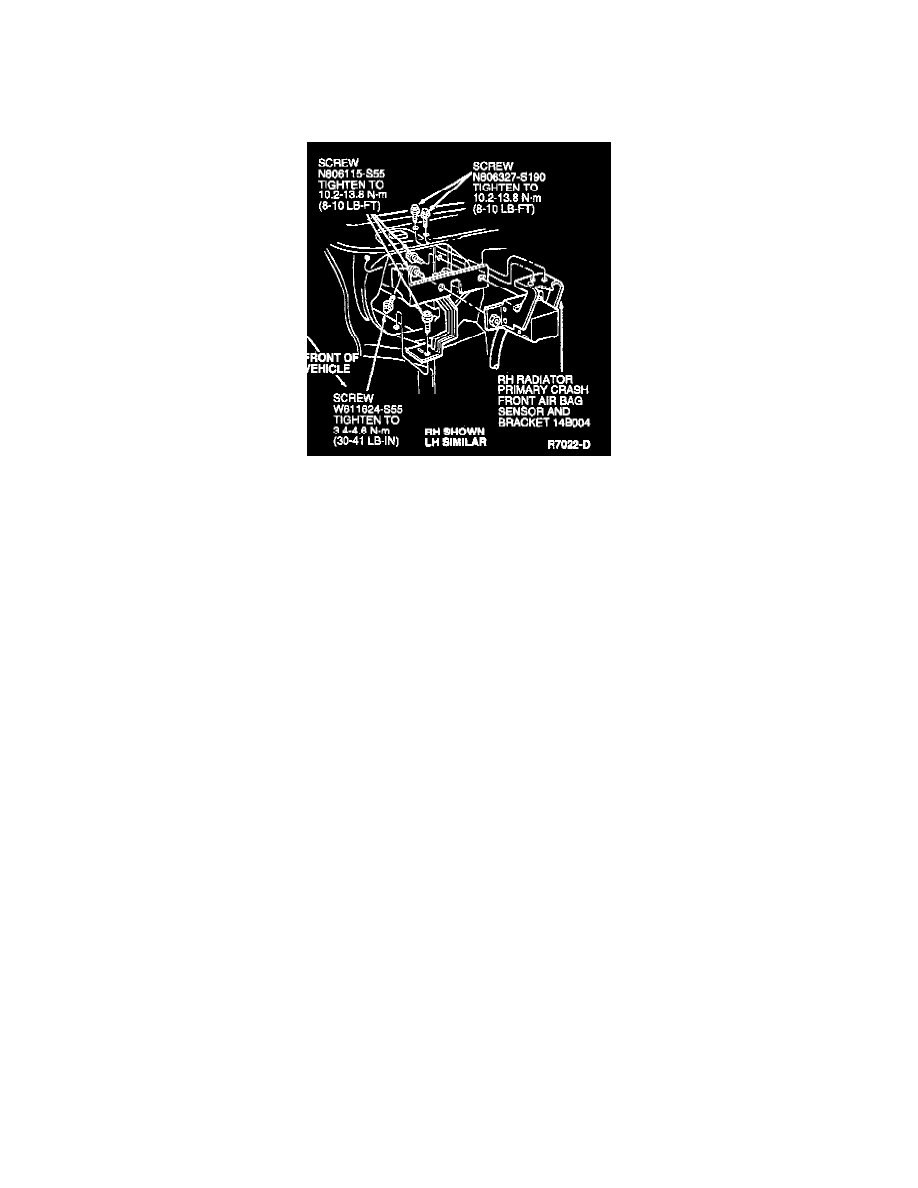
7. Remove four retaining screws and remove RH radiator primary crash front air bag sensor and bracket and LH radiator primary crash front air bag
sensor and bracket.
INSTALLATION
1. Position RH radiator primary crash front air bag sensor and bracket and LH radiator primary crash front air bag sensor and bracket and wire lead
in vehicle and secure sensor to RH and LH radiator support with four retaining screws. Tighten to
10.2-13.8 N.m (8-10 lb-ft).
2. Install RH air bag sensor mounting bracket and LH air bag sensor mounting bracket. Tighten screws to
3.4-4.6 Nm (30-41 lb in).
3. Connect RH and LH front sensor wire lead connector to wiring assembly connector and connect wiring retainers.
4. Install engine air cleaner RH side or battery LH side.
5. Reconnect battery ground cable.
6
7. Prove-out air bag system.
7. Install radiator upper sight shield and retaining screws.
8. Reprogram USER 1 and USER 2 radio frequencies and set clock.