
Mustang GT V8-4.6L SOHC VIN X (1998)
14. Remove two retaining screws and two radiator support upper brackets, tilt radiator out of lower mounts and lift the radiator rearward.
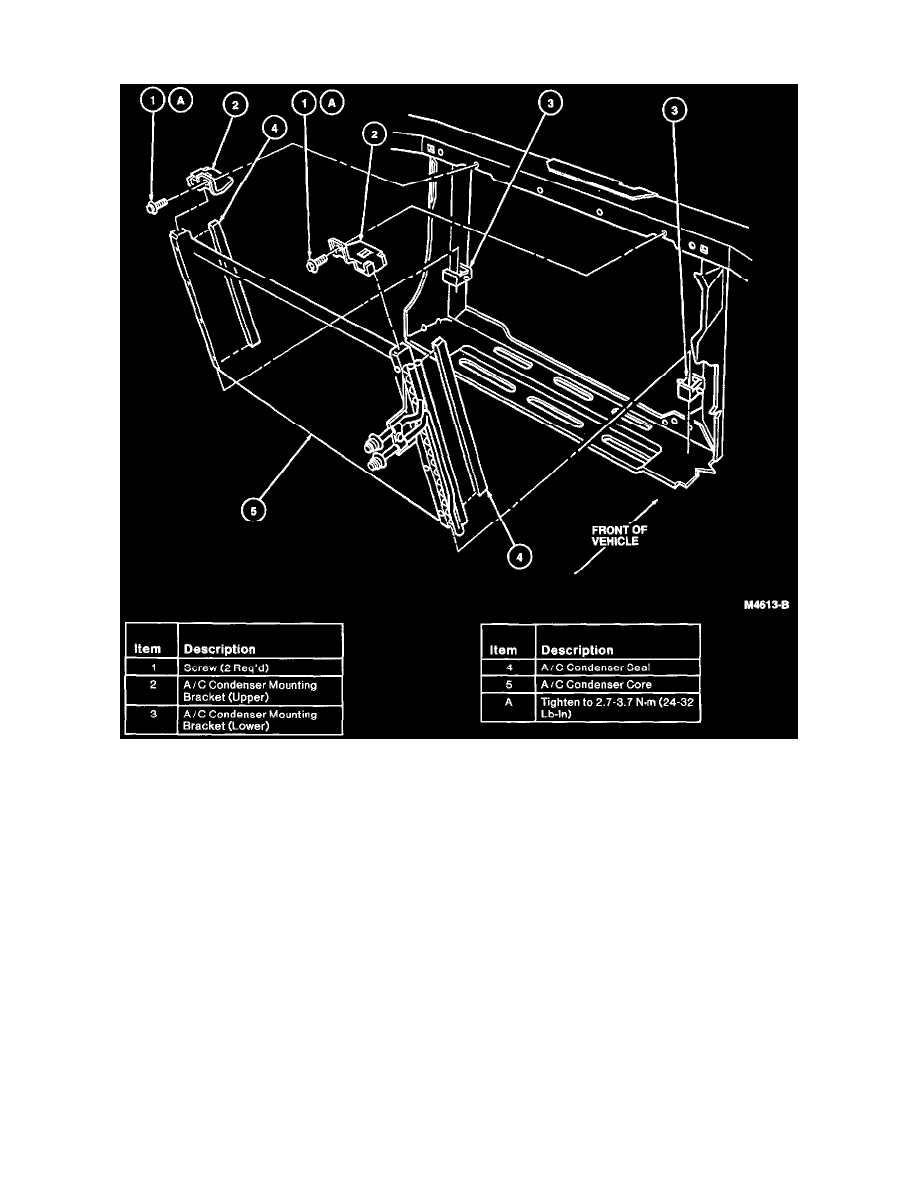
15. Disengage wire harness retainer from upper radiator support and position wire harness on top of upper radiator support.
16. Remove two retaining screws and two A/C condenser mounting brackets from the upper radiator support.
17. Lift the A/C condenser core from the vehicle. Cap the refrigerant lines to prevent entry of dirt and excessive moisture.
INSTALLATION
1. If the A/C condenser core is to be replaced, add 29.5 ml (1 ounce) of clean Motorcraft YN-12b refrigerant oil or equivalent meeting Ford
specification WSH-M1C231B to the new A/C condenser core.
2. Position the A/C condenser core assembly to the vehicle, making sure the lower isolators are properly seated on the two A/C condenser mounting
brackets. Then install the two A/C condenser mounting brackets and two retaining screws. Tighten screws to 2.7-3.7 N.m (24-32 Lb-In).
3. Position the radiator to the radiator support and install the two radiator support upper brackets and retaining screws.
4. Connect the refrigerant lines to the A/C condenser core. Tighten peanut fitting retaining nut to 7-9 N.m (62-79 Lb-In).
5. Position wiring harness under upper radiator support and install wiring harness retainers into radiator support.
6. Install air cleaner housing.
7. Install engine air cleaner housing-to4ront fender apron retaining bolt. Tighten to 7.5-8.5 N.m (67-75 Lb-In).
8. Tighten engine air cleaner tube clamp to 2.3-3.2 N.m (21-28 Lb-In).
9. Connect wire harness to mass air flow sensor.
10. Install cooling fan motor, fan blade and fan shroud to radiator with tour retaining screws. Tighten to 8.0-10.5 N.m (71-92 Lb-In).
11. Connect wire harness connectors to engine cooling fan motor.
12. Install radiator coolant recovery reservoir with two nuts retaining radiator coolant recovery reservoir to upper radiator support and one nut
retaining radiator coolant recovery reservoir to radiator coolant recovery reservoir bracket. Tighten to 4.5-6.3 N.m (40-55 Lb-In).
13. Install battery tray. Tighten screws to 9-14 N.m (80-123 Lb-In).
14. Install battery.
15. Following proper procedures, leak-test, evacuate and charge the system. Observe all safety precautions. See: Service and Repair/Evacuation
16. Install radiator upper sight shield.