| Removal and Installation | | -
CAUTION:Clean away the old sealant before applying the new sealant. CAUTION:Install the differential carrier 10 min. after applying sealant. CAUTION:Allow the sealant to set at least 30 min. after installation before filling the differential with the specified oil. Drain the rear differential oil.
For additional information, refer to: Differential Draining and Filling (205-02 Rear Drive Axle/Differential, General Procedures).
| | | -
Remove the propeller shaft.
For additional information, refer to: Driveshaft - 4x2 (205-01 Driveshaft, Removal and Installation) /
Driveshaft - 4x4 (205-01 Driveshaft, Removal and Installation).
| 3. Remove the components in the order indicated in the following illustration(s) and table(s). 4. To install, reverse the removal procedure. | | -
Add rear differential oil.
For additional information, refer to: Differential Draining and Filling (205-02 Rear Drive Axle/Differential, General Procedures).
| Removal Details Item 1 : Axle shaft and back plate component | | -
Remove the axle shafts.
For additional information, refer to: Rear Halfshaft (205-05 Rear Drive Halfshafts, Removal and Installation).
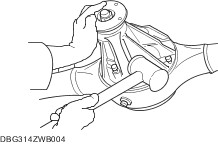
| Item 2 : Rear differential component | | -
To prevent the rear differential from dropping, leave the two bolts loosely tightened, then tap the rear differential carrier using a wooden hammer. | |