| Removal | | -
Disconnect the negative battery cable.
For additional information, refer to: Battery Disconnect and Connect (414-01 Battery, Mounting and Cables, General Procedures).
| | | -
Remove the propeller shaft.
For additional information, refer to: Driveshaft - 4x2 (205-01 Driveshaft, Removal and Installation).
| | | -
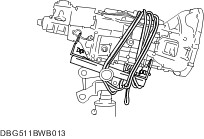
Remove the front pipe and oxidation catalytic converter. For additional information, refer to: (309-00 Exhaust System) Exhaust Downpipe (Removal and Installation), Catalytic Converter (Removal and Installation). | 4. Remove the components in the order indicated in the following illustration(s) and table(s). 4 - Change boot upper plate 12 - Clutch release cylinder 13 - Neutral switch connector 14 - Back-up light switch connector 15 - Vehicle speed sensor connector 19 - Transmission mount rubber 20 - Transmission mount bracket Removal Details Item 16 : Crossmember | | -
WARNING:Remove the transmission carefully, holding it steady. If the transmission falls it could be damaged or cause injury. CAUTION:When removing the transmission, do not move it more than necessary so as to prevent part interference with the body. Support the transmission securely using a transmission jack. | | | -
Set the transmission jack attachment into the concavity of the transmission to prevent the transmission from falling when it is tilted. | | | -
Remove the following parts. - Transmission mount rubber.
| | | -
Remove the transmission installation bolt. | | | -
Remove the transmission. - Move the transmission to the rear.
- Change the inclination of the transmission jack to raise the extension housing side.
- Lower the transmission jack until the transmission does not interfere with the member.
- Repeat Steps (1) to (3) (After Step (3) is completed, a space will be available between the extension housing and member).
| | | -
WARNING:Secure the transmission and transmission jack properly using a rope, otherwise the transmission could fall off, causing damage or injury. Wind a rope around the transmission after it has tilted enough. | |