| General Procedures Special Tool(s) | | Gas Charge Set 49 C061 0A0B | | | Anti-back flow valve 49 C061 012 | | | Gas Leak Tester 49 C061 013 | REFRIGERANT SYSTEM GENERAL PROCEDURES WARNING:Avoid breathing air conditioning refrigerant or lubricant vapor. Exposure may irritate eyes, nose and throat. Also, due to environmental concerns, the use of recovery/recycling/recharging equipment is mandatory when draining R-134a from the air conditioning system. If accidental system discharge occurs, ventilate work area before resuming service. WARNING:Do not perform pressure test or leak test for R-134a service equipment and/or vehicle air conditioning system using compressed air. Some mixtures of air and R-134a have been shown to be combustible at elevated pressures. These mixtures, if ignited, may cause injury or property damage. Additional health and safety information may be obtained from refrigerant manufacturers. WARNING:Do not allow the refrigerant to leak near fire or any kind of heat. A poisonous gas may be generated if the refrigerant gas contacts fire or heat such as from cigarettes and heaters. When carrying out any operation that can cause refrigerant leakage, extinguish or remove the above-mentioned heat sources and maintain adequate ventilation. WARNING:Handling liquid refrigerant is dangerous. A drop of it on the skin can result in localized frostbite. When handling the refrigerant, wear gloves and safety goggles. If refrigerant splashes into the eyes, immediately wash them with clean water and consult a doctor. WARNING:The refrigerant container is highly pressurized. If it is subjected to high heat, it could explode, scattering metal fragments and liquid refrigerant that can seriously injure you. Store the refrigerant at temperatures below 40 °C {104 °F}. CAUTION:If an insufficient refrigerant level is detected at troubleshooting, do not charge (add) the refrigerant. Because an accurate amount of refrigerant cannot be determined from the pressure indicated on the manifold gauge, never charge the refrigerant. If there is too much or too little refrigerant from the refilling, there may be secondary problems such as damage to the refrigerant cycle parts, or a decrease of cooling performance. Therefore, if it is determined that the refrigerant level is insufficient, completely remove refrigerant from the refrigerant cycle and refill with refrigerant to the specified amount. CAUTION:There will be no effect on either performance or quality of A/C-related parts, including but not limited to the piping, etc., provided that said parts are serviced/repaired in accordance with standard procedure. CAUTION:When serviced/repaired A/C units in locations where there is a considerable risk of contamination from dirt or dust, plug up the openings on the parts to prevent dust/dirt from entering. CAUTION:When using adhesive material to cover openings on A/C parts, make sure that the adhesive side of the material does not come in contact with the connectors on the parts. CAUTION:When the system is opened to atmosphere, there is no need to replace the condenser, or the receiver dryer when it is housed within the condenser, provided that the unit is plugged accordingly. CAUTION:Use only FD46XG compressor oil for this vehicle. Using a PAG oil other than FD46XG compressor oil can damage the A/C compressor. CAUTION:Do not spill FD46XG compressor oil on the vehicle. A drop of compressor oil on the vehicle surface can eat away at the paint. If oil gets on the vehicle, wipe it off immediately. CAUTION:FD46XG compressor oil (PAG oil) has a higher moisture absorption efficiency than the previously used mineral oil. If moisture mixes with the compressor oil, the refrigerant system could be damaged. Therefore, install caps immediately after using the compressor oil or removing refrigerant system parts to prevent moisture absorption. | | -
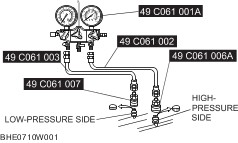
Fully close the valves of the SST (49 C061 001A). | | | -
Connect the SSTs (49 C061 002, 49 C061 003) to the high- and low-pressure side joints of the SST (49 C061 001A). | | | -
Connect the SSTs (49 C061 006A, 49 C061 007) to the ends of the SSTs (49 C061 002, 49 C061 003). | | | -
Connect the SSTs (49 C061 006A, 49 C061 007) to the charging valves. | Recovery | | -
Connect an R-134a recovery/recycling/recharging device to the vehicle and follow the device manufacturer’s instructions | Evacuation | | -
CAUTION:Close the SST (49 C061 001A) valve immediately after stopping the vacuum pump. If the valve is left open, the vacuum pump oil will flow back into the refrigeration cycle and cause a decrease in the efficiency of the air conditioner. Open all the valves of the SST (49 C061 001A). | | | -
Start the vacuum pump and let it operate for 15 min. | | | -
Verify that high- and low-pressure side readings of the SST (49 C061 001A) are at –101 kPa {– 760 mmHg, –29.9 inHg}. Close each valve of the SST (49 C061 001A). | Airtightness Check | | -
Stop the vacuum pump and wait for 5 min. | | | -
Check the high- and low-pressure side readings of the SST (49 C061 001A). - If the reading has changed, inspect for leakage and go to Evacuation.
- If the reading has not changed, go to Charging New R-134a Refrigerant.
| Charging Recycled R-134a Refrigerant | | -
Connect an R-134a recovery/recycling/recharging device to the vehicle and follow the device manufacturer’s instructions. | Charging Preparation | | -
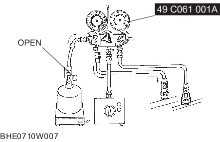
Install the SSTs (49 C061 0A0B). - Connect the tap pin side of the SST (49 C061 004) to the air purge valve of the SST (49C061 001).
- Connect the SST (49 C061 005) to the center joint of the SST (49 C061 001A).
- Connect the SST (49 C061 005) to the vacuum pump.
- Connect the SST (49 C061 004) to the refrigerant tank.
- Place the refrigerant tank on the scale.
| Charging New R-134a Refrigerant WARNING:If the refrigerant system is charged with a large amount of refrigerant when inspecting for gas leakage, and if any leakage should occur, the refrigerant will be released into the atmosphere. In order to prevent the accidental release of refrigerant which can destroy the ozone layer in the stratosphere, follow the proper procedures and charge with only a small amount of refrigerant when inspecting for gas leakage. WARNING:If charging the system with refrigerant using service cans, running the engine with the high-pressure side valve open is dangerous. Pressure within the service cans will increase and the cans could explode, scattering metal fragments and liquid refrigerant that can seriously injure you. Therefore, do not open the high-pressure side valve while the engine is running. CAUTION:Always charge refrigerant from the high-pressure side. If charging is started from the low-pressure side, the vanes of the A/C compressor will not be released and abnormal noise may result. | | -
Open the valve of the refrigerant tank. | | | -
Weigh the refrigerant tank to charge the suitable amount of refrigerant. | | | -
Open the low-pressure side valve of the SST (49 C061 001A). | | | -
When the high-pressure side reading increases to 0.098 MPa {1.0 kgf/cm2, 14 psi}, close the low-pressure side valve of the SST (49 C061 001A). | | | -
Inspect for leakage from the cooler pipe/hose connections using the SST (49 C061 013). - If there is no leakage, go to Step 7.
- If leakage is found at a loose joint, tighten the joint, then go to next step.
| | | -
Inspect for leakage again. - If there is no leakage after tightening the joint, go to next step.
- If there is still a leakage at the same joint, discharge the refrigerant and then repair the joint. Repeat the charging procedure from evacuation.
| | | -
Open the low-pressure side valve of the SST (49 C061 001A) and charge with refrigerant until the weight of refrigerant tank has decreased 250 g {8.83 oz} from the amount in Step 2. | | | -
Close the low-pressure side valve of the SST (49 C061 001A). | | | -
Start the engine and actuate the A/C compressor. | | | -
Open the low-pressure side valve of the SST (49 C061 001A) and charge with refrigerant until the weight of the refrigerant tank has decreased regular amount from the amount in Step 2. | | | -
Close the low-pressure side valve of the SST (49 C061 001A) and the valve of the refrigerant tank. | | | -
Stop the engine and A/C compressor. | |