
Ranger 4WD L4-134 2.2L DSL (1983)
Control Assembly: Technical Service Bulletins
A/C Push Button Control - Light Bulb Replacement
Article No. 83-5-18
AIR CONDITIONING - PUSH BUTTON CONTROL LIGHT BULB REPLACEMENT
LIGHT TRUCKS 1983 RANGER
1983 Rangers with manual A/C heater systems use a small light bulb (D3TZ-13466-B) in the A/C push button to indicate when the A/C is turned on. If
this bulb is burned out, replace it using the following procedure.
Removal
1.
Disconnect battery ground cable.
2.
Remove (pull) the control knobs from the radio shafts (if so equipped).
3.
Remove four screws attaching the top of the cluster finish panel to the upper finish panel pad.
4.
Remove the cigar lighter and the center and left instrument panel trim panels.
5.
Pull the headlamp switch to ON and detach the left instrument panel trim panel enough to allow access to cluster finish panel lower attaching
screw.
6.
Remove four screws attaching the bottom of the cluster finish panel to the instrument panel and lift the cluster finish panel away from the
instrument panel.
7.
Remove four screws attaching the control assembly to the instrument panel.
9.
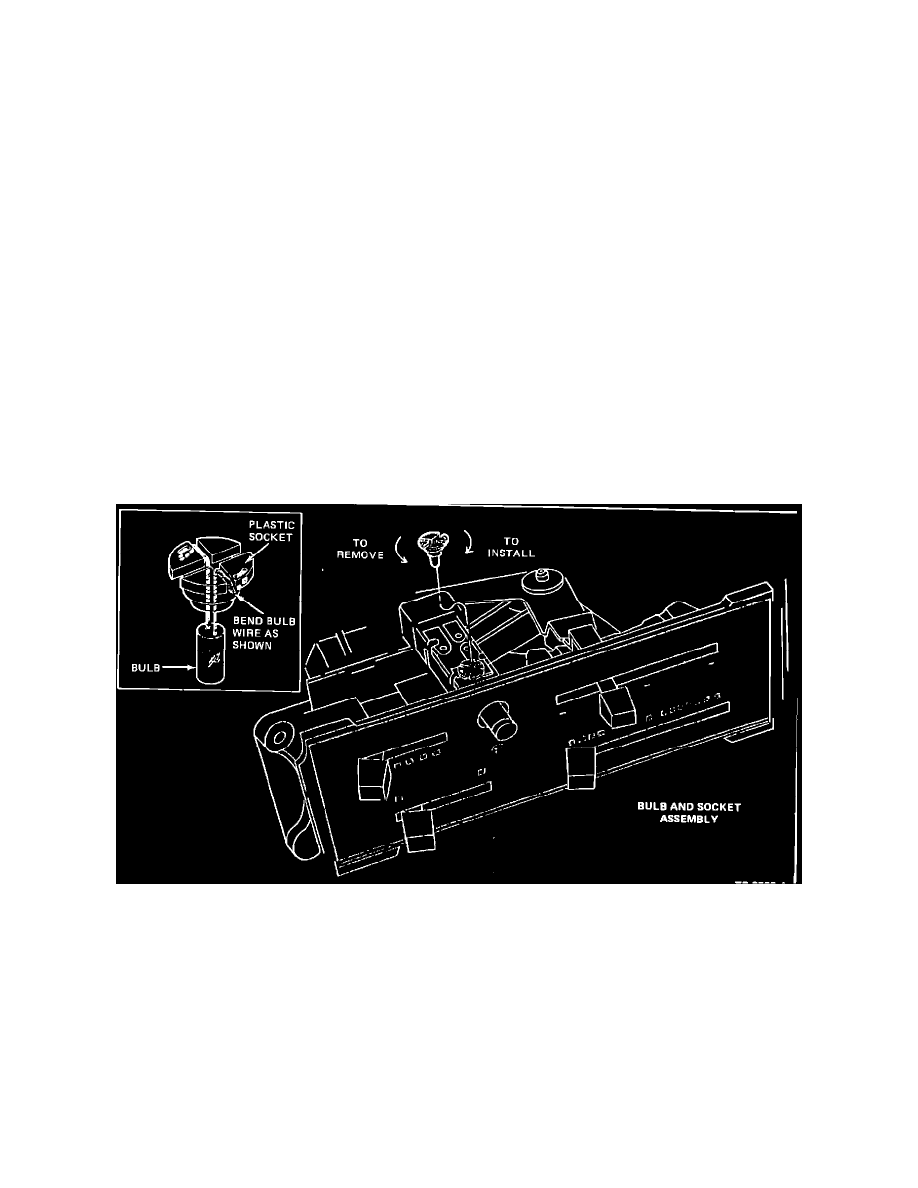
Pull the control assembly out from the instrument panel opening. Then, rotate the bulb plastic base 1/8 turn counterclockwise and lift the bulb
and base from the push button switch.
9.
Note the routing of the bulb wires. Then, unthread the bulb wires from the plastic base.
FIGURE 17
Installation
1.
Assemble the bulb (D3TZ-13466-B) to the plastic base (Figure 17).
2.
Insert the bulb and base in the push button switch and rotate the base and bulb 1/8 turn clockwise to lock the base in the switch.
3.
Position the control assembly into the instrument panel opening and install the four (4) mounting screws.
4.
Install the cluster finish panel with the eight screws (four at the top and four along the lower edge).
5.
Install the instrument panel trim panels by aligning guide pins and snapping retainers into instrument panel attaching holes.
6.
Install the cigar lighter and the radio knobs.
7.
Connect battery ground cable.
8.
Check the A/C-Heater system for proper control assembly operation and verify that the light bulb glows when the A/C push button is
depressed.
PART NUMBER
PART NAME
CLASS