| Removal and Installation Removal | | -
Remove the audio unit. For additional information, refer to Section 415-01 Audio Unit. | | | -
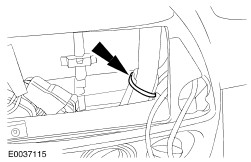
Detach the antenna cable from the cross-vehicle beam support bracket. | | | -
Detach the antenna cable from the clip at the base of the cross-vehicle beam support bracket and pull the antenna cable out from the instrument panel. | | | -
Remove the right-hand seat. For additional information, refer to Section 501-10 Seating. | | | -
Remove the right-hand door scruff plate. - Detach the retaining screw cover.
- Remove the retaining screws.
| | | -
Detach the right-hand floor covering and position it to one side. | | | -
Detach the antenna cable from the right-hand door sill panel. | | | -
Detach the rear bulkhead right-hand trim panel and position it to one side. | | | -
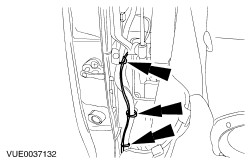
Detach the antenna cable from the rear bulkhead. | | | -
Open the convertible top stowage compartment lid. | | | -
Detach the antenna cable from the wiring harness within the convertible top stowage compartment. | | | -
Detach the trim panel inside the convertible top stowage compartment and position it to one side. | | | -
Remove the convertible top stowage compartment right-hand insulation panel. | | | -
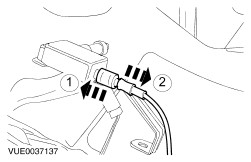
Disconnect the antenna cable from the antenna base (antenna base shown removed for clarity). - Slide and hold the antenna cable retaining clip towards the antenna base.
- Disconnect the antenna cable.
| | | -
Remove the antenna cable. | Installation | | -
NOTE:Install new cable ties. To install, reverse the removal procedure. | | |