ford Workshop Repair Guides

Ford Workshop Service and Repair Manuals

Seat Latch Striker > < Rear Seat Cushion Cover
Seating - Front Seat Backrest Cover—Vehicles With: Side Air Bags Streetka 2003.5 (01/2003-07/2005)
Removal and Installation

Removal

  1. Detach the plastic retaining strip from the base of the backrest.

  1. NOTE:
    NOTE:Some seat trim options have an additional plastic retaining strip on the rear of the backrest.
    Detach the plastic retaining strip from the rear of the backrest (if equipped).

  1. Roll the seat cover up the backrest.

  1. Detach the lower end of the left and right-hand lateral tension rods.
  1. Roll the cover up the backrest.

  1. WARNING:
    WARNING:Do not re-use the plastic retaining rivet. Always use the new retaining rivet from the service kit. Failure to follow this warning could impair the air bag deployment and may result in personal injury.
    Remove the side air bag module deployment sleeve retainer.
    • Remove the black plastic production rivet and discard.

  1. WARNING:
    WARNING:Do not attempt to separate the plastic retaining strips in any other way than that detailed. Failure to follow this warning could impair the air bag deployment and may result in personal injury.
    Slide apart the plastic retaining strips securing the side air bag deployment sleeve.

  1. Detach the upper end of the left and right-hand lateral tension rods.

  1. Remove the head restraint.
    1. Depress the clips.
    1. Lift the head restraint.

  1. Remove the head restraint guides.
    1. Using a suitable screwdriver, release the locking tang.
    1. Lift the head restraint guide out of the backrest frame.

  1. Detach the backrest tip cables from the seat frame.
    1. Detach the backrest tip cable outer from the seat frame.
    1. Detach the backrest tip cable inner from the seat frame.

  1. Detach the backrest tip cable from the tip lever housing.
    1. Lift the release lever.
    1. Detach the backrest tip cable inner.

  1. Detach the backrest tip lever housing.
    1. Using a suitable screwdriver, release the locking tang.
    1. Lift the housing from the backrest frame.

  1. Remove the backrest tip lever housing.
  1. Detach the backrest cover from the front of the foam pad.
    • Detach the hook loop tape.

  1. Remove the cover.
    • Detach the upper plastic retaining strip on the rear of the backrest.

  1. NOTE:
    NOTE:Note the position of the anti-squeak mat to aid assembly.
    Remove the foam pad.

Installation

  1. WARNING:
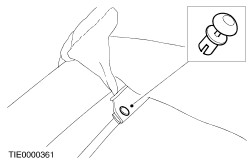
    WARNING:Use the new retaining rivet from the service kit to secure the side air bag deployment sleeve retainer. Failure to follow this warning could impair the air bag deployment and may result in personal injury.
    NOTE:
    NOTE:The anti-squeak mat is available as a one size service part which should be cut to match the mat it is replacing.
    NOTE:
    NOTE:If a new backrest foam pad is to be installed the foam pad must be cut to facilitate the installation of the tip lever mechanism. Use the existing foam pad as a template.
    To install, reverse the removal procedure.
    • Use hog ring plies to close the hog rings. Do not use any other tool. The hog rings must be closed to overlap 8 mm as illustrated.

Seat Latch Striker > < Rear Seat Cushion Cover