Taurus V6-183 3.0L VIN U FI (1993)

wire 13 mm (1/2 inch) from connector. Splice on new wire with correct terminal end obtained from switch + B3 kit, F8DZ-11654-FA. Install
terminal into B3 terminal slot of connector.
11.
Connect new headlamp switch to its electrical connector, then install headlamp switch.
12.
Install instrument panel cluster opening finish panel.
13.
Position gearshift selector in Park position and release parking brake.
14.
Install headlamp switch retaining nut, then install the headlamp switch knob.
15.
Install knee bolster.
16.
Connect battery negative cable, then remove memory saver.
17.
Check operation of headlamp switch.
Section 2: Headlamp Switch Electrical Connector Replacement
CONTINENTAL (HARNESS KIT PART # F80Z-11654-AA)
1.
Remove headlamp switch connector from the wire harness by cutting the wires 1/2 inch (13 mm) from the connector. Discard the old connector.
2.
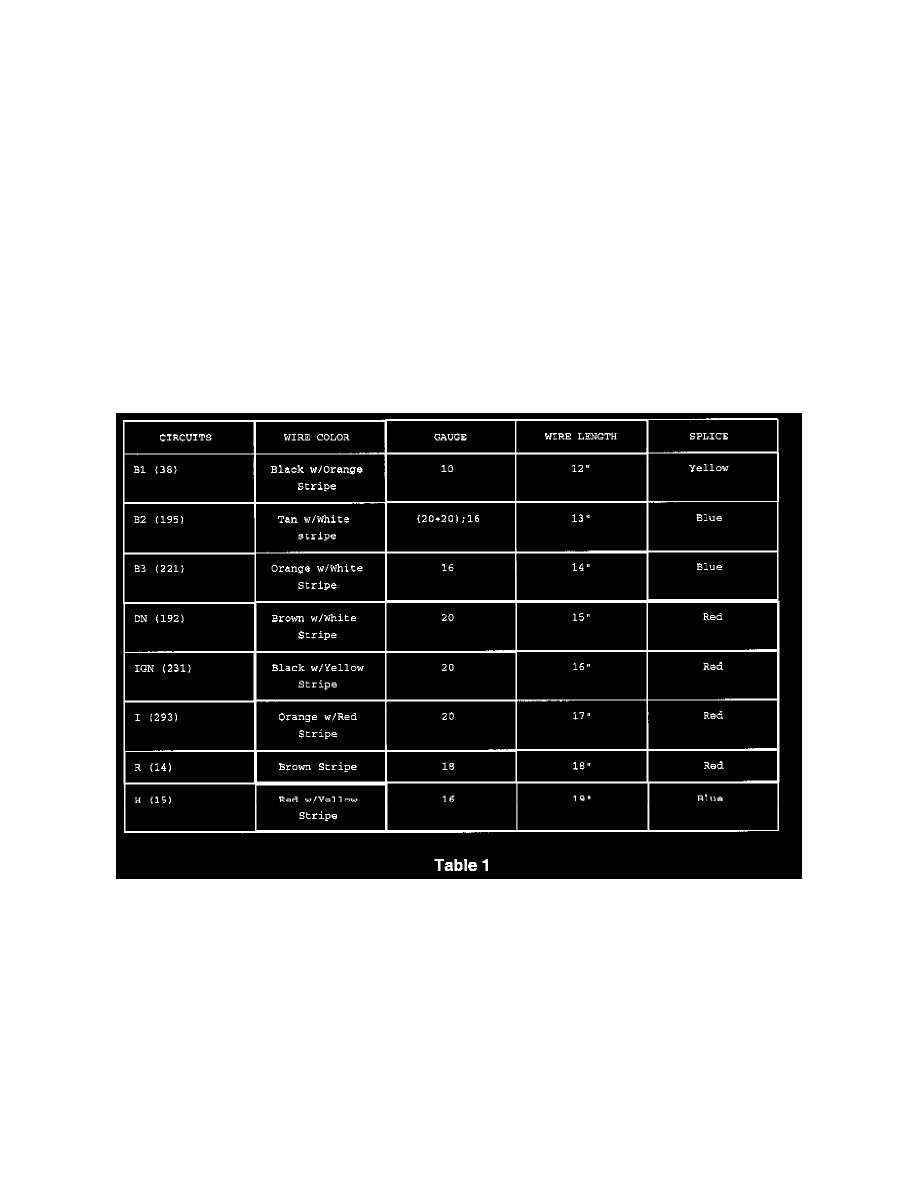
Refer to the table for wire color codes and splices to be used.
NOTE:
CIRCUIT B2 (195), WIRE HARNESS (WIRE COLOR: TAN W/WHITE STRIPE) WILL HAVE A DOUBLE CRIMP (20 + 20 GAUGE). THIS
SHOULD BE SPLICED (BLUE SPLICE) WITH A SINGLE CRIMP (16 GAUGE; WIRE COLOR: TAN W/WHITE STRIPE).
3.
Strip wires 0.5 inch (7.6 mm), then insert each wire into correct crimp barrel.
4.
Using Crimp Tool (AD-1522), crimp all wires.
5.
Heat splice with heat gun until tubing shrinks and adhesive flows from each end.
6.
Temporarily connect new headlamp switch and install knob.
7.
Connect battery negative cable.
