
Taurus V6-195 3.2L DOHC SHO (1994)
Clutch: Service and Repair
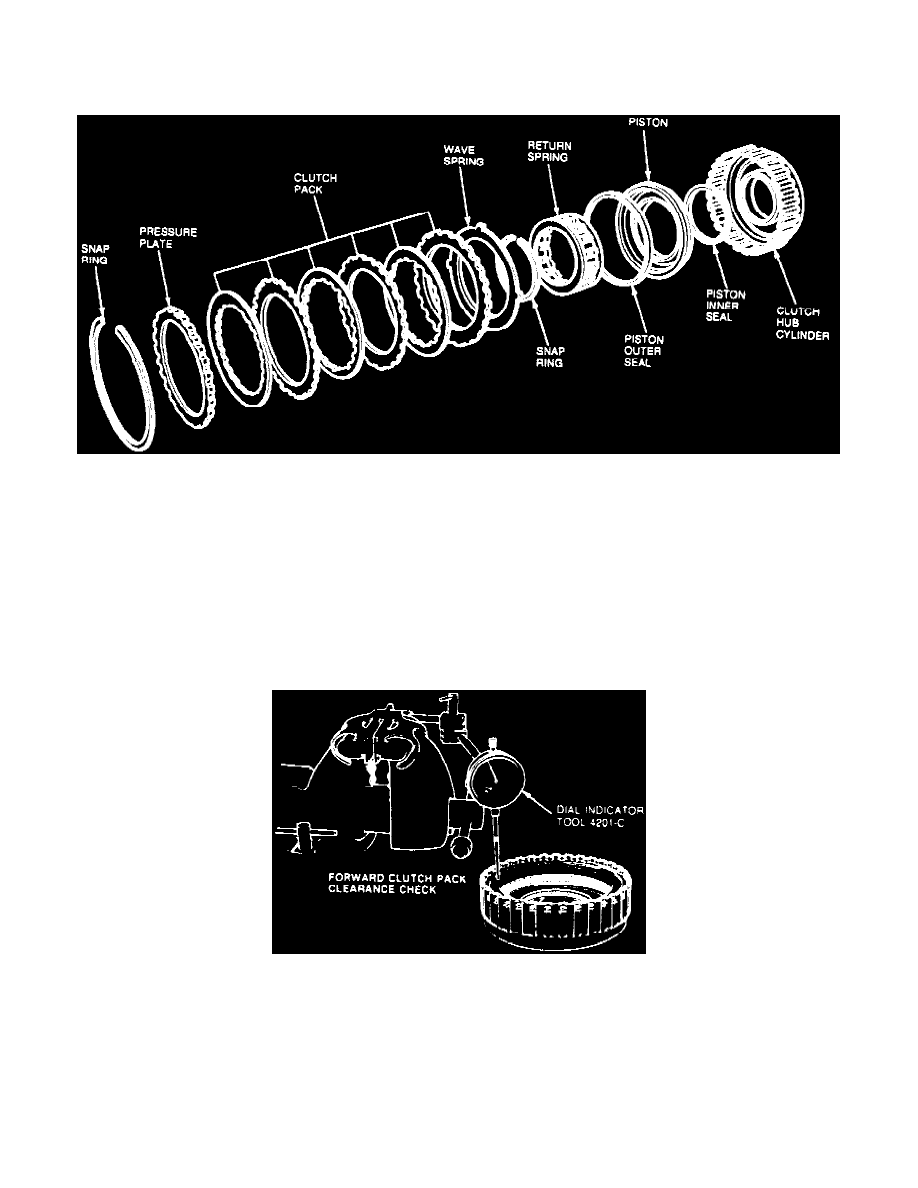
Forward Clutch
DISASSEMBLE
Forward Clutch Assembly
1. Remove snap ring, pressure plate, clutch pack, and wave spring.
2. Remove return spring snap ring and return spring using clutch spring compressor tool No. T65L-77515-A or equivalent.
3. Remove piston assembly from hub, then the piston inner and outer seals.
ASSEMBLE
1. Install inner and outer piston seals with lip seal facing toward bottom of cylinder, as shown in the Forward Clutch Assembly image.
2. Install piston assembly using clutch seal lip protector tool No. T86P-70548-A or equivalent.
3. Install return spring and return spring snap ring using clutch spring compressor T65L-77515-A or equivalent.
4. Install wave spring, clutch pack, pressure plate, and snap ring.
5. Check forward clutch pack clearance as follows:
Measuring Forward Clutch Pack Clearance
a. Install suitable dial indicator as shown in the Forward Clutch Pack Clearance Measurement image.
b. Push downward on clutch pack with at least 10 lbs of force, then release pressure and zero dial indicator.
c. Lift pressure plate to bottom of snap ring and note indicator reading.
d. Take two readings 180° apart and determine average of both readings.
e. The clearance should be 0.072-0.052 inch. If clearance is not within specifications, replace select snap ring. Select snap rings are available in
the following inch thicknesses: 0.049-0.053, 0.063-0.067, 0.077-0.081, 0.091-0.094, and 0.104-0.108 inch.
f.
After installing correct snap ring, recheck clearance.