
Taurus V6-3.0L DOHC VIN S (2000)
6
DO NOT PLACE THE DRIVER OR PASSENGER AIR BAG MODULE WITH THE TRIM COVER OR DEPLOYMENT DOOR FACING
DOWN, AS THE FORCES OF THE DEPLOYING AIR BAG COULD CAUSE IT TO RICOCHET AND CAUSE PERSONAL INJURY.
1. Remove the side air bag from the vehicle.
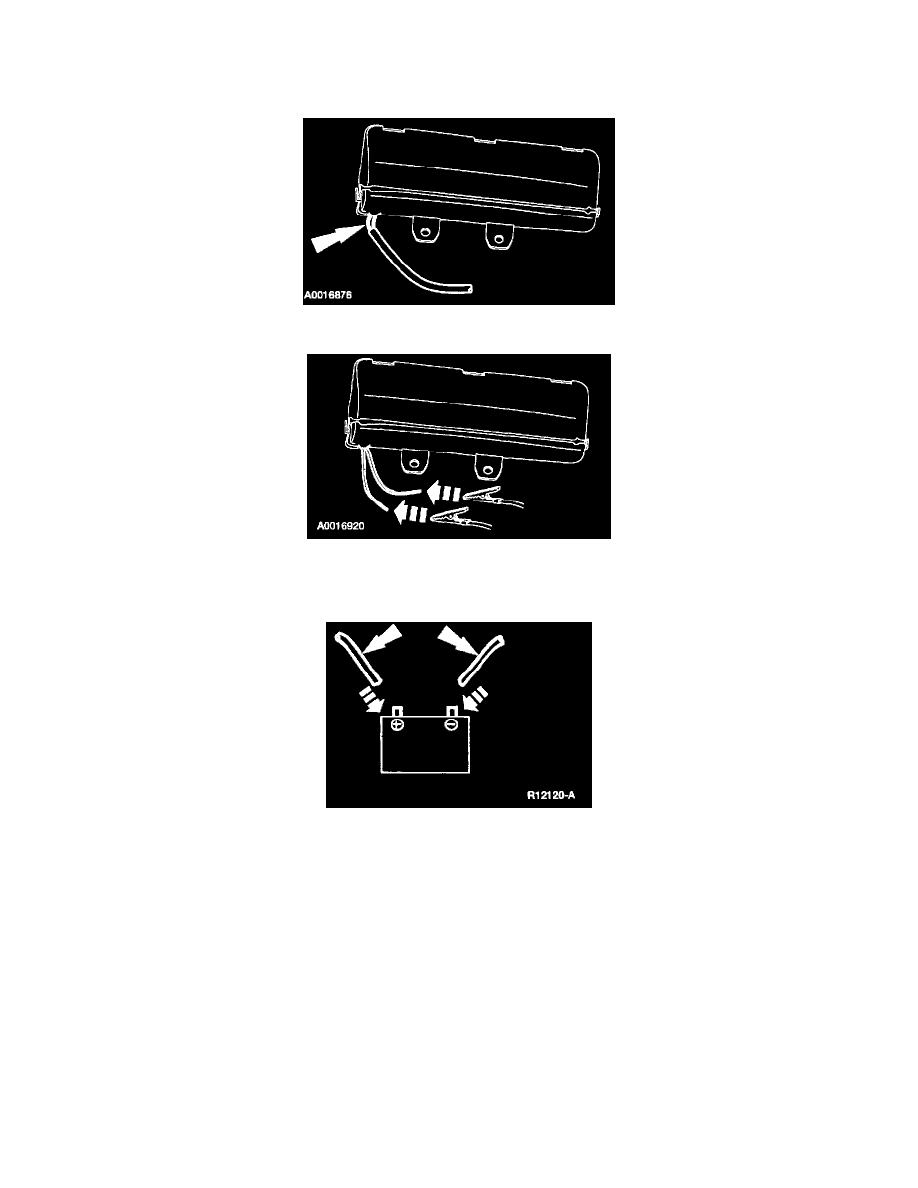
2. Cut and strip the wires.
3. Obtain two wires (20 gauge minimum) at least 6.1 meters (20 feet) long and attach one end of each wire to stripped ends of the side air bag wires.
4. Place the air bag module on a flat surface in an open outdoor area.
5. Remain at least 6.1 meters (20 feet) away from the air bag module.
6. Deploy the air bag module by touching the other ends of the two wires to the terminals of a 12-volt battery.
7. To allow for cooling, wait at least ten minutes before approaching the deployed air bag.
8. Dispose of the deployed air bag module in the same manner as any other part to be scrapped.
"J" Nut, Restraints Control Module (RCM) and Side Crash Sensor
WARNING: TO AVOID ACCIDENTAL DEPLOYMENT AND POSSIBLE PERSONAL INJURY, THE BACKUP POWER SUPPLY MUST
BE DEPLETED BEFORE REPAIRING OR REPLACING ANY FRONT OR SIDE AIR BAG SUPPLEMENTAL RESTRAINT SYSTEM
(SRS) COMPONENTS AND BEFORE SERVICING, REPLACING, ADJUSTING OR STRIKING COMPONENTS NEAR THE FRONT OR
SIDE AIR BAG SENSORS, SUCH AS DOORS, INSTRUMENT PANEL, CONSOLE, DOOR LATCHES, STRIKERS, SEATS AND HOOD
LATCHES.
DETERMINE LOCATION OF THE FRONT AIR BAG SENSORS.
THE SIDE AIR BAG SENSORS ARE LOCATED AT OR NEAR THE BASE OF THE B-PILLAR.
TO DEPLETE THE BACKUP POWER SUPPLY ENERGY, DISCONNECT THE BATTERY GROUND CABLE AND WAIT AT LEAST
ONE MINUTE. BE SURE TO DISCONNECT AUXILIARY BATTERIES AND POWER SUPPLIES (IF EQUIPPED).
NOTE:
^
There are two procedures to repair a vehicle having missing air bag crash sensor attaching weld nut(s). Read both this procedures and Weld Nut
Repair-Missing Weld Nut, Restraints Control Module (RCM) and Side Crash Sensor before proceeding with the repair.