
Thunderbird V6-232 3.8L SC (1989)
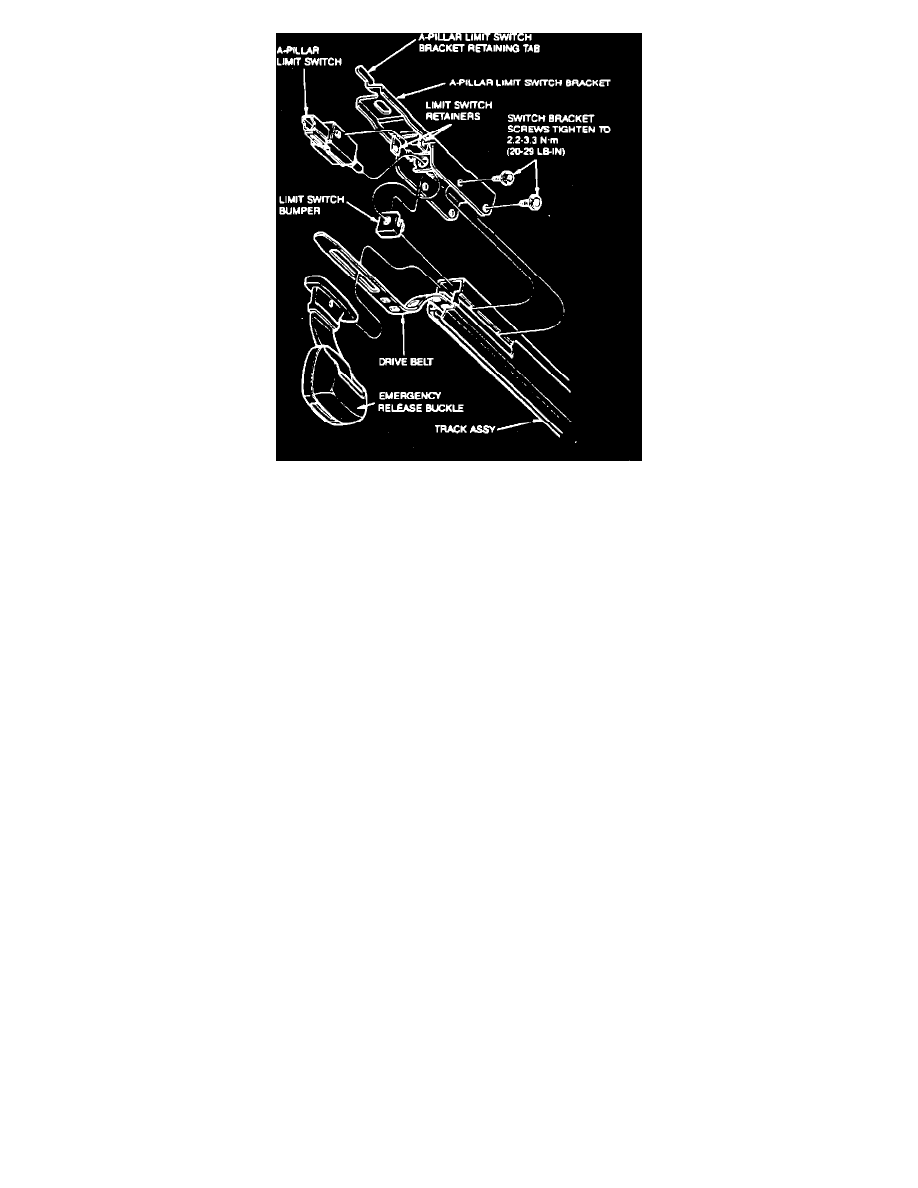
14. Remove the two screws retaining the "A" pillar limit switch bracket to the track assembly.
15. Gently slide the buckle assembly forward out of the track assembly.
16. Remove the buckle assembly from the drive belt.
INSTALLATION
1. Insert drive belt at the front of the track assembly. Prior to drive belt installation, lubricate the track using E7FZ-19590-A or equivalent lubricant.
2. Install the buckle assembly into the large slot at the front end of the drive belt.
3. Slide the drive belt and buckle assembly into the track assembly far enough to allow the installation of the "A" pillar limit switch and bracket
assembly.
4. Secure the switch and bracket using the two previously removed screws.
5. Install the drive belt into the vertical guide.
6. Rotate the thumb wheel on the motor clockwise to feed the drive belt through the motor guide and into the lower guide.
7. Rotate the track assembly downward at the rear and position the retaining tab on the "A" pillar limit switch bracket into the forward hole in the
"A" pillar. Then, rotate the track assembly upward.
8. Engage the vertical guide retaining tab into the "B" pillar bracket. Then, install but do not tighten the previously removed screw and bolts used to
secure the track assembly to the roof rail and "A" pillar.
9. Secure the "B" pillar bracket to the "B" pillar using the previously removed bolts. Tighten the bolts to 22-33 Nm (17-24 lb-ft).
10. Tighten the "A" pillar limit switch attachment to 2.2-3.3 Nm (20-29 lb-in).
11. Tighten the two bolts retaining the track assembly to the roof rail to 4.5-7.0 Nm (40-62 lb-in).
12. Install and tighten the bolt retaining the vertical guide to the quarter panel inner sheet metal to 4.5-7.0 Nm (40-62 lb-in).
13. Connect the electrical connectors at the "A" and "B" pillar limit switches.
14. Install the quarter trim panel and the "A" pillar garnish mouldings.
15. Cycle the mini buckle to the "B" pillar position.
16. Insert the tongue of the shoulder belt into the mini buckle. Make sure there is no twist in the belt (the belt should lay flat against the seat back).
17. Cycle the restraint system a few times to ensure the system operates properly.
Shoulder Belt Retractor Switch