
Thunderbird V6-232 3.8L SC (1989)
INSTALLATION
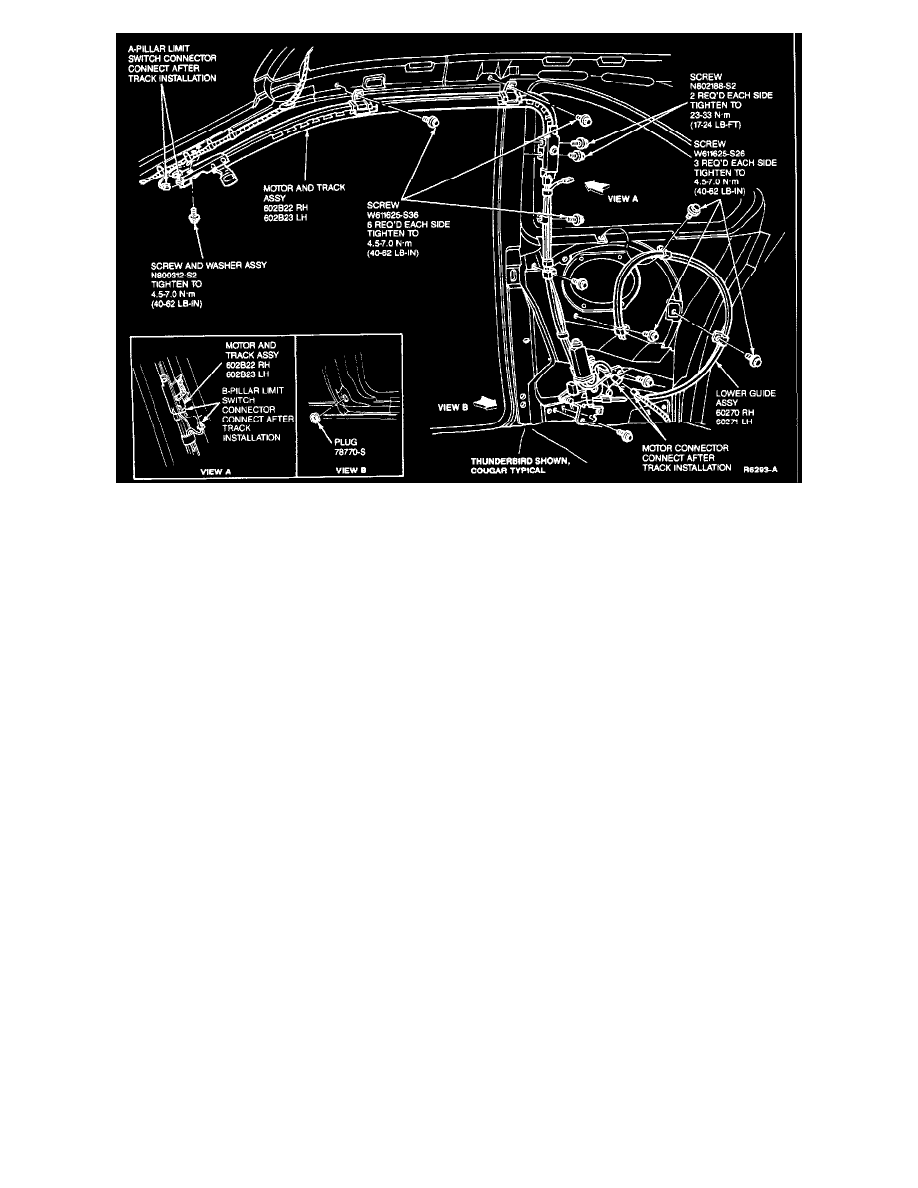
1. Position the retaining tab on the "A" pillar limit switch bracket into the forward hole in the "A" pillar. Then rotate the track assembly upward.
2. Install but do not tighten the previously removed screw and bolts used to secure the track assembly to the roof rail and the "A" pillar.
3. Secure the "B" pillar bracket to the "B" pillar using the previously removed bolts. Tighten the bolts to 23-33 Nm (17-24 lb-ft).
4. Tighten the "A" pillar limit switch attachment to 2.2-3.3 Nm (20-29 lb-in).
5. Tighten the two bolts retaining the track assembly to the roof rail to 4.5-7.0 Nm (40-62 lb-in).
6. Engage the locating tab on the motor bracket into the slot in the quarter panel inner sheet metal. Then, install the two motor attaching bolts and
tighten the bolts to 4.5-7.0 Nm (40- 62 lb-in).
7. Engage the vertical guide retaining tab into the "B" pillar bracket. Then, secure the guide to the quarter panel inner sheet metal using the two
previously removed bolts. Tighten the bolts to 4.5-7.0 Nm (40-62 lb-in).
8. Secure the lower belt guide to the quarter inner panel using the three previously removed bolts. Tighten the bolts to 4.5-7.0 Nm (40-62 lb-in).
9. Connect the electrical connectors at the "A" pillar limit switch and at the motor.
10. Install the quarter trim panel and the "A" pillar garnish mouldings.
11. Cycle the mini buckle to the "B" pillar position.
12. Insert the tongue of the shoulder belt into the mini buckle. Make sure there is no twist in the belt (the belt should lay flat against the seat back).
13. Cycle the restraint system a few times to ensure the system operates properly.