
Thunderbird V6-232 3.8L SC (1989)
1.
Remove relay/timer assembly from under LH side of instrument panel, by rotating the ' assembly 90 degrees.
2.
Disconnect electrical connector and remove assembly.
3.
To install, reverse Steps 1 and 2.
Window
Disconnect wire leads at each end of the glass. Remove window. Refer to Section 43-11.
1989 Mustang
36-86-4
Window, Rear-Defroster
36-86-4
MAJOR SERVICE OPERATIONS
Grid Wire Repair
NOTE:
A single break or any breaks that total more an 25 mm (1 inch) in one grid cannot be repaired. The window must be replaced. For breaks less
than 25 mm (1 inch) tong, use the following procedure:
NOTE:
If the first layer of the heated rear window grid (brown color) is damaged or missing, it will be necessary to apply brown Acrylic Lacquer
Touch-Up Paint AL81-5477-B (ESR-M2P100-B) or equivalent on the glass prior to applying the silver Rear Window Defroster Repair
D8AZ-19562-AA (ESB-M4J58-A) or equivalent. Inoperative grid wires on heated rear windows should be repaired by using Rear Window
Defroster Repair D8AZ-19562-AA (ESB-M4J58-A) or equivalent.
Surface Preparation
1.
The vehicle should be brought inside and permitted to come to room temperature of 16~C (60~F) or above.
2.
Clean the entire grid line service area with Ultra Clear Spray Glass Cleaner D4AZ-19C507-AA (ESR-M14P5-A) or equivalent to remove all dirt,
wax, grease, oil or other foreign matter. It is important that the repair area be clean and dry.
CAUTION: Do not use scrapers, sharp instruments, or abrasive cleaners on the interior surface of the rear window, as this may cause damage to
the grid lines.
Mixing The bottle of Rear Window Defroster Repair D8AZ- 19562-AA (ESB-M4J58-A) or equivalent and touchup paint (if needed) must be at room
temperature. Shake bottle for at least one minute for thorough mixing. Shake frequently during use.
Application
1.
Mark location of break on the outside of the window.
2.
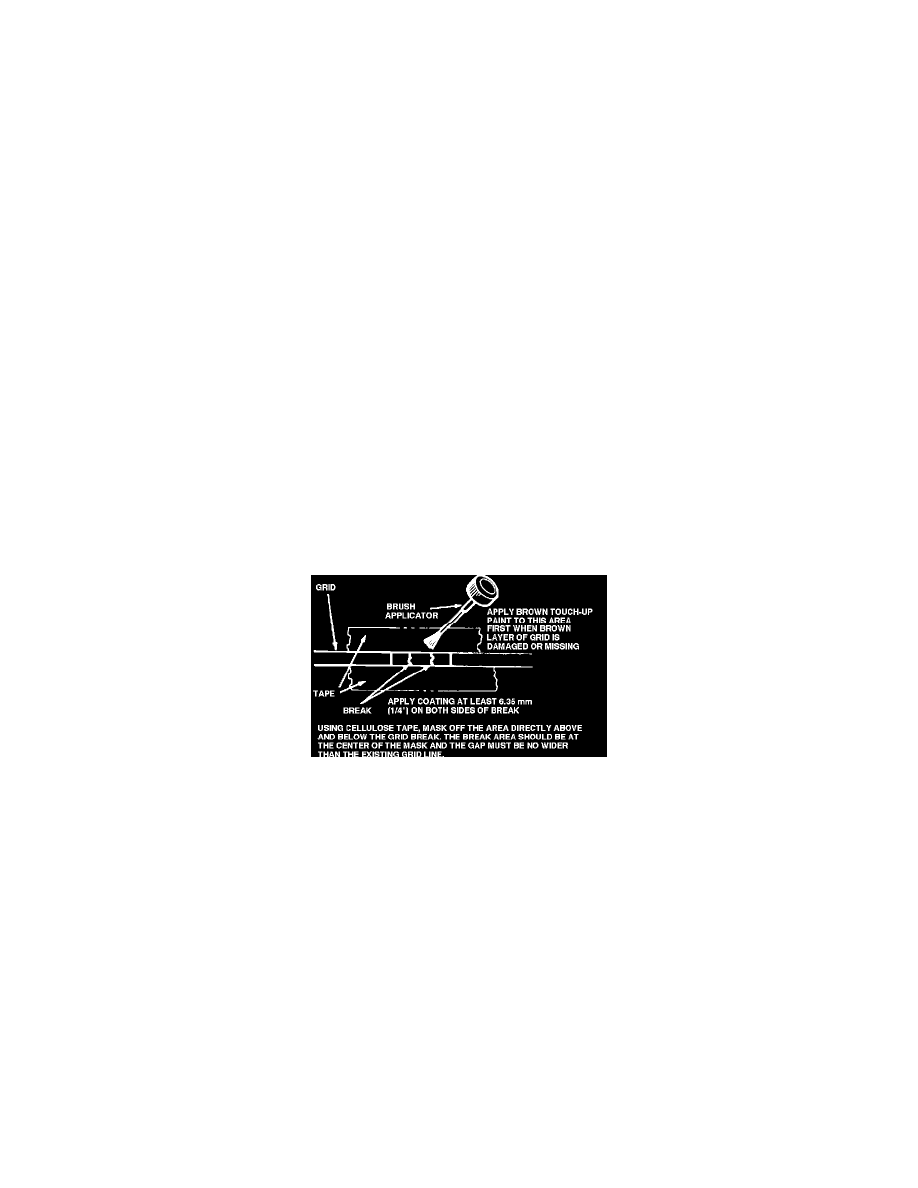
Using cellulose tape, mask off the area directly above and below grid break. The break area should be at the center of mask, and tape gap must be
no wider than the existing grid line.
3.
Apply the repair coating in several smooth continuous strokes (allowing three to five minutes drying time between coats) across the break area
using the brush applicator in the cap. Extend the service coating at least 6.35 mm (1/4 inch) on both sides of the break area. If both brown and
silver layers of the grid are broken or missing, apply a coating of the brown touch-up paint across the break area first. Two coats may be necessary
to obtain the proper color. Allow the touch-up paint to dry, then apply three coats of silver grid repair compound allowing three to five minutes
drying time between coats. The coating of the silver grid repair compound should extend at least 6.35 mm (1/4 inch) on both sides of the break
area.
4.
Allow to dry for five minutes, then remove the mask.
5.
After removing the mask, check the outside appearance of the grid repair. If the silver repair compound is visible above or below the grid, this
excess should be removed. This can be done by placing a single-edge razor blade on the glass parallel to grid and scrape gently towards grid.
CAUTION: Be careful not to damage grid line with the razor blade.
Curing The service coating will air dry in approximately one minute and can be energized within three minutes. Optimum hardness and adhesion occurs
after approximately 24 hours. At that time, the serviced area may be cleaned with a mild window cleaner.