
K 1500 Suburban 4WD V8-5.7L VIN R (1997)
Leading/Trailing Drum Brake
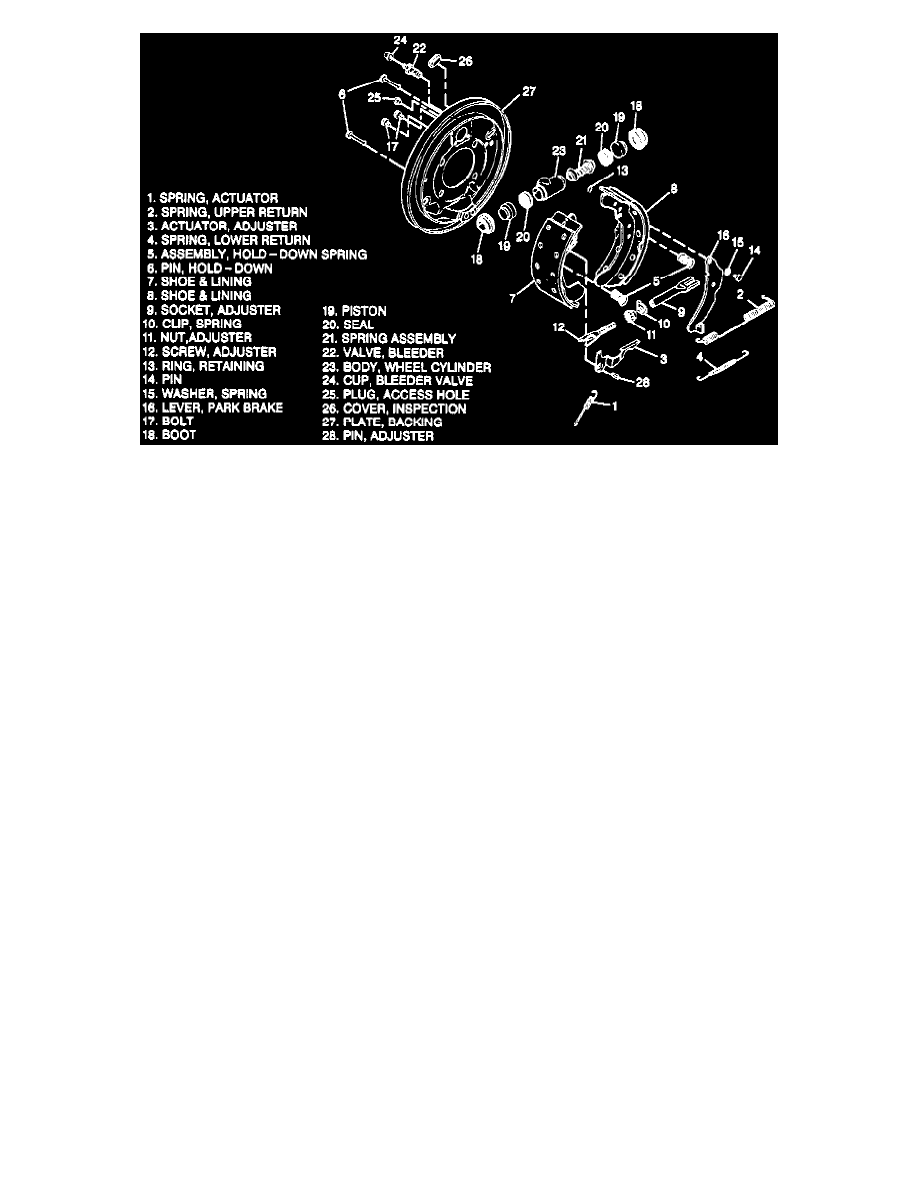
1. Parking brake lever (16) spring washer (15) pin (14) and retaining ring (13).
^
The concave side of the spring washer should face the parking brake lever.
2. Adjuster pin (28) in the shoe (7) so the pin projects 6.8 to 7.0 mm (0.268 to 0.276 inch) from the side of the shoe web where the adjuster actuator
is installed.
3. Brake lubricant GM P/N 5450032 or equivalent to the threads of the adjuster screw (12) and inside diameter and face of the socket (9).
^
Adequate lubrication is achieved when there is a continuous bead of lubricate at the open end of the adjuster nut (11) and socket (9) when the
threads are fully engaged.
4. Upper return spring (2).
a. Lay the shoes (7 and 8) on a clean flat work surface in the position they will be in when installed on the backing plate.
b. The shoe with the parking brake lever goes to the rear of the vehicle.
CAUTION: Do not over-stretch the upper return spring. Damage can occur if it is stretched to more than 204.2 mm (8.04 inches).
5. Adjusting screw assembly.
^
The adjusting screw assembly should engage the adjuster shoe (8) and parking brake lever (16) respectively.
^
Make sure the spring clip (10) faces the backing.
6. Lubricate the shoe pads on the backing plate with a thin coat of white lithium grease.
7. Shoe and lining assemblies (7 and 8) upper return spring (2) and adjusting screw assembly.
a. Be careful not to damage the wheel cylinder boots.
b. Overlap the bottoms of the shoes so the upper shoe ends clear the wheel cylinder boots.
c. Make sure the upper shoe ends rest on the wheel cylinder piston ends.
d. Do not place the lower shoe web ends under the anchor plate until the lower return spring is installed.
CAUTION: Do not overstretch the lower return spring. Damage can occur if it is stretched to more than 107.3 mm (4.22 inches).
8. Lower return spring (4).
a. Bring the ends of the shoe and lining assemblies (7 and 8) together over the anchor plate.
b. Hook the spring ends to the shoe web holes.
c. Spread the lower ends of the shoe and lining assemblies to clear the anchor plate.
d. Position the shoes against the backing plate and release them.
e. Pull the spring into the groove at the bottom of the anchor plate.
9. Hold-down pins (6) and spring assemblies (5).
10. Adjuster actuator (3) over the end of the adjuster pin (28) so the top leg engages the notch in the adjuster screw.
CAUTION: Do not overstretch the actuator spring (1). Damage can occur if it is stretched to more than 83 mm (3.27 inches).
11. Actuator spring.
^
Make sure the free end of the adjuster-actuator (3) engages the notch of the adjuster nut.