
K 1500 Truck 4WD V8-4.8L VIN V (1999)
10.
Remove and transfer the outer tie rod ends to the revised steering gear.
Tighten
Tighten the tie rod end jam nuts to 68 Nm (50 lb ft).
11.
Remove the two long bolts that retain the rack using a pry bar to slightly move the position of the anti-sway bar. This will allow removal of the
steering rack retaining bolts through the crossmember.
12.
Remove the undercoating from around the left side rack and pinion mount with solvent.
13.
Lightly grind the area around the left mount.
^
Extend the grinding area to at least a 101 mm (4 in) area around the left side rack mounting point.
^
Remove all underbody coating around the reinforcement plate in order to obtain the strongest weld possible. In addition, some area around the
reinforcement must be cleared of undercoating in order to prevent the possibility of the coating "flashing".
Caution:
The underbody coating on the frame will burn if exposed to the extreme heat of welding. The coating may ignite and/or flash suddenly. Avoid direct
contact of the welding torch to the underbody coating. Always remove the coating so that sufficient area is free of coating for the welding operation
to be preformed without risk of igniting the coating. Avoid inhalation of fumes from any over-heated or burning underbody coating
14.
In order to obtain an effective weld for this repair, you must follow the welding pattern diagram. The most effective way of welding this
reinforcement is to quickly tack the three sides of the reinforcement first. This method will keep all sides of the reinforcement in contact with the
frame crossmember throughout the welding operation. If one whole side of the reinforcement is welded without first tacking the edges, the patch
may warp. If the reinforcement plate warps, it will be difficult to obtain as accurate a weld. A warned reinforcement plate will also increase the
size of the gap that must be sealed later in this procedure.
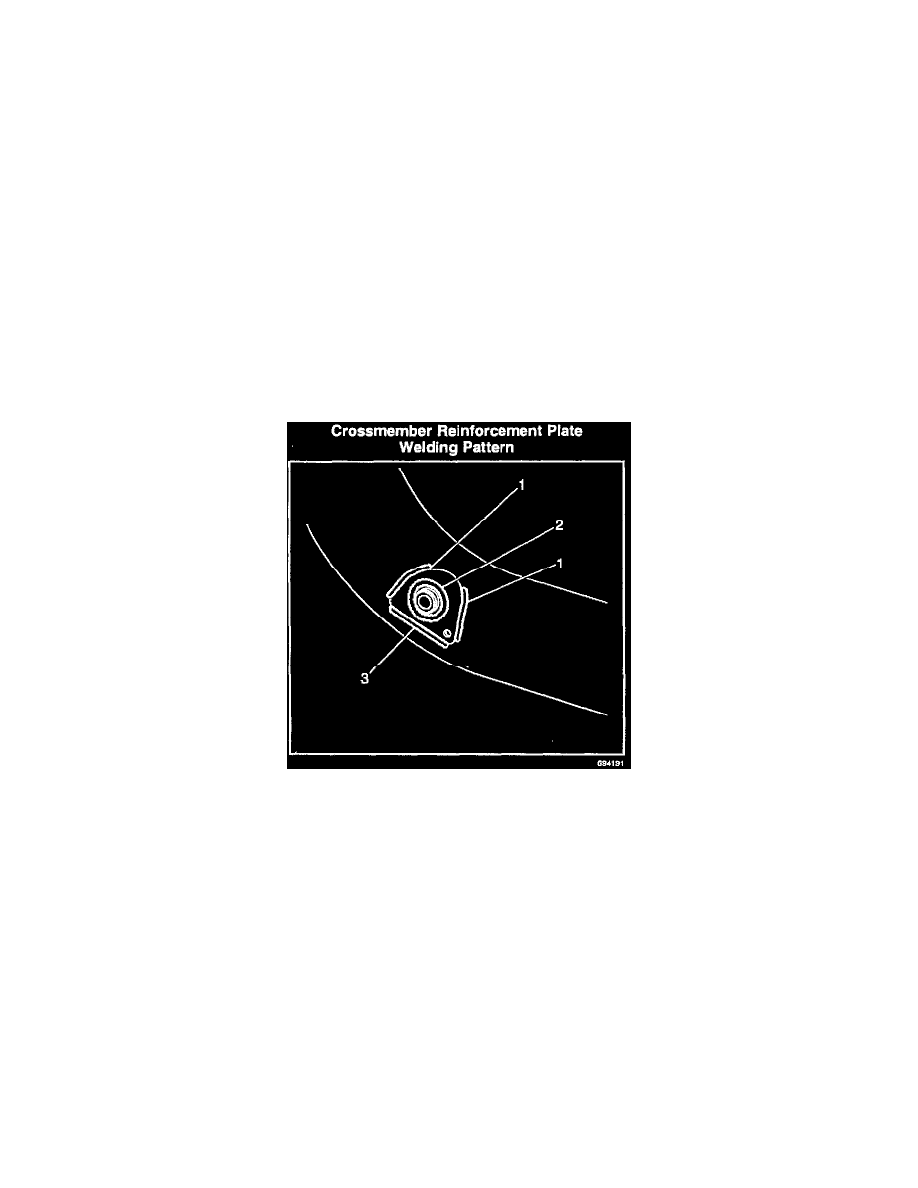
15.
The finished weld must consist of four welded beads. Two beads along the side of the reinforcement (1) must be 80 mm (3.20 in). The bead along
the lower edge (3) must be at least 90 mm (3.60 in). The final weld (2) should be a continuous bead around the center of the reinforcement to the
mounting post on the crossmember. A correct weld bead should measure 120 mm (4.80 in) around the post. Let the weld area cool.
16.
Coat the reinforcement plate and the bare portion of the frame crossmember with a self-etching primer. Allow the primer to flash off its solvent.
Important:
It is essential that a primer coating and effective seal be created around the reinforcement. This creates a corrosion barrier for the mating surface of
the plate and frame crossmember.
17.
Apply a heavy-bodied seam sealer, such as 3M Ultrapro Autobody Sealant (P/N 08302) or equivalent, to all edges of the reinforcement. The P/N
for the 3M Sealer is for a clear style. Any color is acceptable for this repair. Create a seal along the edges and around the center mount coming
through the plate. A good seal will prevent moisture from accumulating between the frame crossmember and the back side of the welded
reinforcement.