
K 3500 Truck 4WD V8-6.6L DSL Turbo VIN 1 (2001)
4. Install the master cylinder.
5. Release the parking brake.
6. Bleed the brakes.
Master Cylinder Reservoir Filling
Master Cylinder Reservoir Filling
Notice: When adding fluid to the brake master cylinder reservoir, use only Delco Supreme 110 (GM P/N 12377967) or equivalent DOT-3 brake fluid
from a clean, sealed brake fluid container. The use of any type of fluid other than the recommended type of brake fluid, may cause contamination
which could result in damage to the internal rubber seals and/or rubber linings of hydraulic brake system components.
Notice: Refer to Brake Fluid Effects on Paint and Electrical Components Notice in Service Precautions.
1. Visually inspect the brake fluid level through the brake master cylinder reservoir.
2. If the brake fluid level is at or below the half-full point during routine fluid checks, the brake system should be inspected for wear and possible
brake fluid leaks.
3. If the brake fluid level is at or below the half-full point during routine fluid checks, and an inspection of the brake system did not reveal wear or
brake fluid leaks, the brake fluid may be topped-off up to the maximum-fill level.
4. If brake system service was just completed, the brake fluid may be topped-off up to the maximum-fill level.
5. If the brake fluid level is above the half-full point, adding brake fluid is not recommended under normal conditions.
6. If brake fluid is to be added to the master cylinder reservoir, clean the outside of the reservoir on and around the reservoir cap prior to removing
the cap and diaphragm. Use only Delco Supreme 110 (GM P/N 12377967) or equivalent DOT-3 brake fluid from a clean, sealed brake fluid
container.
Overhaul
Master Cylinder Overhaul
Disassembly Procedure
1. Remove the brake master cylinder from the vehicle.
2. Secure the mounting flange of the brake master cylinder in a bench vise so that the rear of the primary piston is accessible.
3. Clean the outside of the master cylinder reservoir on and around the reservoir cap prior to removing the cap and diaphragm.
4. Remove the reservoir cap and diaphragm from the reservoir.
5. Inspect the reservoir cap and diaphragm for the following conditions. If any of these conditions are present, replace the affected component(s).
^
Cuts or cracks
^
Nicks or deformation
6. Remove the master cylinder reservoir from the master cylinder.
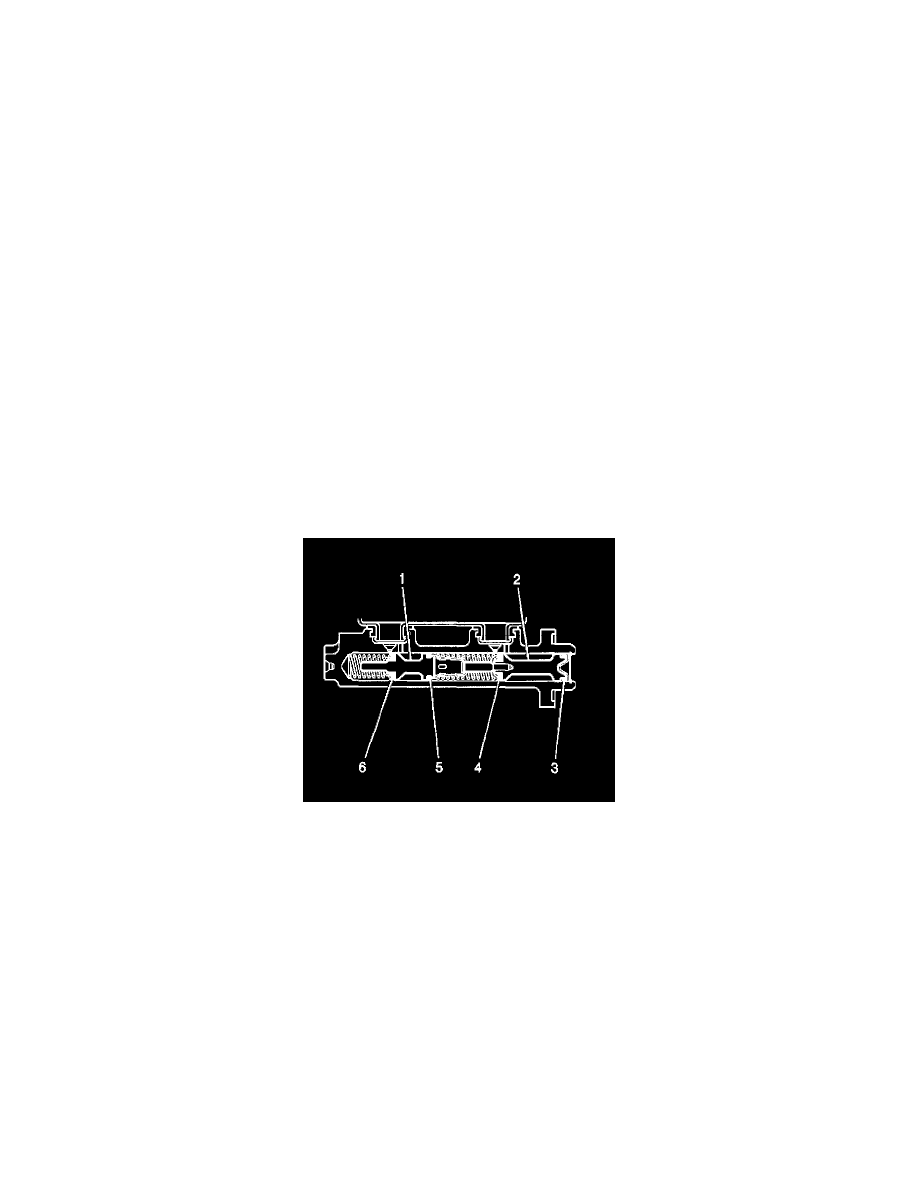
7. Using a smooth, round-ended tool, depress the primary piston (2) and remove the piston retainer.
8. Remove the primary piston assembly from the cylinder bore.
9. Plug the cylinder inlet ports and the rear outlet port. Apply low pressure, non-lubricated, filtered air into the front outlet port, in order the remove
the secondary piston (1) with the primary (6) and secondary (5) seals, and the return spring.
10. Discard the primary piston assembly, the piston retainer, and the seals and seal retainer from the secondary piston.
Assembly Procedure
Important: Do not use abrasives to clean the brake master cylinder bore.