
Sierra 2500 Denali 2WD V8-6.0L (2011)
Items Required
*
DuraSeal splice sleeves to crimp and seal connections
*
High temperature SCT1 shrink tubing to protect the splice sleeves
*
Terminated leads or pigtails
*
The correct tools to remove the terminals from the connectors
Use high temperature bulk wire rated at 150°C (302°F) continuous temperature of the same or larger gauge size as the original wire when repair damage
wire. Also replace any reflective tape that you remove during the repair.
High Temperature Wiring
Wiring that is exposed to high temperatures, 135°C (275°F) or higher, for prolonged periods of time may use materials i.e. wires, connectors, and
shielding that has a higher heat rating than typical wiring. When making a repair in a high temperature area observe the following:
*
Use high temperature bulk wire rated at 150°C (302°F) continuous temperature to replace any damaged wire.
*
Replace any heat shielding that is removed.
*
Cover any DuraSeal splice sleeves with SCT1 shrink tubing.
*
After making a wiring repair, ensure that the location of the wiring is not moved closer to the heat source.
Identifying High Temperature Wiring
Note: High temperature areas would be areas located near exhaust manifolds, catalytic converters, exhaust pipes, and turbocharged engines.
Wiring that is exposed to high temperature, 135°C (275°F) or higher, for prolonged periods of time need special considerations when making wiring
repairs. Areas that may be exposed to higher temperatures can be identified by heat resistant materials that are being used in those areas. These materials
may include heat reflective tape, moon tape, and high temperature shrink tubing. Also conduit and other protective coverings may be used. Because
conduit or similar coverings are used throughout the vehicle regardless of the temperature, it may be necessary for the technician to determine if an area
is exposed to excessive heat before making a wiring repair.
Repairing Damaged Wire Insulation
Repairing Damaged Wire Insulation
Danger: In order to reduce the risk of personal injury, loss of high voltage isolation to ground and higher system impedance, do not attempt to
repair any HV wiring, connector, or terminal that is damaged. High voltage coaxial type cables are not repairable. Never attempt to repair a
coaxial type cable. The entire cable/harness or component must be replaced. In order to maintain system integrity and personal safety, never
attempt to repair any high voltage wiring, cables, or terminals. Performing this procedure on high voltage circuits may result in serious injury
or death.
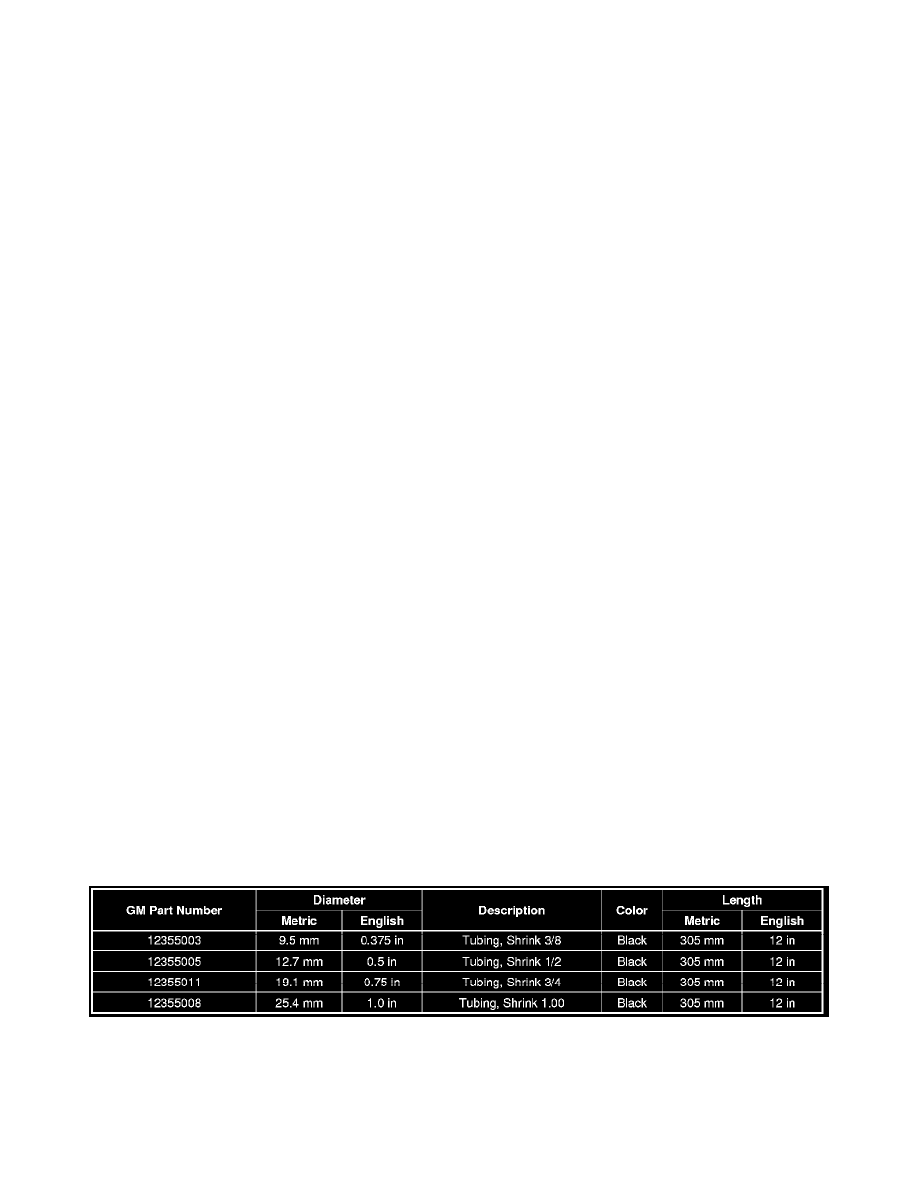
If the wire insulation has been chafed, or broken, enough to show the conductive portion of the wire, and the wire is not damaged, determine the length
of insulation that needs to be repaired. If the repair is less than 280 mm (11 in), cut the wire within the damaged area. Than slide the appropriate heat
shrink tubing (listed below) over the wire, and repair the wire by splicing the wires together. Refer to Splicing Copper Wire Using Splice Sleeves (See:
Testing and Inspection/Component Tests and General Diagnostics/General Electrical Diagnostic Procedures/Wiring Repairs/Splicing Copper Wire
Using Splice Sleeves). Once the wire is spliced together slide heat shrink tubing over the damaged area and apply heat to seal the repaired wire.
If the wire is damaged, or the damaged area is larger than 280 mm (11 in), than replace the damaged wire by splicing in a new section of wire. Refer to
Splicing Copper Wire Using Splice Sleeves (See: Testing and Inspection/Component Tests and General Diagnostics/General Electrical Diagnostic
Procedures/Wiring Repairs/Splicing Copper Wire Using Splice Sleeves).