
Accord L4-1829cc 1.8L SOHC ES, ET FI (1985)
Brake Shoe: Service and Repair
Mark installation position of all components prior to removal to ensure proper assembly. Components that are to be reused should be installed in
original position.
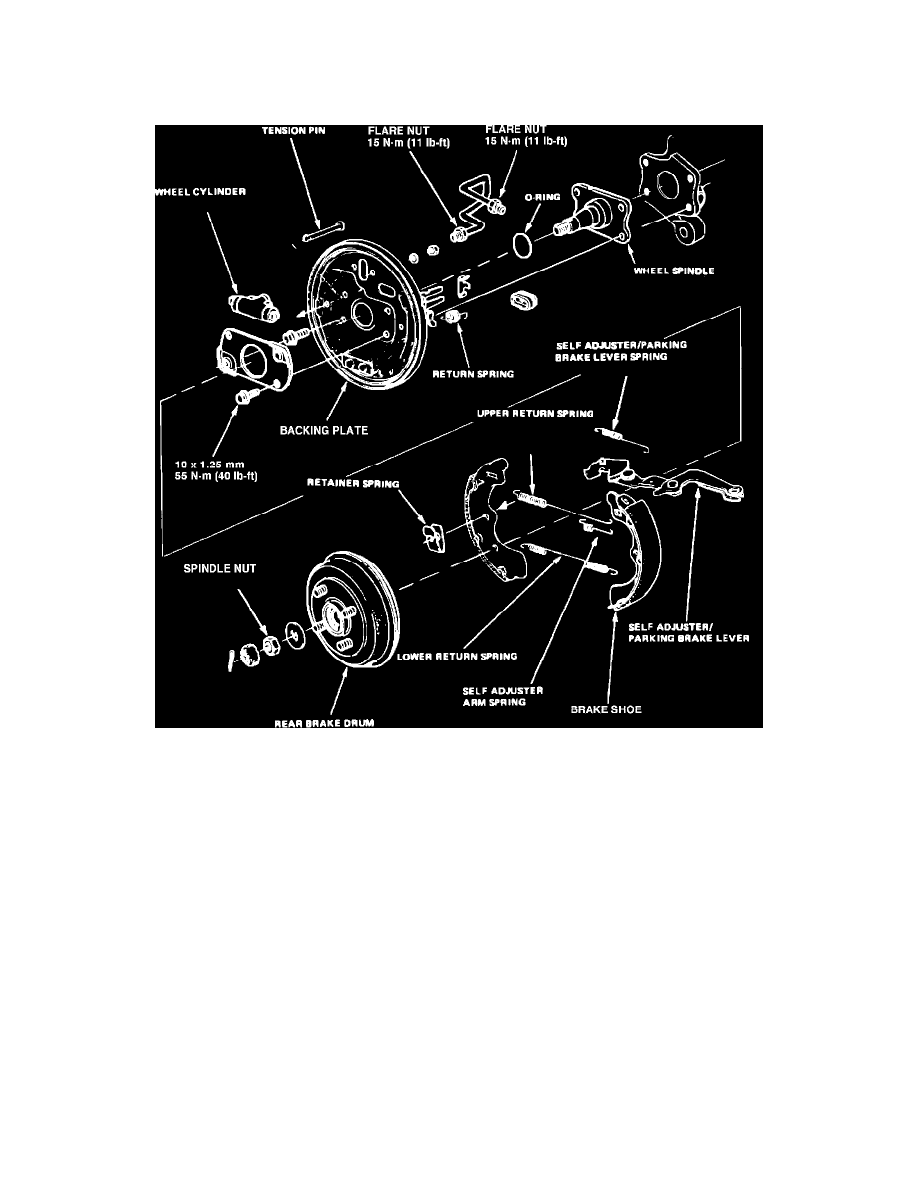
Fig. 1 Rear drum brake assembly exploded view. 1984-88 Civic & CRX & 1987-88 Accord (1984-86 Accord similar)
1.
Raise and support rear of vehicle and remove wheels.
2.
Fully loosen parking brake equalizer adjusting nut.
3.
Remove rear wheel bearing cap and seal, cotter pin and pin holder, rear axle washer and spindle nut.
4.
Remove brake drum and hub assembly, taking care not to drop wheel bearings.
5.
Compress each retainer spring, Fig. 1, rotate spring until slot is aligned with tension pin, then remove retainer spring and tension pin.
6.
Lower brake shoes and pull assembly away from backing plate, disconnect parking brake cable from lever and remove brake shoe assembly.
7.
Remove return springs noting installation position, then separate brake shoes.
8.
Remove self-adjuster bolt, lever and spring.
9.
Pry off circlip securing parking brake lever, then remove washer, pivot pin and lever.
10.
Disassemble and clean self adjuster bolt and clevis assembly, inspect all components and replace any that are damaged, weakened or excessively
worn.
11.
Lubricate friction surfaces of self adjuster bolt, screw bolt into clevis A until bottomed, then install clevis B, Fig. 1. Do not tighten adjuster bolt
into clevis.
12.
Insert pivot pin outside of leading shoe, then install parking brake lever, washer and new circlip on inside of shoe.
13.
Ensure circlip is seated in pivot pin groove, then squeeze ends of circlip together with pliers.
14.
Install adjuster lever on trailing shoe, then connect adjuster spring, first to adjuster lever then to brake shoe.