
CR-V LX 2WD L4-1972cc 2.0L DOHC MFI (1998)
Air Bag: Service and Repair
Airbag Assembly Disposal and Deployment
Damaged Airbag/Tensioner Special Procedure
WARNING: If an airbag (or Seat Belt Tensioner) cannot be deployed, it should not be treated as normal scrap; it should still be considered a
potentially explosive device that can cause serious injury.
Special Procedure For Damaged Airbag
1. If installed in a vehicle, follow the removal procedure.
2. In all cases, make a short circuit by twisting together the two airbag inflator wires.
3. Package the airbag in exactly the same packaging that the new replacement part came in.
4. Mark the outside of the box "DAMAGED AIRBAG (or TENSIONER) NOT DEPLOYED" so it does not get confused with your parts stock.
5. Contact your Honda District Service Manager for how and where to return it for disposal.
Deploying Airbags/Tensioner (Inside Vehicle)
Before scrapping any airbags (and seat belt tensioners) (including those in a whole vehicle to be scrapped), the airbags (and seat belt tensioners) must be
deployed. If the vehicle is still within the warranty period the Honda District Service Manager must give approval and/or special instructions, before you
deploy the airbags (and seat belt tensioners). Only after the airbags (and seat belt tensioners) have been deployed (as the result of vehicle collision, for
example), can they be scrapped.
If the airbags (and seat belt tensioners) appear intact (not deployed), treat them with extreme caution. Follow this procedure:
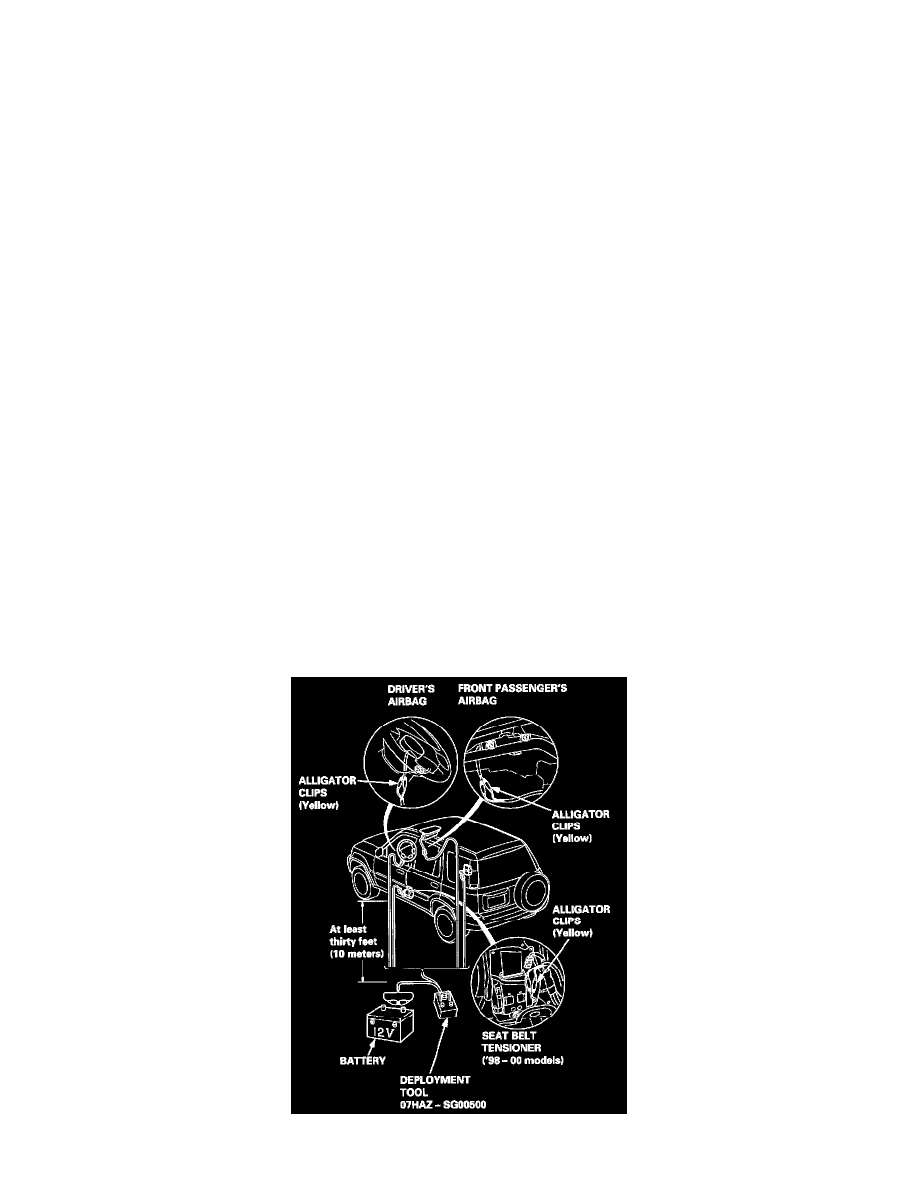
Deploying The Airbags (and Seat Belt Tensioners): In-Vehicle
If an SRS vehicle is to be entirely scrapped, its airbags
(and seat belt tensioners) should be deployed while still in the vehicle. The airbags (and seat belt tensioners) should not be considered as salvageable
parts and should never be installed in another vehicle.
WARNING: Confirm that each airbag (and seat belt tensioner) is securely mounted; otherwise, severe personal injury could result from
deployment.
1. Disconnect the battery negative cable, then disconnect the positive cable.
2. Confirm that the special tool is functioning properly by following the check procedure on the tool label.
3. Remove the access panel, then disconnect the 2P connector between the driver's airbag and the cable reel.
4. Remove the glove box, then disconnect the 2P connector between the front passenger's airbag and SRS main harness.
5. Remove the center pillar lower trim panel, then disconnect the 2P connector between the seat belt tensioner and side wire harness.
6. Cut off the airbag (and seat belt tensioner) connectors. Strip the ends of the airbag (and seat belt tensioner) wires, and connect the deployment tool