
Del Sol L4-1.5L SOHC (1993)
Steering Gear: Service and Repair
Manual Steering
Removal and Installation
1.
Remove bottom bolt from steering shaft coupler, then disconnect coupler from steering gear.
2.
Raise and support front of vehicle and remove wheels.
3.
Remove cotter pins and retaining nuts, then disconnect tie rods from steering knuckles using suitable puller.
4.
On models with manual transmission, disconnect shift lever torque rod from clutch housing, slide pin retainer aside and drive out spring pin,
then disconnect shift rod.
5.
On models with automatic transmission, remove shift cable guide and pull cable down by hand.
6.
On all models, remove nuts bolts and springs joining exhaust header pipe to intermediate pipe, then pull intermediate pipe down by hand.
7.
Push rack all the way to the right, then remove steering gear brackets.
8.
Lower steering gear until pinion shaft clears opening in frame and rotate steering gear forward until pinion shaft points toward the rear.
9.
Move steering gear to the right until the left tie rod clears the exhaust pipe, then lower steering gear and remove from left side of vehicle.
10.
Reverse procedure to install. Torque steering gear mounting bolts, tie rod nuts and coupler pinch bolt to specifications.
Overhaul
Before disassembling the steering gear, clean gear thoroughly to prevent dirt from entering the unit. During disassembly, carefully note and label
disassembled component (part) from the main gear unit for assembly reference.
DISASSEMBLY
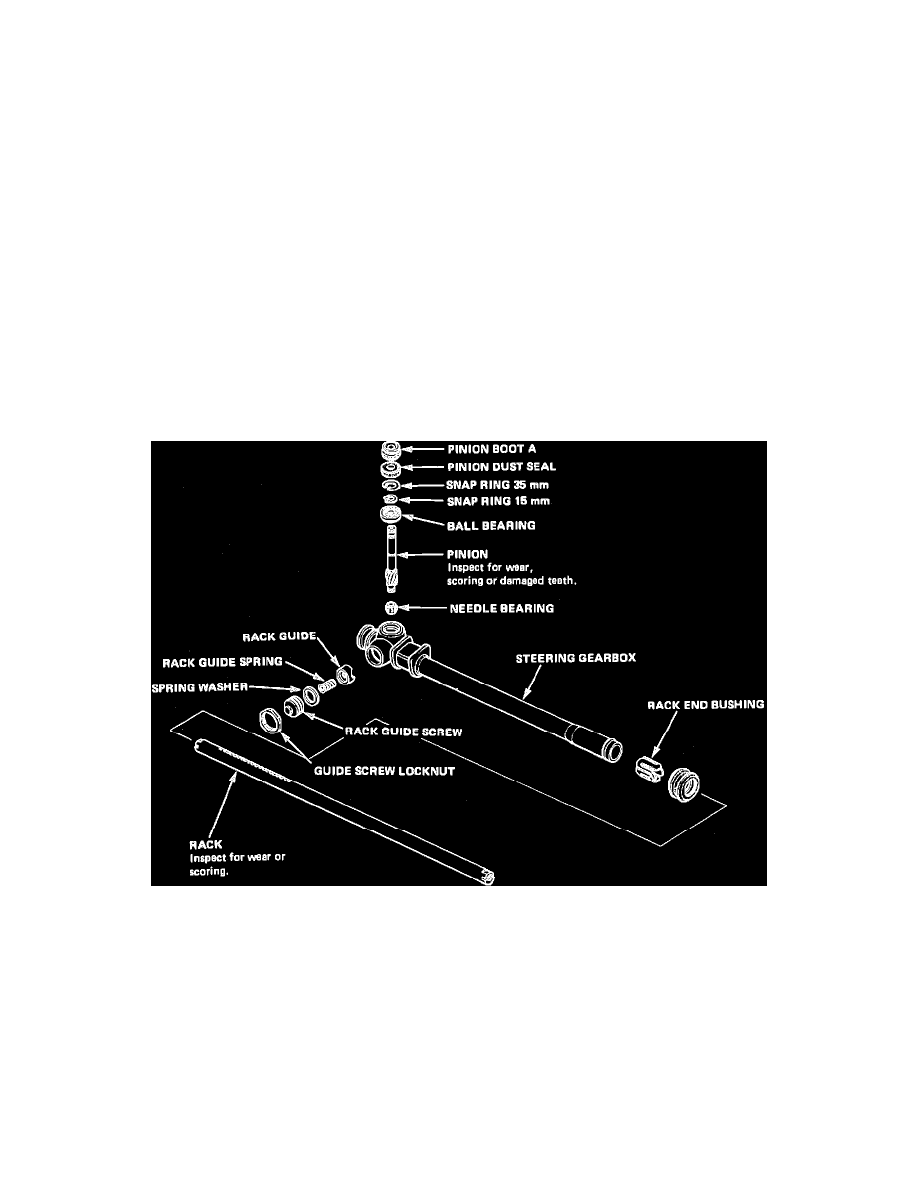
Fig. 2 Manual Steering Gear Exploded View
1.
Clamp steering gear in vise, then loosen bellows bands and slide away from gear.
2.
Straighten tie rod lock washers, then hold rack with suitable wrench and remove tie rod.
3.
Remove rack locknut and guide screw, then rack guide spring and guide from steering gear, Fig. 2.
4.
Remove pinion boot and dust seal.
5.
Remove 35mm snap ring securing pinion, then withdraw pinion and bearing assembly.
6.
Withdraw rack, then remove rack end bushings from housing.
ASSEMBLY
1.
Apply thin coat of grease to inside of rack end bushing. Do not fill bushing slots with grease as they must remain open to serve as air
passages.
2.
Install rack end bushings, aligning round projections on bushings with holes in housing.