
Vanden Plas L6-3.6L (1988)
appropriate repair code.
NOTE:
Labor allowances are inclusive of all related clerical operations.
NOTE:
Should a lower wishbone be replaced submit a separate warranty claim in the normal manner.
Parts & Inspection Information
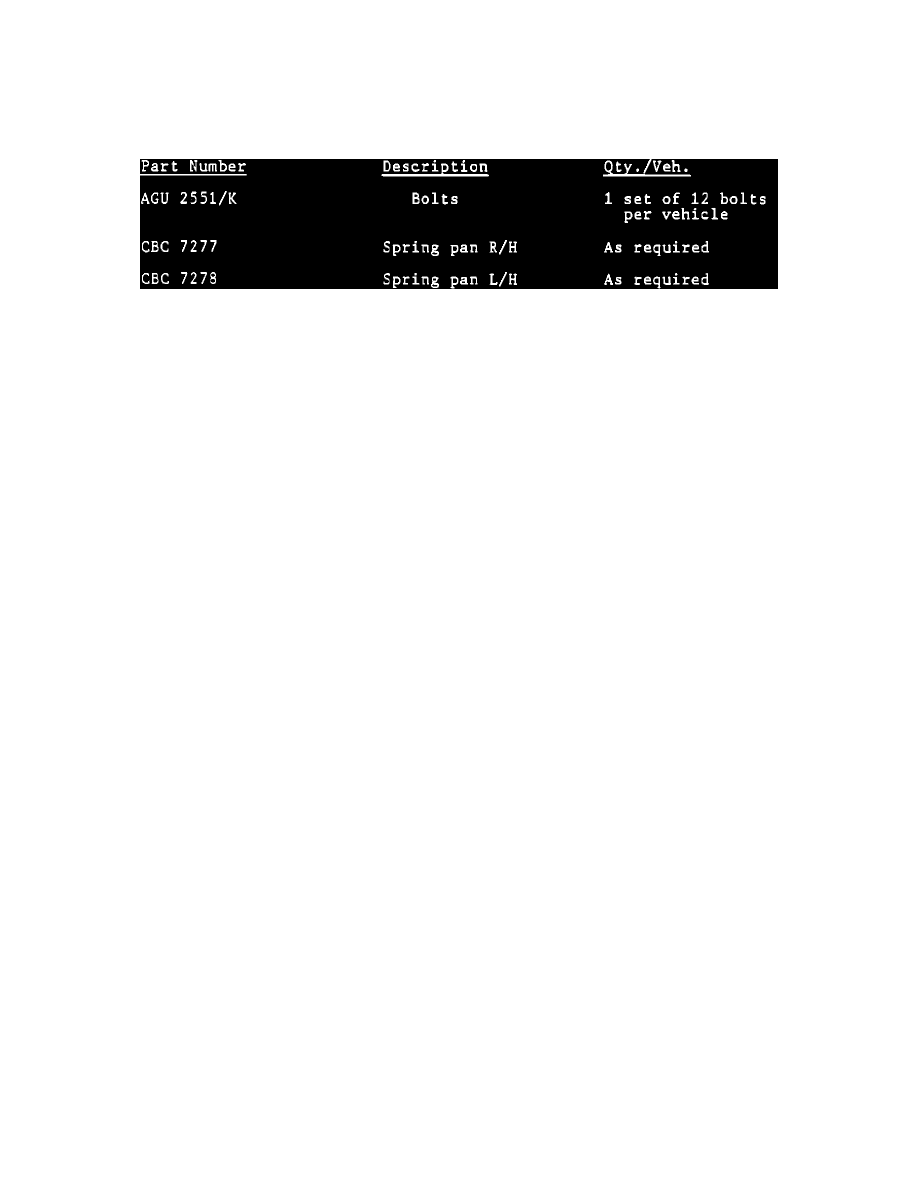
PARTS INFORMATION:
*
Ensure the Parts manager receives a copy of this bulletin.
Replacement parts will be shipped to you, chargeable, by your Zone Office. Initial parts supply to cover 20% of your vehicle park will arrive at your
dealership by the campaign launch date. A similar quantity will arrive approximately one week later. Reimbursement for labor and parts will be through
the normal campaign system. Adequate supplies of "D325" campaign completion labels are enclosed in this bulletin package.
NOTE:
Some spring pans supplied to you under this recall will have affixed Part Number CAC 5724 and CAC 5725 (the old part numbers). These
pans are suitable for use for recall D325 and will be identified with a yellow paint mark.
CAUTION: Part Numbers included in Service Bulletins are for reference only and should always be cross referenced with the latest parts information.
RECALL D325 XJ6 AND VDP 3.6
SPRING PAN BOLT INSPECTION/REPLACEMENT WORKSHOP INSTRUCTIONS
1988 XJ6 3.6 - Spring Pan Bolt Inspection/Replacement
Workshop Instructions
Inspection
1.
Raise vehicle on suitable hoist.
2.
Inspect bolts securing the spring pans to the lower wishbones on both right and left side front.
If all the bolts are in position and intact then proceed with procedure "A". If any bolts or bolt heads are missing proceed with procedure "B".
Procedure "A" - Bolts Intact And In Position
1.
Install Spring Compressor Tool JD 115 as detailed in Operation Number 60.20.03 of the XJ6 3.6 Service Manual.
2.
With special tool in place, replace the bolts securing the spring pans to the wishbones ONE AT A TIME.
Fit replacement bolts, Part Number AGU 2551/K, set of 12. (The new bolt type may be identified by the codes 10.9 on the top face of the bolt
head). Tighten to a torque of 55-60 N-m/ 40-45 ft.lbs. It is advisable when tightening the bolts to use a single hexagon (6 sided) socket.
3.
Loosen the anti-roll bar link arm lower securing nut one flat and retighten to a torque of 55-60 N-m/40-45 ft.lbs. Repeat for the other side.
4.
Remove spring compressor, special tool number JD 115.
Procedure "B" - Bolt(s) Missing/Head(s) Sheared
1.
Remove the spring pan using Service Tool JD 115 as detailed in Operation Number 60.20.03 of the XJ6 3.6 Service Manual.
2.
Remove any threaded portion(s) of sheared bolt(s) from the lower wishbones. Check the threads in the wishbones for signs of debris or damage.
IF THE THREADS ARE DAMAGED, THE WISHBONE MUST BE REPLACED.
3.
Inspect the spring pan(s) for damage or distortion, particularly in the vicinity of the mounting holes. If any damage or distortion is evident then the
spring pan must be renewed.