
Vanden Plas L6-4.0L (1990)
Steering Gear: Service and Repair
Assemble
End Housing
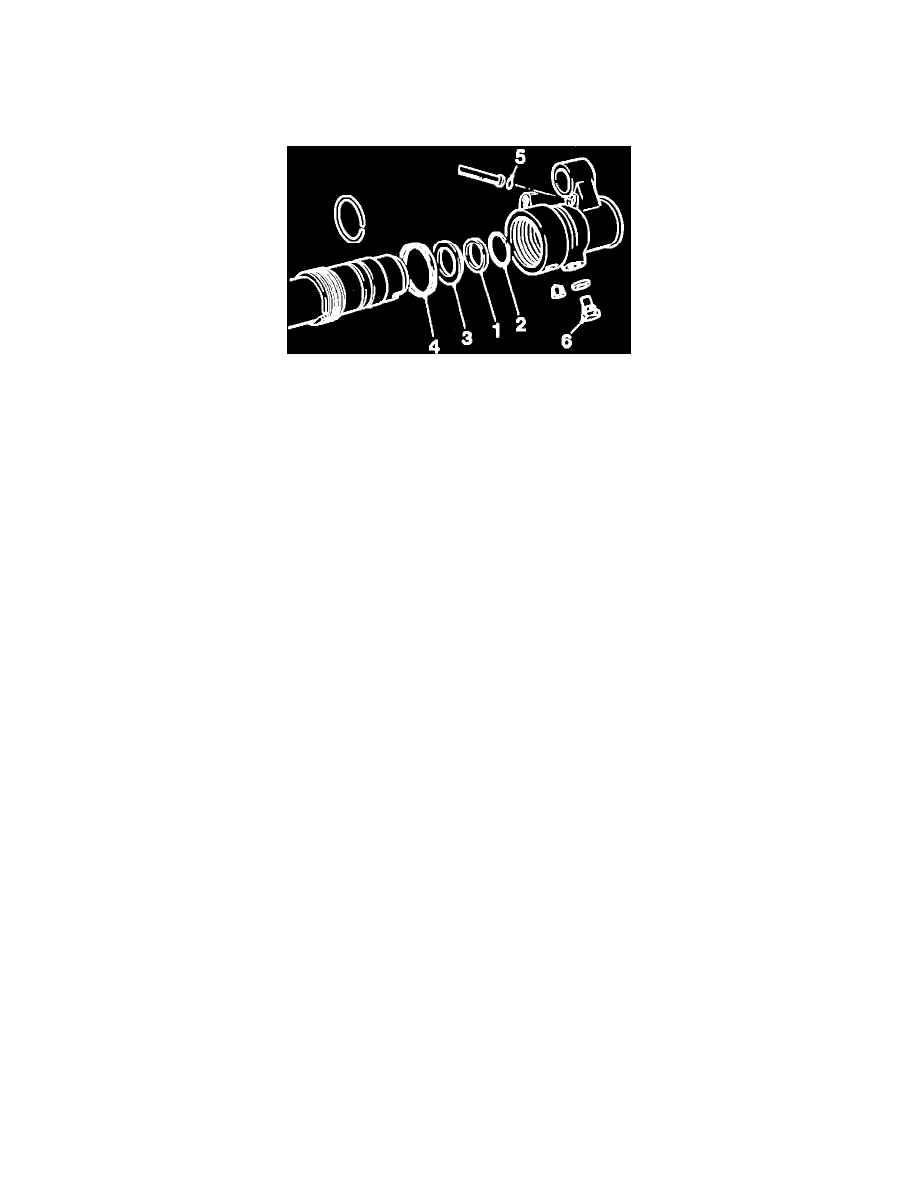
Fig. 17 End Housing Assembly
1.
Remove seal (1) and O-ring (2) using a sharp instrument. Fig. 17.
2.
Using a soft metal drift, carefully remove steel retaining washer (3).
3.
Install a new O-ring in recess, pushing a new seal with groove uppermost, on to top of O-ring.
4.
Replace steel retaining washer with spigot towards seal and press into position.
5.
Install a new square section sealing ring (4) into end housing Fig. 17. Smear sealing ring bore, with a silicone lubricant, to aid assembly.
6.
Install new air transfer line sealing rings (5) to pinion and end housings. Install air transfer line to pinion rack housing.
7.
Install and align end housing over rack bar. Avoid damaging end housing seal.
8.
Slide end housing onto rack tube with a slightly twisting action. Engage air transfer line into its port. Align end housing mounting lug (6) with
lower cut out of rack tube.
9.
Tighten ``C'' nut using spanner tool No. S355 or equivalent, to specifications.
10.
Install hexagon socket grub screw and stake into position.
Inner Sleeve & Rack Bar
1.
Install new backing ring and piston ring to piston. Ensure it moves freely in its groove.
2.
Place a new seal retaining cap over rack teeth , with three tabs facing away from piston.
3.
Install new split bearing in recess in inner sleeve, ensure it is seated properly.
4.
To protect new inner sleeve seal from being damaged by rack teeth, cover rack teeth with a piece of plastic adhesive tape.
5.
Carefully slide seal, with recessed face towards piston, over tape and onto rack bar. Remove tape.
6.
Install a new O-ring in its recess in inner sleeve. Ensure it seats correctly.
7.
Ensure ends of split baring are on opposite side of rack bar to teeth and push inner sleeve along rack bar. Carefully push seal up against retaining
cap and in turn, against piston.
8.
Ensure inner sleeve is square to piston, continue pushing until seal is fully in place.
9.
Maintain pressure against piston and neatly bend three tangs into groove on outside of inner sleeve, securing retaining cap.
10.
Apply a smear of silicone to bore of new square section sealing ring. Install nylon backing washer and sealing ring into bore of rack tube. Slide
down until they contact pinion end main housing.
11.
Assemble rack bar, with inner sleeve still against piston, into rack tube bore. Guide piston ring into rack tube bore. Continue sliding rack and inner
sleeve assembly into rack tube bore, until inner sleeve enters sealing ring and seats firmly against pinion end rack housing.
12.
Look into hexagon socket screw hole and ensure retaining shoulder has passed the hole. Install sealing washer and socket grub screw.
Pinion Valve & Housing
1.
Remove seals from pinion using a sharp knife. Cut diagonally, taking care to not damage groove ends.
2.
Using pinion ring expansion sleeve tool No. 606602 or equivalent, to expand seals, install one in groove nearest to ball bearing race. Repeat
procedure for other three seals.
3.
Rings can then be compressed to original size by installing pinion ring compression sleeve tool No. 606603 or equivalent. If this tool is not
available, rings will return to original size in one hour.
4.
Install washer and U section seal, into pinion main housing. Ensure grooves in seal face upwards and seal flange fits snugly in groove.
Tie Rods & Boots