
Vanden Plas L6-4.2L (1982)
Timing Chain: Service and Repair
Replace
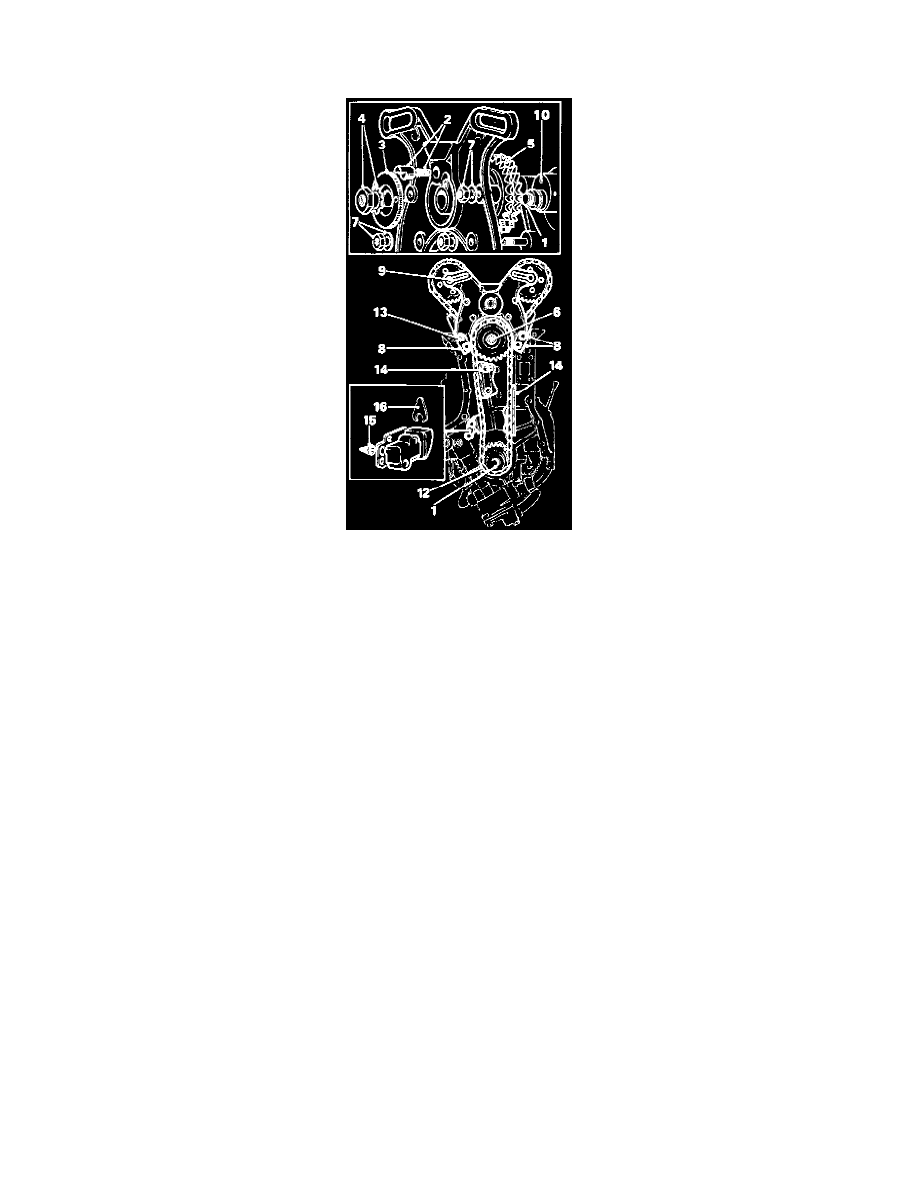
Timing Chain Components
REFIT
1. Fit the eccentric idler shaft (1) to the hole in the front mounting bracket.
2. Fit the spring and plunger (2) in the bracket and locate the serrated plate (3) on the shaft. Loosely secure using serrated washer and nut (4).
3. Fit the idler sprocket (5) (21 teeth) to the idler shaft.
4. Fit the intermediate sprocket (6), large gear forward, on the intermediate shaft.
5. Fit shim in rear mounting bracket, ensuring that the roll-pin engages in the slot and retain the shaft with the circlip.
6. Locate the top timing chain (longer) on the small intermediate sprocket, and lower timing chain on the large sprocket.
7. Loop the top chain beneath the idler sprocket and secure the top mounting bracket to the rear mounting bracket using four nuts and serrated
washers (7).
8. Fit four long setscrews (8) and spring washers to the front mounting bracket and fit the dampers, chain support plate, and distance pieces to the
setscrews.
9. Equalize the loops of the top timing chain, and locate the camshaft sprockets in the loops (9).
10. Rotate the eccentric idler shaft (10) to lift the idler sprocket to the highest po5ition between the camshaft sprockets.
11. Ensure that the Woodruff key is fitted to the crankshaft.
12
Locate the crankshaft sprocket (11) on the shaft, but do not slide it fully home at this stage.
13. Loop the bottom timing chain (12) beneath the crankshaft sprocket, tap the sprocket fully home and locate the assembly.
14. Tighten the four setscrews (13) to retain the assembly,
15. Fit the bottom timing chain guides (14) but do not tighten the setscrews at this stage. Fit the conical filter (15) in the hole in the cylinder block.
16. Screw the slipper into the tensioner until 3.2 mm (0.125 in) exists between slipper and body.
17. Locate the tensioner on shims as necessary to ensure that the slipper runs central on the chain and secure using two setscrews and lockplate.
18. Place slip gauge or distance card (16) supplied with new tensioner between slipper and body of tensioner to maintain distance of 3.2 mm (0.125
in) and adjust the intermediate damper to touch the chain.
19. Tighten the setscrews and turn up tabs of the lockplate.
20. Remove the slip gauge to release the ratchet.
21. Position the oil thrower on the crankshaft.
22. Refit the timing cover.